
Creating Custom Reports Using
the Data Processing Extension
Version 14.00.00
Reference Manual
Original Instructions
Contents
Introduction..............................................................................................................................................................................................................................................6
Document overview................................................................................................................................................................................................................................................................ 6
What is DPE?............................................................................................................................................................................................................................................................................6
How DPE works........................................................................................................................................................................................................................................................................7
Custom report options...........................................................................................................................................................................................................................................................9
Benefits of creating custom reports...................................................................................................................................................................................................................................9
Set up your system environment...........................................................................................................................................................................................................10
Installation prerequisites..................................................................................................................................................................................................................................................... 10
Information for SQL Server users....................................................................................................................................................................................................................................... 11
Configure SQL Server Data Tools.........................................................................................................................................................................................................................................11
Choose an RSBizWare database......................................................................................................................................................................................................................................... 14
Getting started........................................................................................................................................................................................................................................16
Load the SSDT project..........................................................................................................................................................................................................................................................16
DPE data sources................................................................................................................................................................................................................................... 18
Standard report templates...................................................................................................................................................................................................................................................18
DPE standard queries........................................................................................................................................................................................................................................................... 19
Query fields...................................................................................................................................................................................................................................................................19
Time settings...............................................................................................................................................................................................................................................................23
Grouping settings........................................................................................................................................................................................................................................................23
Sorting settings...........................................................................................................................................................................................................................................................24
Plant model filtering settings...................................................................................................................................................................................................................................28
Filtering settings.........................................................................................................................................................................................................................................................29
Structure and functionality....................................................................................................................................................................................................................31
Structure of standard report templates............................................................................................................................................................................................................................31
Report naming conventions......................................................................................................................................................................................................................................32
Structure of subreports.......................................................................................................................................................................................................................................................33
Report configuration............................................................................................................................................................................................................................................................ 34
Shared data source....................................................................................................................................................................................................................................................34
Dataset..........................................................................................................................................................................................................................................................................35
Dataset fields.............................................................................................................................................................................................................................................................. 36
Report parameters......................................................................................................................................................................................................................................................37
Dataset parameters................................................................................................................................................................................................................................................... 38
Report properties..................................................................................................................................................................................................................................................................39
2 RPTDPE-RM002D-EN-E - October 2023 Rockwell Automation, Inc.
Report references.......................................................................................................................................................................................................................................................39
ParameterSet class instance..........................................................................................................................................................................................................................41
Customize report styles............................................................................................................................................................................................................................................ 42
Terminology methods and properties...............................................................................................................................................................................................................................44
Requirements of subreports...............................................................................................................................................................................................................................................44
Number of subreports and groupings....................................................................................................................................................................................................................46
Aggregate function................................................................................................................................................................................................................................................................47
Aggregate with page grouping.................................................................................................................................................................................................................................47
Aggregate without page grouping...........................................................................................................................................................................................................................47
Drillthrough capability.......................................................................................................................................................................................................................................................... 47
Creating a report template....................................................................................................................................................................................................................52
Create NewPerformanceR2C0 subreport..........................................................................................................................................................................................................................52
Delete redundant datasets....................................................................................................................................................................................................................................... 53
Remove references to datasets...............................................................................................................................................................................................................................53
Configure datasets.....................................................................................................................................................................................................................................................54
Add a list: List1............................................................................................................................................................................................................................................................55
Add a text box: txtPageGroup1.................................................................................................................................................................................................................................56
Add a list: List2...........................................................................................................................................................................................................................................................56
Add a matrix: tablixKPIs............................................................................................................................................................................................................................................57
Create the matrix.............................................................................................................................................................................................................................................57
Configure general properties.........................................................................................................................................................................................................................58
Configure column headers.............................................................................................................................................................................................................................58
Configure row headers................................................................................................................................................................................................................................... 60
Configure the Drillthrough property..............................................................................................................................................................................................................61
Add a chart: chartKPIs.............................................................................................................................................................................................................................................. 62
Create the chart...............................................................................................................................................................................................................................................62
Configure TEEP data........................................................................................................................................................................................................................................63
Configure MME data.........................................................................................................................................................................................................................................65
Add a category group......................................................................................................................................................................................................................................66
Add a series group...........................................................................................................................................................................................................................................67
Configure the vertical axis.............................................................................................................................................................................................................................68
Configure the legend.......................................................................................................................................................................................................................................69
Configure 3D options.......................................................................................................................................................................................................................................70
Hide axis titles..................................................................................................................................................................................................................................................70
Add groupings............................................................................................................................................................................................................................................................. 70
Rockwell Automation, Inc. RPTDPE-RM002D-EN-E - October 2023 3
Link List2 and txtPageGroup1........................................................................................................................................................................................................................70
Add row groupings to the matrix...................................................................................................................................................................................................................71
Configure the RowGroup1 text box......................................................................................................................................................................................................71
Configure the first row grouping........................................................................................................................................................................................................72
Configure the RowGroup2 text box.................................................................................................................................................................................................... 73
Configure the second row grouping.................................................................................................................................................................................................. 73
Add headings to the row groupings............................................................................................................................................................................................................. 75
Preview the subreport..........................................................................................................................................................................................................................................................76
Check the parameter set ID value...........................................................................................................................................................................................................................77
Create a report template.....................................................................................................................................................................................................................................................78
Delete datasets........................................................................................................................................................................................................................................................... 79
Remove dataset references......................................................................................................................................................................................................................................79
Configure the report title..........................................................................................................................................................................................................................................80
Add the ParameterSet subreport............................................................................................................................................................................................................................. 81
Add a NewPerformanceR2C0 subreport.................................................................................................................................................................................................................82
Preview the report template...............................................................................................................................................................................................................................................84
Integrate templates with FactoryTalk Report Expert.....................................................................................................................................................................................................84
Deploy the report template to SSRS.......................................................................................................................................................................................................................85
Add a template to the inventory............................................................................................................................................................................................................................. 86
Add a template to the tree.......................................................................................................................................................................................................................................88
Advanced features.................................................................................................................................................................................................................................90
Methods and properties of RDLUtil................................................................................................................................................................................................................................... 90
Methods and properties of styles......................................................................................................................................................................................................................................93
Datasets, queries, and fields..............................................................................................................................................................................................................................................95
Legal Notices......................................................................................................................................................................................................................................... 97
4 RPTDPE-RM002D-EN-E - October 2023 Rockwell Automation, Inc.
Important User Information
Read this document and the documents listed in the additional resources section about installation, configuration, and operation of this equipment before you install,
configure, operate, or maintain this product. Users are required to familiarize themselves with installation and wiring instructions in addition to requirements of all
applicable codes, laws, and standards.
Activities including installation, adjustments, putting into service, use, assembly, disassembly, and maintenance are required to be carried out by suitably trained
personnel in accordance with applicable code of practice.
If this equipment is used in a manner not specified by the manufacturer, the protection provided by the equipment may be impaired.
In no event will Rockwell Automation, Inc. be responsible or liable for indirect or consequential damages resulting from the use or application of this equipment.
The examples and diagrams in this manual are included solely for illustrative purposes. Because of the many variables and requirements associated with any particular
installation, Rockwell Automation, Inc. cannot assume responsibility or liability for actual use based on the examples and diagrams.
No patent liability is assumed by Rockwell Automation, Inc. with respect to use of information, circuits, equipment, or software described in this manual.
Reproduction of the contents of this manual, in whole or in part, without written permission of Rockwell Automation, Inc., is prohibited.
Throughout this manual, when necessary, we use notes to make you aware of safety considerations.
WARNING:
Identifies information about practices or circumstances that can cause an explosion in a hazardous environment, which may lead to personal
injury or death, property damage, or economic loss.
ATTENTION:
Identifies information about practices or circumstances that can lead to personal injury or death, property damage, or economic loss.
Attentions help you identify a hazard, avoid a hazard, and recognize the consequence.
IMPORTANT:
Identifies information that is critical for successful application and understanding of the product.
These labels may also be on or inside the equipment to provide specific precautions.
SHOCK HAZARD:
Labels may be on or inside the equipment, for example, a drive or motor, to alert people that dangerous voltage may be present.
BURN HAZARD:
Labels may be on or inside the equipment, for example, a drive or motor, to alert people that surfaces may reach dangerous
temperatures.
ARC FLASH HAZARD:
Labels may be on or inside the equipment, for example, a motor control center, to alert people to potential Arc Flash. Arc Flash
will cause severe injury or death. Wear proper Personal Protective Equipment (PPE). Follow ALL Regulatory requirements for safe work practices and for
Personal Protective Equipment (PPE).
The following icon may appear in the text of this document.
Tip:
Identifies information that is useful and can help to make a process easier to do or easier to understand.
Rockwell Automation recognizes that some of the terms that are currently used in our industry and in this publication are not in alignment with the movement toward
inclusive language in technology. We are proactively collaborating with industry peers to find alternatives to such terms and making changes to our products and content.
Please excuse the use of such terms in our content while we implement these changes.
Rockwell Automation, Inc. RPTDPE-RM002D-EN-E - October 2023 5

Chapter 1
Introduction
The manual is intended to help users responsible for creating custom Report Expert report templates as a part of a
FactoryTalk® Metrics implementation. The users may be Rockwell Automation® consultants, authorized integrators,
or members of the customer implementation team. They should be using and must be familiar with:
• FactoryTalk® Report Expert version14.00.00.
•
FactoryTalk Metrics 14.00.00.
•
SQL ServerManagement Studio 2012, 2016, 2017, 2019 or 2022.
•
SQL ServerData Tools (SSDT)2012, 2016, 2017, 2019, or 2022 or Visual Studio® .
• SQL Server Reporting Services (SSRS).
NOTE:
For more information on specific software requirements, refer to Installation
prerequisites on page 10.
Document overview
In this document you will find information on the following topics:
•
Data Processing Extension (DPE) on page 6
• DPE data sources on page 18
Standard report templates, settings related to time, grouping, sorting, filtering, and so on.
•
Structure and functionality of standard report templates on page 31
Report properties, parameters, functionalities used for configuring the report content, and so on.
•
Tutorial: How to create a customized report template on page 52
A step-by-step guide on how to create a custom report template in SQL Server Data Tools (SSDT), and deploy
it to SQL Server Reporting Services (SSRS) and Report Expert.
•
Advanced methods and properties of the RDLUtil library on page 90
•
Advanced methods and properties of styles on page 93
•
Datasets, queries, and dataset fields that are defined in the SSDT project on page 95
What is DPE?
DPE stands for Data Processing Extension, which is a part of the architecture of SQL Server Reporting Services
(SSRS). Specifically, DPE that is referred to in this manual is a specialized Data Processing Extension that is a
component of Report Expert and is designed to feed FactoryTalk Metrics data to SSRS.
DPE takes as an input a set of parameters defined in Report Expert, and returns a data set consistent with those
parameters. The Report Expert report templates are used by SSRS to present the data to the user in a report. This
document presents how to build report templates in SSRS that can use DPE as a data source, and therefore can be
integrated into Report Expert.
Here is a simple example of one of the many ways that a DPE query differs from a standard SQL query or stored
procedure used with SSRS:
One of the time filtering parameters in Report Expert is “Current Shift”, which is used to request data from the
beginning of the current shift to the present time. “Current Shift” is passed to DPE along with all the other parameters
necessary to return the requested data set. The term “Current Shift” means nothing to Microsoft® SQL Server® , but
6 RPTDPE-RM002D-EN-E - October 2023 Rockwell Automation, Inc.

Chapter 1Introduction
DPE has a code that interprets this term, queries the database to figure out what the current shift period is for every
FactoryTalk Metrics work cell, constructs an SQL query to return only this data, and returns the correct data set to the
report.
Custom report templates are created for Report Expert using DPE along with SQL Server Data Tools (SSDT). Once the
Report Expert DPE is specified as a data source for the reports, and various queries used by DPE are defined, you can
write reports that use the fields returned by these queries.
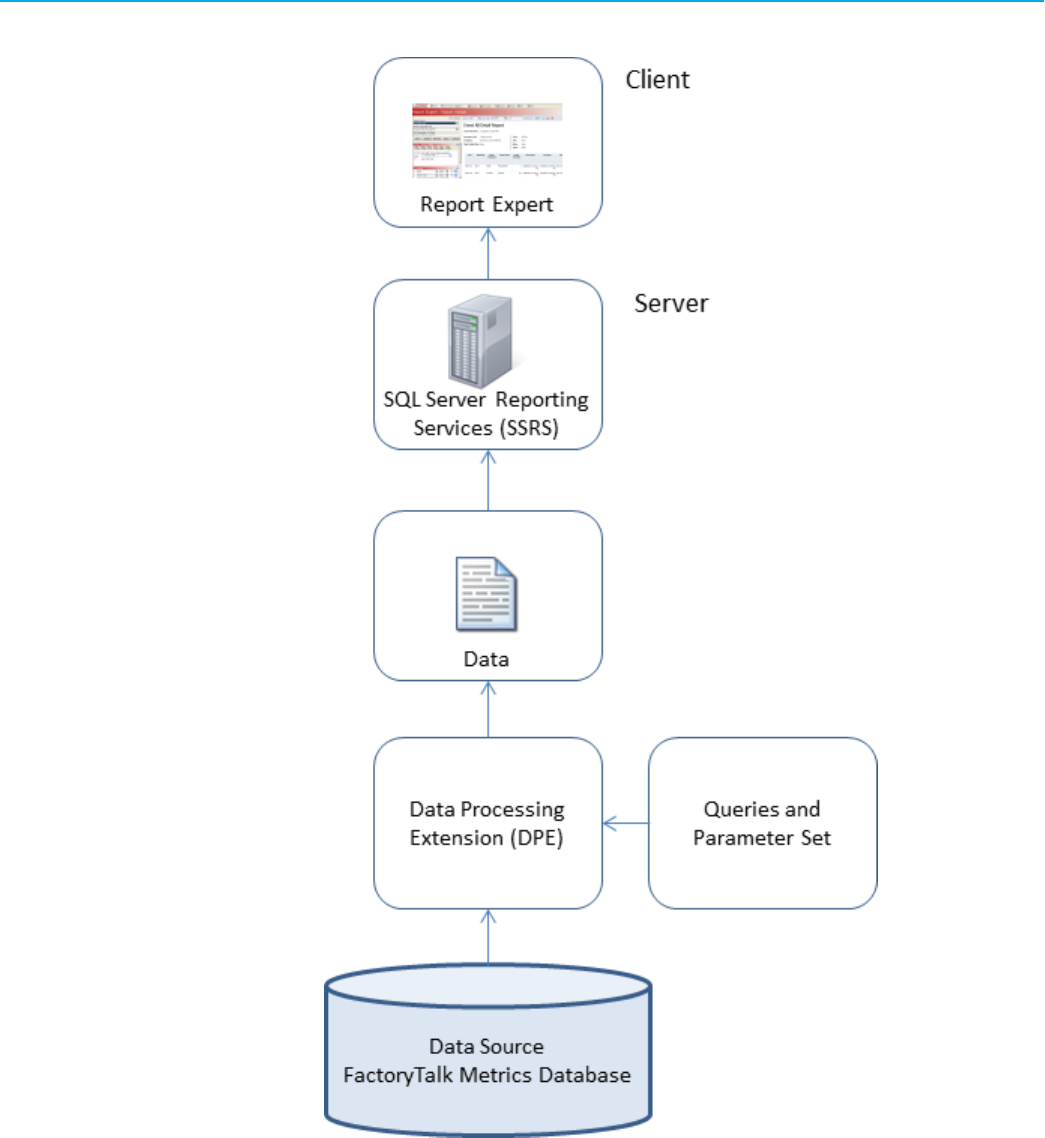
How DPE works
When you use DPE, SSRS treats DPE as one of its own data providers. In order to provide data to SSRS, the DPE data
provider evaluates the parameter set and its query string and then returns the data in a format SSRS can use. DPE
does not have a user interface but uses SQL Server Data Tools (SSDT), the standard development environment for
SSRS reports.
When DPE creates the final database query, the resulting data columns are based on the information from the
standard query and the settings (for example, grouping settings) contained in a parameter set. Refer to Grouping
settings on page 23 for more information about groupings.
Custom report templates that use DPE must be deployed to SSRS and added to the inventory of Report Expert report
templates in the FactoryTalk Metrics database. Then you can use the custom report templates like any other report
template in the Report Expert user interface.
Rockwell Automation, Inc. RPTDPE-RM002D-EN-E - October 2023 7
Chapter 1Introduction
The following flowchart depicts a high-level workflow of how DPE is used to render custom report templates:
8 RPTDPE-RM002D-EN-E - October 2023 Rockwell Automation, Inc.

Chapter 1Introduction
Custom report options
A range of default report templates are provided with Report Expert for reporting on FactoryTalk Metrics data.
Customers almost always have additional reporting requirements that cannot be satisfied with the default report
templates. The options for providing additional reporting functionality are:
• Use the capabilities provided in Report Expert to create reports by creating parameter sets and using the
standard report templates. This is the easiest approach and can be done by end users with no special
knowledge.
•
Use Quick Web reporting. Quick Web reports have some capabilities that are not supported in Report Expert.
In turn, certain Report Expert capabilities, such as to create parameter sets, dynamically group, drill-down,
and drillthrough, are not supported in Quick Web. Custom report templates can be created using wizards.
•
Use SQL Server Reporting Services (SSRS) or some other third-party reporting package. By this option we
mean using a commercial reporting package and accessing the FactoryTalk Metrics database as an ODBC
or OLE DB data source, without using DPE. With this approach, none of the parameter capabilities of Report
Expert is available. Also, none of the specialized code in DPE that ensures an accurate calculation of OEE
and other Key Performance Indicators is available, so these numbers may not be accurate unless custom
database queries are used.
•
Copy and modify existing Report Expert report templates. This approach can be used if an existing report
template is close to what is required, but not exactly. All the report templates use DPE as a data source,
so this document can be used as a guide for how to accomplish this task. We recommend that you DO NOT
change the standard report templates in any way, because any changes made to standard report templates
may be lost when a new version of Report Expert is installed.
•
Create Report Expert report templates using DPE. This document includes the information necessary to
accomplish this task.
Benefits of creating custom reports
If you use DPE and follow the instructions in this document on creating report templates and modifying existing
templates, you will experience the following benefits:
• Your custom reports can inherit all the Report Expert parameter set functionality, including settings for
filtering, grouping, sorting, Top N, and so on.
•
Your custom reports can use the terminology functionality of Report Expert.
•
You can implement drill-down and drillthrough in your custom reports.
•
Your custom reports will be presented to the user in the standard Report Expert interface.
• You will be assured of accurate data, calculations, and roll-ups in your custom reports.
•
Your custom reports will be compatible with future versions of FactoryTalk Metrics and Report Expert.
Rockwell Automation, Inc. RPTDPE-RM002D-EN-E - October 2023 9
Chapter 2
Set up your system environment
In this chapter, you will learn about the following:
•
Installation prerequisites on page 10
• Information for users of Microsoft SQL Server 2016, 2017, 2019, or 2022 on page 11
• Configure your SQL Server Data Tools (SSDT) to work with Report Expert custom reports on page 11
•
Choose the RSBizWare database for DPE purposes on page 14
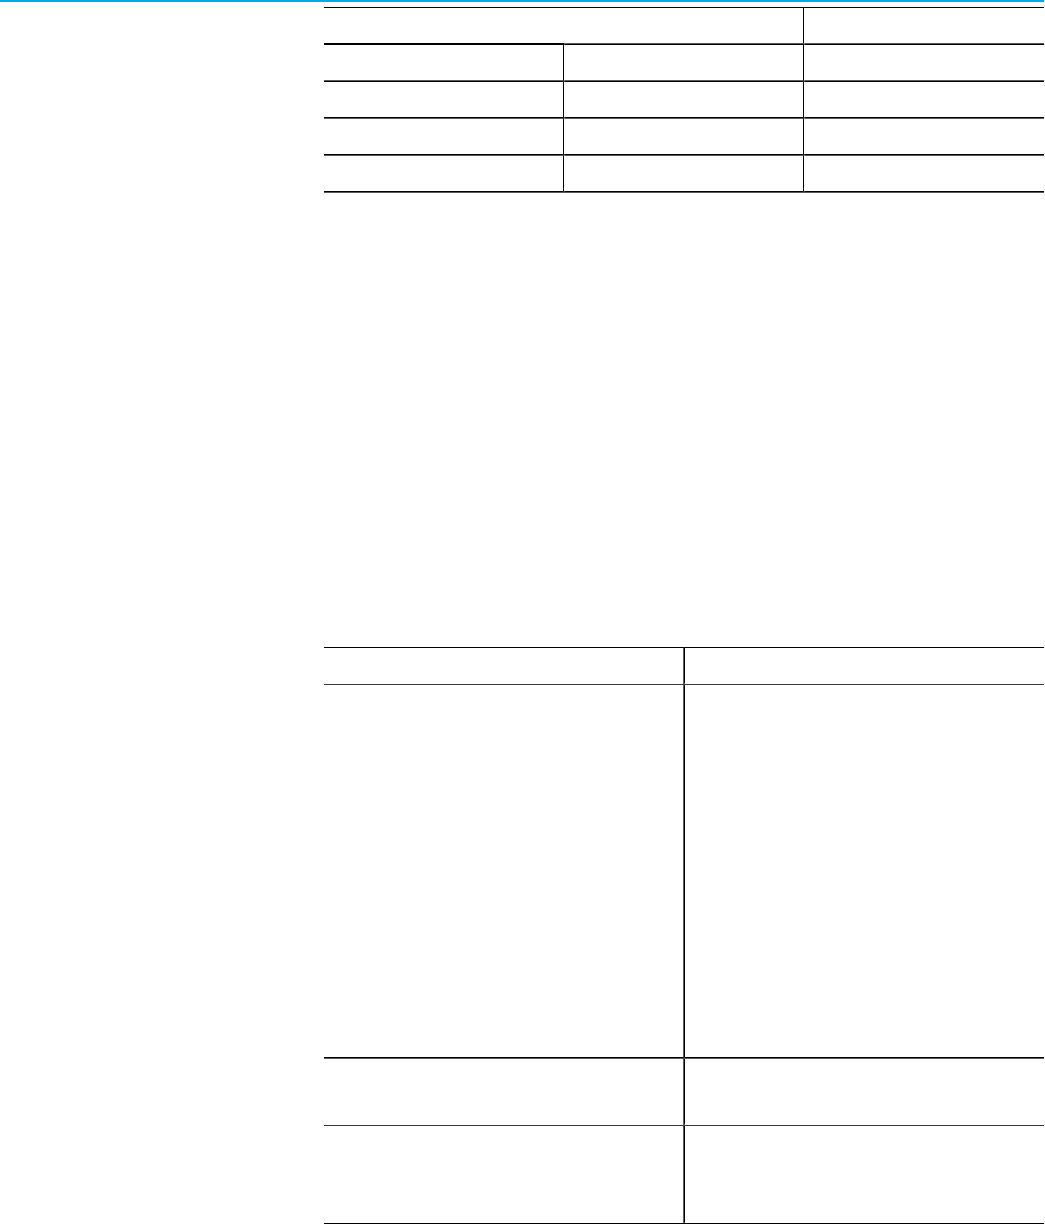
Installation prerequisites
Make sure that you have the following software installed on the computers on which you are going to create and
deploy your custom reports:
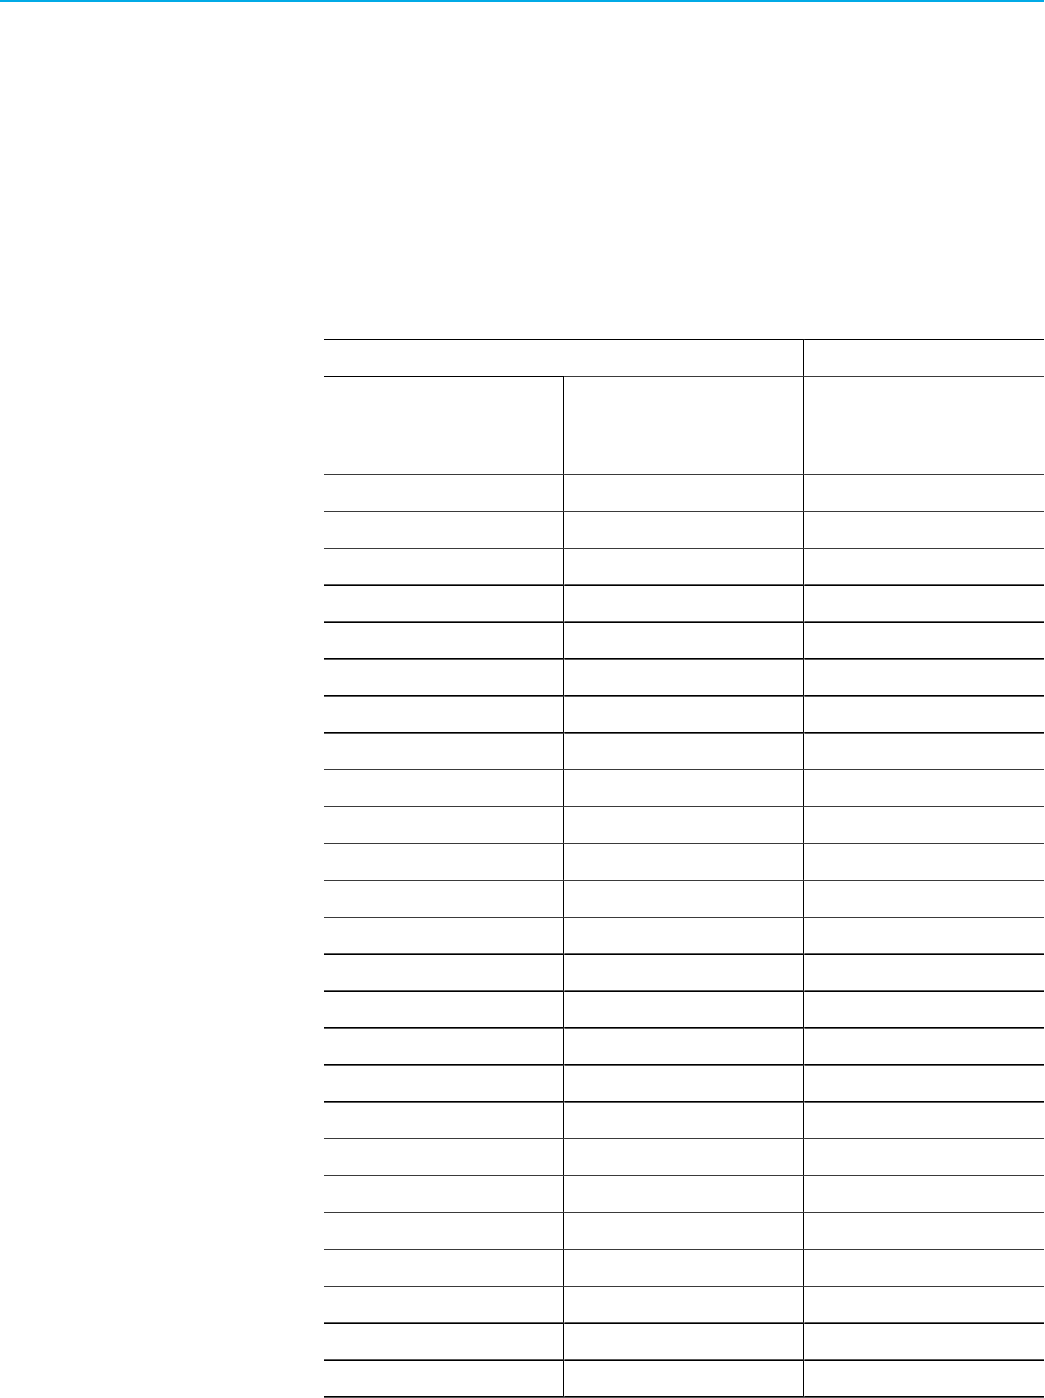
Computer for creating custom reports Computer for deploying custom reports
Windows Server® 2016 Standard
Windows Server 2016 Datacenter
Windows Server 2019 Standard
Windows Server 2019 Datacenter
Windows Server 2022 Standard
Windows Server 2022 Datacenter
Windows Server 2016 Standard
Windows Server 2016 Datacenter
Windows Server 2019 Standard
Windows Server 2019 Datacenter
Windows Server 2022 Standard
Windows Server 2022 Datacenter
MicrosoftSQLServer2016 Standard 64-bit
MicrosoftSQL Server 2016 Enterprise 64-bit
MicrosoftSQL Server 2017 Standard 64-bit
MicrosoftSQL Server 2019 Standard 64-bit
MicrosoftSQL Server 2019 Enterprise 64-bit
MicrosoftSQL Server 2022 Standard 64-bit
MicrosoftSQL Server 2016 Standard 64-bit
MicrosoftSQL Server 2016 Enterprise 64-bit
MicrosoftSQL Server 2017 Standard 64-bit
MicrosoftSQL Server 2019 Standard 64-bit
MicrosoftSQL Server 2019 Enterprise 64-bit
MicrosoftSQL Server 2022 Standard 64-bit
Visual Studio 2015, 2017, 2019, or 2022 with SQL Server Data
Tools
Note:To ensure that the DPE works correctly,
apply the fix described by Microsoft
(http://support.microsoft.com/kb/2750044), "The selected data
extension is not installed or cannot be loaded" error when you
load custom extensions in SQL Server 2012 Data Tools.
SQL Server Reporting Services (SSRS)
Internet Explorer® 11, Microsoft® Edge™ (Chromium core), or
Google® Chrome™ browser
Internet Explorer 11, Microsoft Edge (Chromium core), or Google
Chrome browser
FactoryTalkReport Expert 14.00.00 FactoryTalk Report Expert 14.00.00
Tip:
•
For information on installing Microsoft products, refer to the product documentation.
• For more information on software requirements for installing Report Expert, refer to
theFactoryTalkReport Expert Release Notes.
•
For information on installing Report Expert, refer to the FactoryTalkReport Expert User Guide and
Conguration Assistant (RSBizWareConfiguration.chm).
10 RPTDPE-RM002D-EN-E - October 2023 Rockwell Automation, Inc.

Chapter 2Set up your system environment
Information for SQL Server users
If you intend to create custom reports for Report Expert, a part of the RSBizWare™ suite, these versions
ofMicrosoftSQL Server do not include SQL Server Data Tools (SSDT) that are required to create the custom reports.
This document describes installation steps for Microsoft SQL Server 2012 SP4. You may follow the steps for
installingMicrosoftSQL Server 2016, 2017, 2019, or 2022 with the exceptions and configure them to work with Report
Expert.
•
SQL Server 2016 SP2: Install SQL Server Data Tools and SQL Server Management Studio separately.
•
SQL Server 2017: Install SQL Server Data Tools, SQL Server Management Studio, and SQL Server Reporting
Services separately.
•
SQL Server 2019: Install SQL Server Data Tools, SQL Server Management Studio, and SQL Server Reporting
Services separately.
•
SQL Server 2022: Install SQL Server Data Tools, SQL Server Management Studio, and SQL Server Reporting
Services separately.
To use the custom reports functionality of Report Expert withMicrosoftSQL Server
2016, 2017, 2019, or 2022
1.
Install a version of SSDT of your choice.
The installation steps are not covered in this document.
For details, see the SSDT documentation.
2.
Configure your version of SSDT to work with Report Expert.
For more information, refer to Configure your SQL Server Data Tools (SSDT) to work with Report Expert
custom reports on page 11.
Configure SQL Server Data Tools
Perform the following steps to configure your SQL Server Data Tools to work with your Report Expert custom reports.
To configure your SQL Server Data Tools (SSDT) to work with Report Expert custom
reports
1.
Install SQL Server Data Tools (SSDT).
See the SSDT documentation for details.
When installing SSDT, make sure that all the following options are selected:
◦ SQL Server Database
◦
SQL Server Analysis Services
◦
SQL Server Reporting Services
◦
SQL Server Integration Services
2.
Run the ReportExpertDeployment.exe file, in the Deployment folder of your Report Expert installation
directory, for example:
C:\Program Files (x86)\Rockwell Software\Report Expert\Deployment
The Report Expert Deployment Tool window appears.
3.
In the window, click the Reports design tool configuration tab.
4.
Next to the Path to report templates design tool binaries folder box, click .
Rockwell Automation, Inc. RPTDPE-RM002D-EN-E - October 2023 11

Chapter 2Set up your system environment
5. In the window that appears, navigate to the location in which your SSDT is installed, for example:
◦
If using SSDT for Visual Studio 2015:
C:\Program Files (x86)\Microsoft Visual Studio 14.0\Common7\IDE\PrivateAssemblies
◦ If using SSDT for Visual Studio 2017:
C:\Program Files (x86)\Microsoft Visual Studio\2017\SQL\Common7\IDE\CommonExtensions
\Microsoft\SSRS
◦
If using SSDT for Visual Studio 2019:
C:\Program Files (x86)\Microsoft Visual Studio\2019\Community\Common7\IDE
\CommonExtensions\Microsoft\SSRS
◦
If using SSDT for Visual Studio 2022:
C:\Program Files\Microsoft Visual Studio\2022\Community\Common7\IDE\CommonExtensions
\Microsoft\SSRS
6.
Click OK.
7.
In the Report Expert Deployment Tool window, click Deploy.
Your SSDT is configured to work with Report Expert custom reports.
12 RPTDPE-RM002D-EN-E - October 2023 Rockwell Automation, Inc.
Chapter 2Set up your system environment
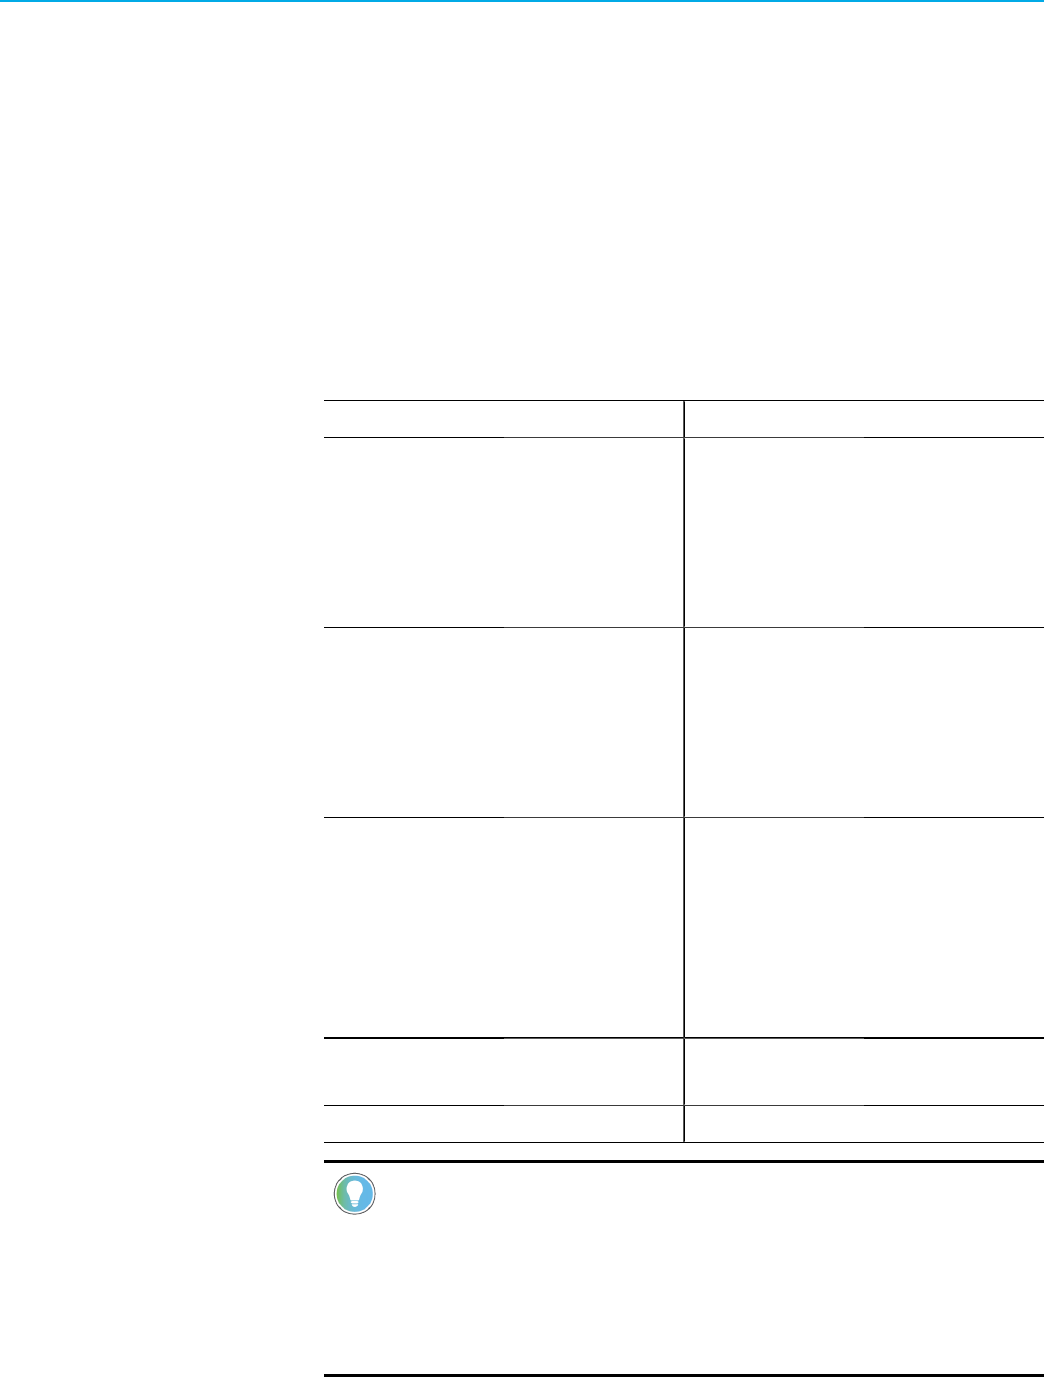
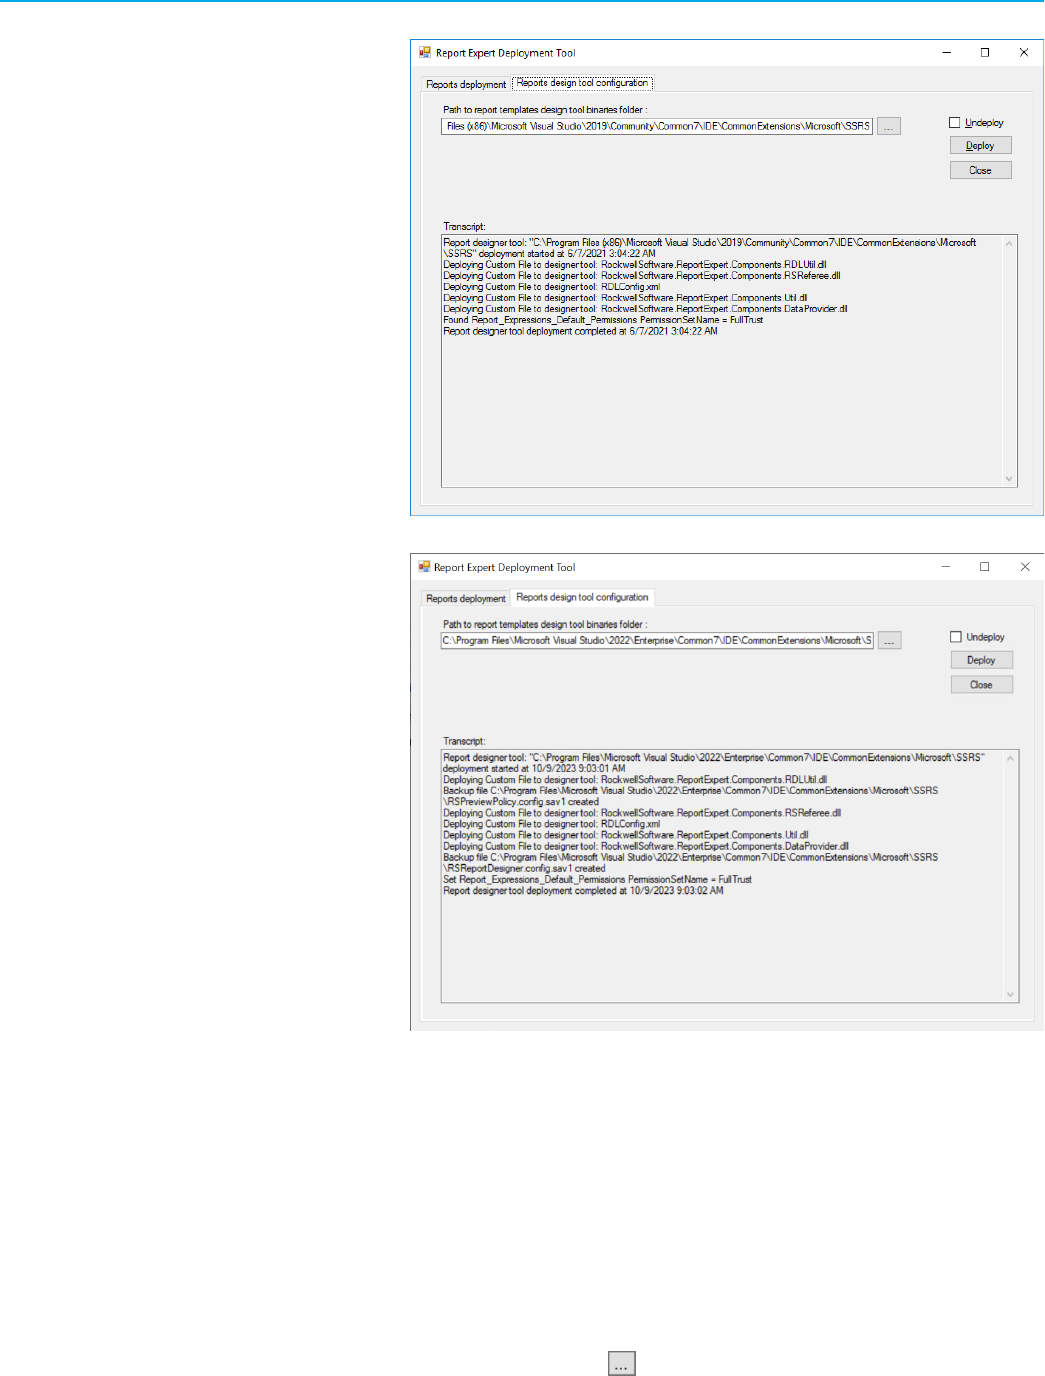
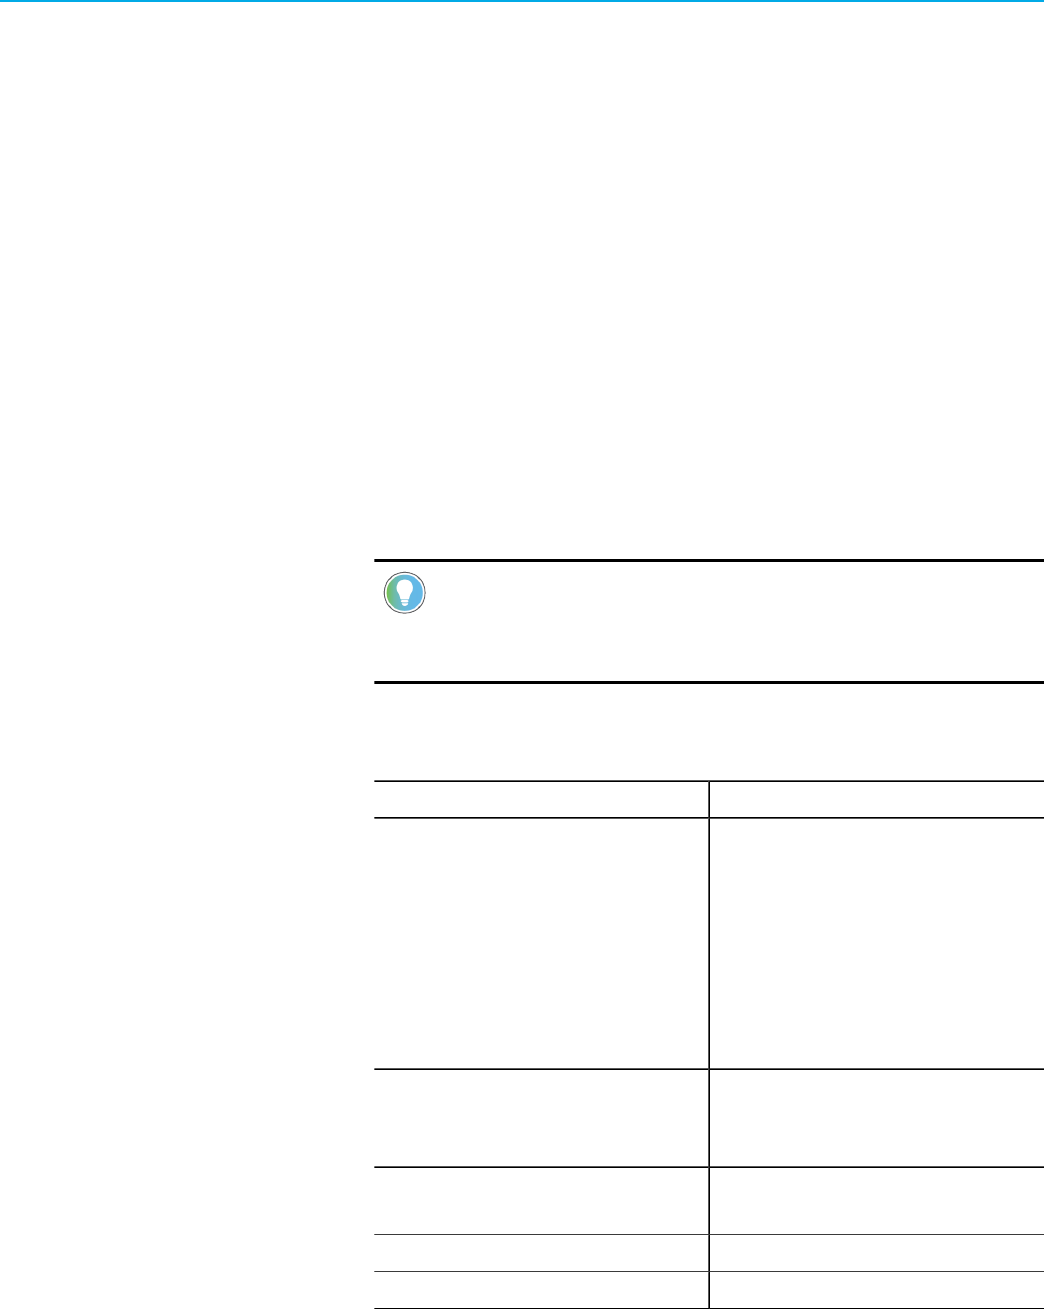
The following image presents the Report Expert Deployment Tool window after the SSDT configuration has
been successfully performed.
◦ If using SSDT for Visual Studio 2015:
◦
If using SSDT for Visual Studio 2017:
Rockwell Automation, Inc. RPTDPE-RM002D-EN-E - October 2023 13
Chapter 2Set up your system environment
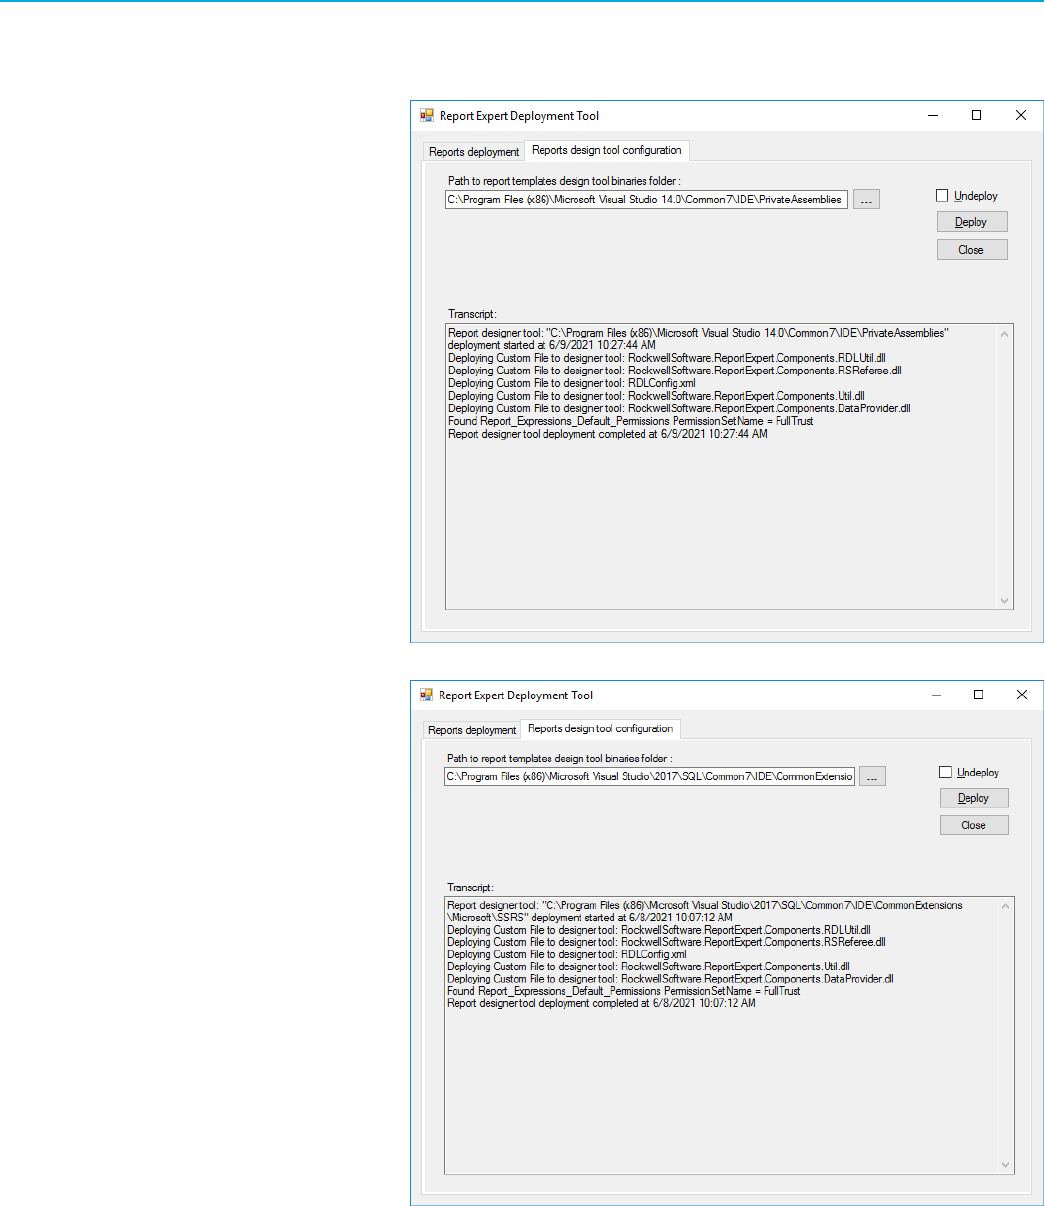
◦ If using SSDT for Visual Studio 2019:
◦
If using SSDT for Visual Studio 2022:
Choose an RSBizWare database
Choose an RSBizWare database with parameter sets and data that you will use in your reports.
The database will be used by the DPE shared data source on page 34.
To choose an RSBizWare database
1.
In the File Explorer, go to <Program Files>\Rockwell Software\Report Expert\Deployment\.
2.
Double-click ReportExpertDeployment.exe.
The Report Expert Deployment Tool dialog box appears.
3.
Under Connection String Value, click .
The Data Link Properties dialog box appears.
14 RPTDPE-RM002D-EN-E - October 2023 Rockwell Automation, Inc.

Chapter 2Set up your system environment
4. Under Select or enter a server name, select the server computer with the RSBizWare database that you
want to use.
If necessary, click Refresh to reload the list of the computers.
5. Under Enter information to log on to the server, select either of the logging options that is suitable for the
server computer that you have selected.
If necessary, type the username and password to the server computer.
6.
Select the Allow saving password option.
7. Under Select the database on the server, select the RSBizWare database that you want to use with the DPE.
8.
Click Test Connection.
9.
In the message box with the test results, click OK.
10.
Click OK.
Rockwell Automation, Inc. RPTDPE-RM002D-EN-E - October 2023 15
Chapter 3
Getting started
In this chapter, you will learn about the following:
•
Load the SSDT project on page 16
Load the SSDT project
If you are reading this document, you should also have access to the Report Expert 3.2 SSDT project. The project
contains DPE data sources and a sample (empty) report template that can be copied and modified to create custom
reports. It is possible to create a SSDT project from scratch, but in this document we assume that you are working
with the provided project.
To load the SSDT project
1.
Download the compressed SSDT project package, VSProject 3.2zip, from the Rockwell Automation
Knowledgebase Document ID: QA13035 - Creating Custom Reports Using Report Expert DPE.
2.
Extract the downloaded package to the Report Expert installation directory, for example, C:\Program Files
\Rockwell Software\Report Expert\.
Tip:
It is recommended that you save your SSDT project package to the Report Expert installation
directory, so that you have access from the project to standard Report Expert report templates as
well.
A VSProject 3.2 folder with the project files is created.
The project consists of the following files:
This file: Is:
EmptyTemplate.rdl An empty pre-configured sample report template. We will
refer to it when discussing the report configuration and
properties, and you will use it to create your own report
template and subreport. The sample report template
includes the following data:
◦ Datasets and dataset fields for all DPE queries.
◦
Report parameters.
◦
Report properties defined for all the datasets.
RptCustomDataSource.rds The FactoryTalk Metrics Data Provider data source defined
for custom report templates. You will use this data source
for your custom reports.
RptMainDataSource.rds The FactoryTalk Metrics Data Provider data source used by
all default Report Expert report templates.
RptReports.rptproj The SSDT project file.
RptReports.sln The SSDT solution file.
3.
Open SQL Server Data Tools.
4.
On the File menu, select Open > Project/Solution.
16 RPTDPE-RM002D-EN-E - October 2023 Rockwell Automation, Inc.
Chapter 3Getting started
The Open Project dialog box appears.
5.
Navigate to the RptReports.sln solution file, and select it.
6. Click OK.
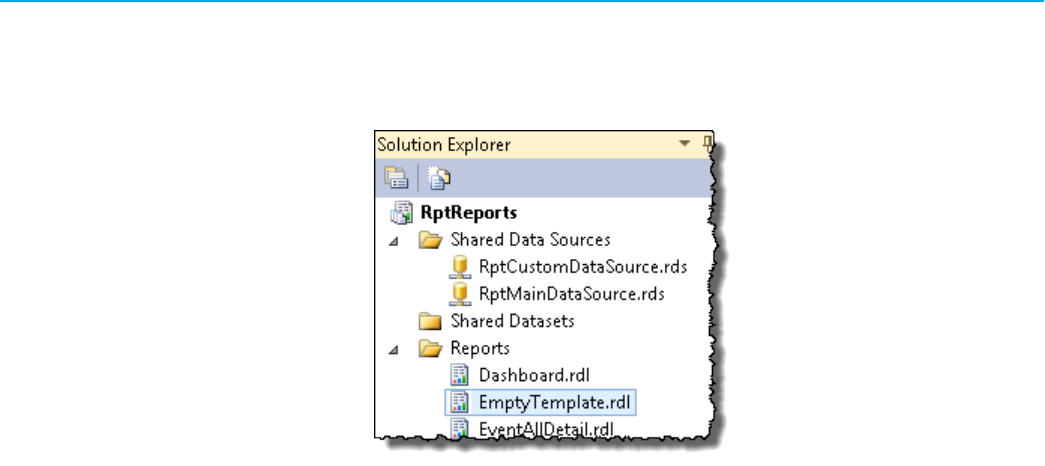
The sample empty template from the project is loaded to the Solution Explorer panel.
Rockwell Automation, Inc. RPTDPE-RM002D-EN-E - October 2023 17
Chapter 4
DPE data sources
In this chapter, you will learn about the following:
•
Standard report templates on page 18
• DPE standard queries on page 19
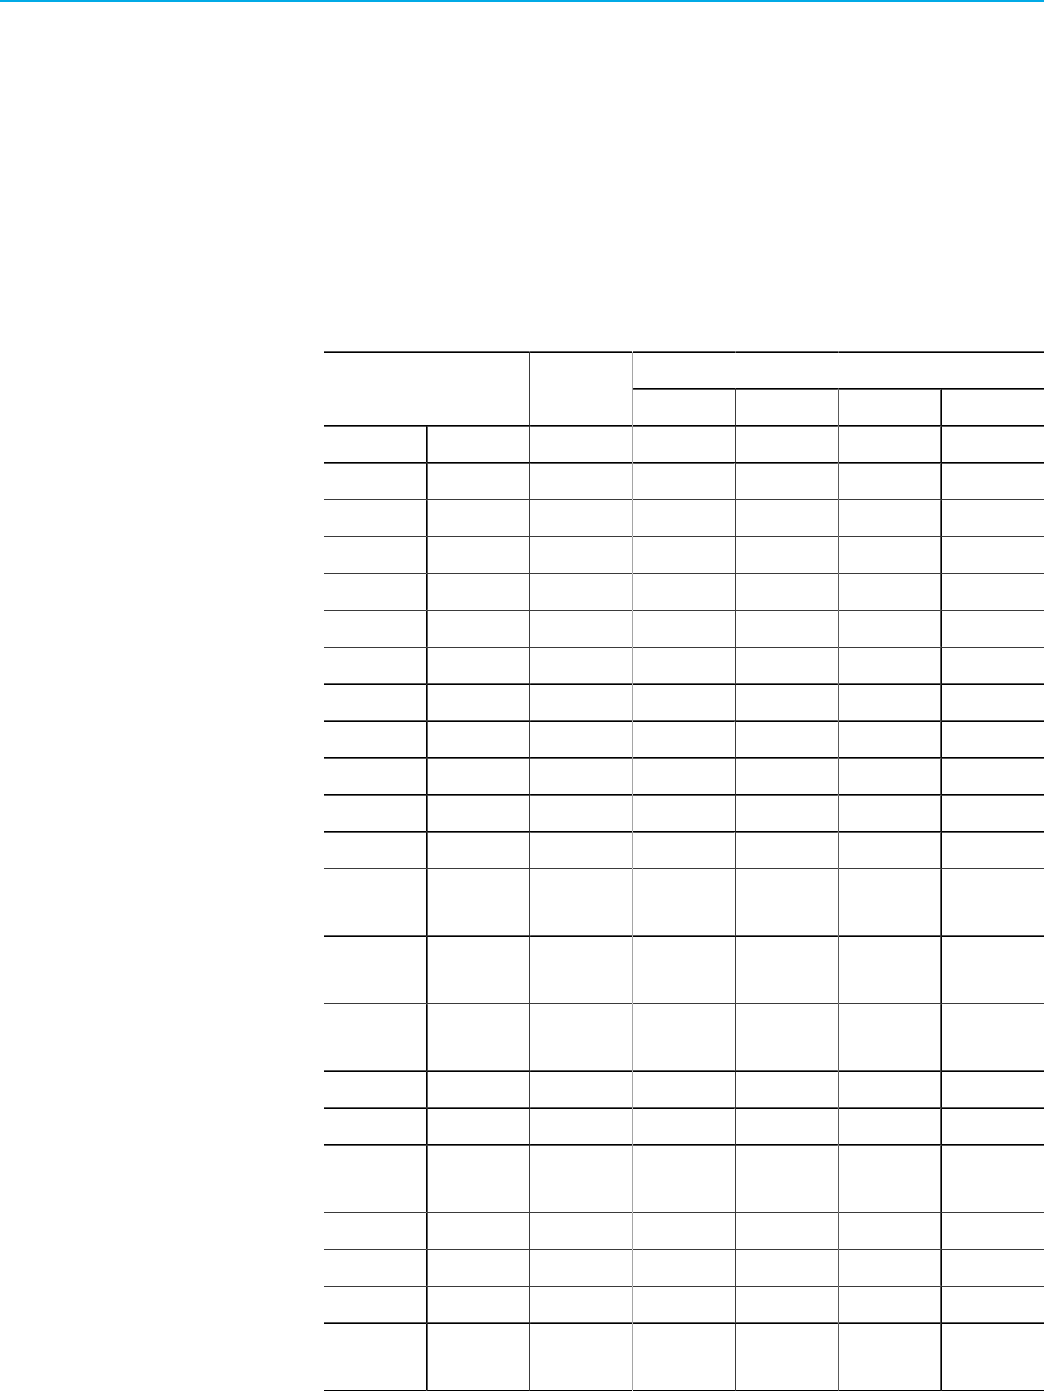
Standard report templates
Standard Report Expert report templates use standard DPE queries and have their own report layout. Following is a
complete list of standard DPE report templates and the queries that each template uses.
Report template / introduced in DPE version: DPE query
Dashboard 2.0 • Event
• Performance
•
StateDetail
EventAllDetail 2.0 EventDetailExt
EventChart 2.0 Event
EventConfiguration 2.2 EventConfiguration
EventDetail 1.1 EventDetail
EventDetailPaged 3.2 EventDetail
EventHistoryString 2.2 EventDeatilExt
EventHistoryValue 2.2 EventDeatilExt
EventOverview 2.2 EventDeatilExt
EventSummary 1.1 Event
Fault 2.0 Performance
Performance 1.1 Performance
Production 1.1 Performance
ProductionOverview 2.0 Performance
Quality 1.1 Performance
RootCauseAnalysis 1.1 StateDetail
StateDetail 2.0 State
StateSummary 2.2 State
Throughput 1.1 Performance
Uptime 2.2 Performance
Widget_3OEEComponents 2.0 Performance
Widget_EventCountAndDuration 2.0 Event
Widget_FaultSummary 2.0 Performance
Widget_GoodPartsVsScrapParts 2.0 Performance
Widget_LastState 2.0 StateDetail
Widget_MachineStates 2.0 StateDetail
18 RPTDPE-RM002D-EN-E - October 2023 Rockwell Automation, Inc.
Chapter 4DPE data sources
Report template / introduced in DPE version: DPE query
Widget_OEE 2.0 Performance
Widget_ProductionSummary 2.0 Performance
Widget_UptimeSummary 2.0 Performance
Widget_UptimeVsDowntime 2.0 Performance
DPE standard queries
DPE supports seven queries. Each of these queries returns a set of fields that can be used in reports:
•
Event
• EventDetail
• EventDetailExt
•
Performance
•
StateDetail
•
State
• EventConfiguration
Query fields
The final database query created by the DPE contains the following types of fields:
Field Description
Grouping The fields available for all DPE queries, aliased as:
• RowGroup1…RowGroup5. The fields representing the
grouping by row.
• ColGroup1…ColGroup5. The fields representing the
grouping by column.
• PageGroup1…PageGroup5. The fields representing the
grouping by page.
With these aliased field names, you can prepare a report (in
SSDT) performing drill-down and grouping on the fields whose
names are not known until the report is generated.
The actual field names can be retrieved later (at runtime) from
the RDLUtil library.
AggregationFieldCount The value in this field represents the aggregation (grouping)
level.
Data The fields available for a specific DPE query. They are filled with
data grouped according to the information contained in the
parameter set.
Following is a list of DPE queries and their data fields:
Rockwell Automation, Inc. RPTDPE-RM002D-EN-E - October 2023 19

Chapter 4DPE data sources
DPE query / introduced in DPE version:
This DPE query
provides:
Fields available for the DPE query / introduced
in DPE version
Event 1.1 Summarized data of
events in a grouping
context.
Sequence
Event_Count
Duration
Min_Duration
Max_Duration
Avg_Duration
2.0
1.1
1.1
1.1
1.1
1.1
ventDetail 1.1 Detailed information
on event occurrences
that are organized
in groupings. The
groupings are defined
for the given event.
Sequence
Start_Time
End_Time
Duration
Start_Value
End_Value
Event_Occurrence
Event_Start_Num
Event_End_Num
Event_During_Num
2.0
1.1
1.1
1.1
1.1
1.1
2.0
2.0
2.0
2.0
EventDetailExt 2.0 Row-level data from
the Event table with no
summarization.
Sequence
Line
Workcell
Event_Name
Event_Category
Event_Severity
Start_Time
End_Time
Duration
Start_Value
End_Value
Event_Occurrence
lOEEConfigEventId
Part_Id
Shift_Name
Shift_Start_Time
Shift_Number
RecordState
Event_During_Schedule
d_Time
Event_Start_Num
Event_End_Num
Event_During_Num
Event_is_Faul
Event_Reason_Code
Event_Reason
Flex1
2.0
2.0
2.0
2.0
2.0
2.0
2.0
2.0
2.0
2.0
2.0
2.0
2.0
2.0
2.0
2.0
2.0
2.0
2.0
2.0
2.0
2.0
2.0
2.0
2.0
2.0
2.0
20 RPTDPE-RM002D-EN-E - October 2023 Rockwell Automation, Inc.

Chapter 4DPE data sources
DPE query / introduced in DPE version:
This DPE query
provides:
Fields available for the DPE query / introduced
in DPE version
Flex2
Flex3
Flex4
Flex5
2.0
2.0
2.0
Performance 1.1 Production data
and production KPIs
summarized in a
grouping context.
Sequence
Availability
Throughput
Quality
OEE
GoodParts
ScrapParts
TotalParts
IdealCycleTime
Realized_Cycle_Time
Cycle_Time_Difference
Cycle_Time_Pct_Differe
nce
IdealParts
PercentIdeal
PercentScrap
UptimePercent
Stops
DownTime
AvailTime
RunTime
TotalTime
SchedAvailTime
SchedUnavailTime
MonitoredUnavailTime
Faults
FaultTime
UpTime
DownPercent
MTBF
MTTR
MTTR
FailureRate
ScheduleCapacity
TotalCapacity
2.0
1.1
1.1
1.1
1.1
1.1
1.1
1.1
1.1
1.1
1.1
1.1
1.1
1.1
1.1
1.1
1.1
1.1
1.1
1.1
2.0
2.0
2.0
2.0
2.0
2.0
2.0
2.0
2.0
2.0
2.0
2.0
2.0
2.0
State 2.0 Summarized data of
states in a grouping
context.
Sequence
State_Count
Duration
Min_Duration
2.0
2.0
2.0
2.0
Rockwell Automation, Inc. RPTDPE-RM002D-EN-E - October 2023 21

Chapter 4DPE data sources
DPE query / introduced in DPE version:
This DPE query
provides:
Fields available for the DPE query / introduced
in DPE version
Max_Duration
Avg_Duration
2.0
2.0
StateDetail 1.1 Detailed information
on state occurrences
organized by line, work
cell and shift.
Line
WorkCell
Sequence
StateId
StateName
StateColor
Start_Time
End_Time
Duration
Shift
ShiftNumber
ShiftStart
GoodParts
ScrapParts
TotalParts
Part_Id
1.1
1.1
1.1
1.1
1.1
1.1
1.1
1.1
1.1
2.0
2.0
2.0
2.0
2.0
2.0
3.2
EventConfiguration Configuration
information for
User-Defined events,
including settings and
tag names. No collected
data.
Sequence
Enterprise
Site
Area
Workcell
ConfigWorkCellId
ConfigEventId
EventName
EventCategory
SeverityLevel
UnschedDatapoint4Even
tTrigger
FTTMExpr4EventTrigger
Value
FaultMetricUse
Datapoint4EventValue
FTTMExpr4EventValue
EventValueLookupListN
ame
MachineStateId
MachineStateName
2.2
2.2
2.2
2.2
2.2
2.2
2.2
2.2
2.2
2.2
2.2
2.2
2.2
2.2
2.2
2.2
2.2
2.2
To create a final database query, DPE evaluates the settings contained in the parameter set. Not all parameter set
settings apply to all reports.
22 RPTDPE-RM002D-EN-E - October 2023 Rockwell Automation, Inc.
Chapter 4DPE data sources
Time settings
All standard DPE queries respect the time range specified in the parameter set.
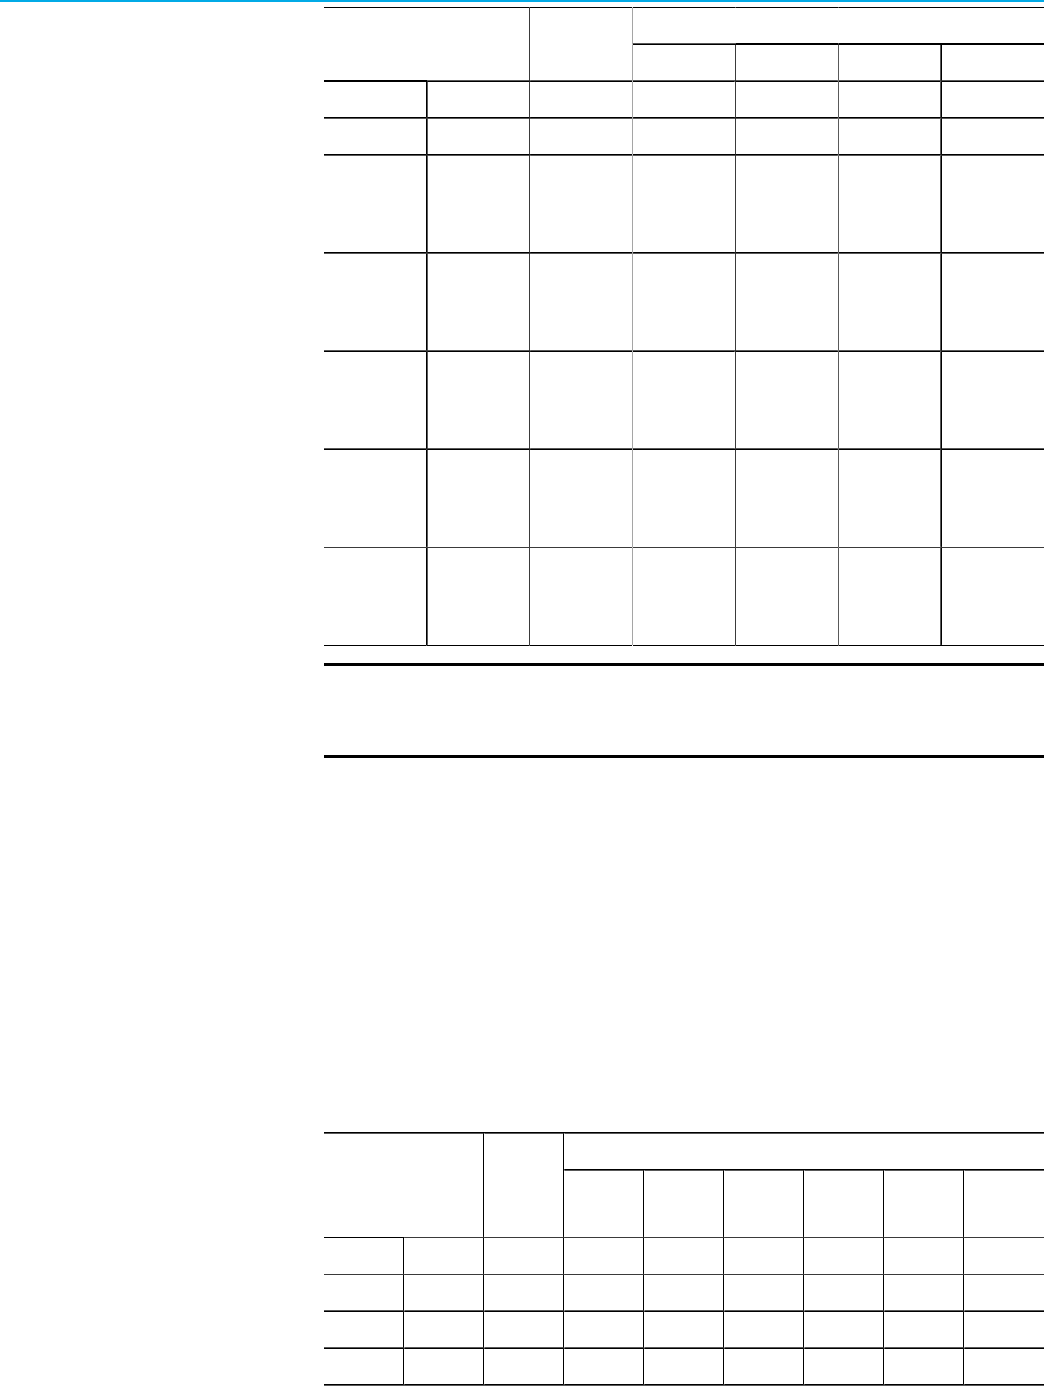
Grouping settings
All standard DPE queries implement groupings as specified in the parameter set, but not all groupings are respected.
For example, the Performance query does not respect grouping on the Event Reason Code field, because there is no
such field in the returned data. Generally, any groupings inappropriate for the query (that is, those by which the data
cannot be grouped) are ignored.
Following are the available grouping fields and the specific DPE queries that use them:
Supported by the DPE query?
Grouping field / introduced in
DPE version:
Source
Performance Event Event Detail State
Start Time 2.2 Plant Model No No Yes No
Area 1.1 Plant Model Yes Yes Yes Yes
Line 1.1 Plant Model Yes Yes Yes Yes
Site 1.1 Plant Model Yes Yes Yes Yes
Workcell 1.1 Plant Model Yes Yes Yes Yes
Date 1.1 Date Part Yes Yes Yes Yes
Hour 1.1 Date Part Yes Yes Yes Yes
Month 1.1 Date Part Yes Yes Yes Yes
Shift 1.1 Date Part Yes Yes Yes Yes
Shift Number 2.0 Date Part Yes Yes Yes Yes
Shift Start 2.0 Date Part Yes Yes Yes Yes
Week 1.1 Date Part Yes Yes Yes Yes
Ideal Cycle Time 1.1 Summarization
Fields
Yes No No No
Part Description 1.1 Summarization
Fields
Yes Yes Yes Yes
Part Id 1.1 Summarization
Fields
Yes Yes Yes No
State Name 2.0 State Data No No No Yes
Event Category 1.1 Event Data No Yes Yes No
Event During
Scheduled Time
2.0 Event Data No Yes Yes No
Event is Fault 2.0 Event Data No Yes Yes No
Event Name 1.1 Event Data No Yes Yes No
Event Reason 1.1 Event Data No Yes Yes No
Event Reason
Code
1.1 Event Data No Yes Yes No
Rockwell Automation, Inc. RPTDPE-RM002D-EN-E - October 2023 23
Chapter 4DPE data sources
Supported by the DPE query?
Grouping field / introduced in
DPE version:
Source
Performance Event Event Detail State
Event Severity 1.1 Event Data No Yes Yes No
Record State 2.0 Event Data Yes No Yes No
Name will be the
configured name
for Flex Field 1
1.1 Flex Field 1 Yes Yes Yes Yes
Name will be the
configured name
for Flex Field 2
1.1 Flex Field 2 Yes Yes Yes Yes
Name will be the
configured name
for Flex Field 3
1.1 Flex Field 3 Yes Yes Yes Yes
Name will be the
configured name
for Flex Field 4
1.1 Flex Field 4 Yes Yes Yes Yes
Name will be the
configured name
for Flex Field 5
1.1 Flex Field 4 Yes Yes Yes Yes
NOTE:
The StateDetail query and the EventDetailExt query ignore all groupings, since the majority
of the field values may change during the same occurrence of an event (such as a shift or state).
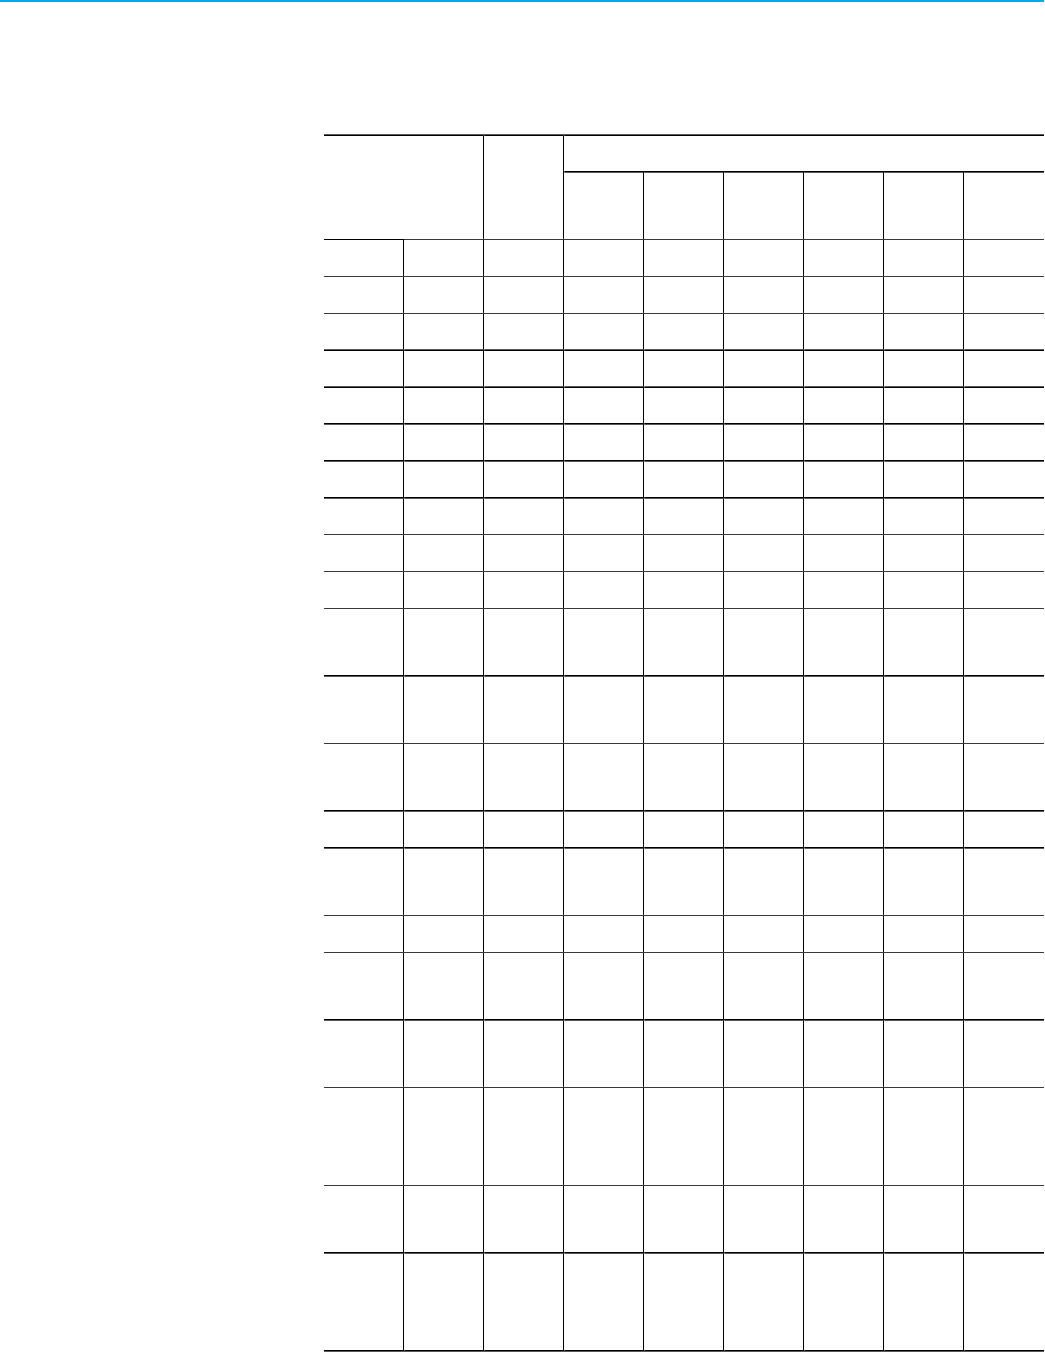
Sorting settings
Generally, report data is sorted using the values of the grouping fields specified in the parameter set. Grouping field
values are sorted in ascending order. It is possible to change the default sorting behavior using the Sort parameter
settings, and to sort by other data fields. Sorting settings that are not supported by the query are ignored. Data is not
sorted by grouped data, if the grouping field is not supported by the query.
Another type of sorting settings that are ignored is sorting by fields you can group by, but which are not selected
as a grouping (for example, you have selected sorting by Line, while there is no grouping by Line selected in the
parameter set).
Following are the available sorting fields and the specific DPE queries that use them:
Is this field supported by the DPE query?
Sorting field / introduced
in DPE version:
Source
Performa
nce
Event
Event
Detail
State Detail State
Event
DetailExt
Area 1.1 Plant Model Yes Yes Yes No Yes No
Line 1.1 Plant Model Yes Yes Yes Yes Yes Yes
Site 1.1 Plant Model Yes Yes Yes No Yes No
Workcell 1.1 Plant Model Yes Yes Yes No Yes Yes
24 RPTDPE-RM002D-EN-E - October 2023 Rockwell Automation, Inc.

Chapter 4DPE data sources
Is this field supported by the DPE query?
Sorting field / introduced
in DPE version:
Source
Performa
nce
Event
Event
Detail
State Detail State
Event
DetailExt
Workcell
Ordered
2.0 Plant Model Yes Yes Yes Yes Yes Yes
Date 1.1 Date Part Yes Yes Yes No Yes No
Hour 1.1 Date Part Yes Yes Yes No Yes No
Month 1.1 Date Part Yes Yes Yes No Yes No
Shift 1.1 Date Part Yes Yes Yes No Yes Yes
Shift
Number
2.0 Date Part Yes Yes Yes No Yes Yes
Shift Start 2.0 Date Part Yes Yes Yes No Yes Yes
Week 1.1 Date Part Yes Yes Yes No Yes No
Ideal Cycle
Time
1.1 Summarizat
ion Fields
Yes No No No No No
Part
Description
1.1 Summarizat
ion Fields
Yes Yes Yes No Yes No
Part Id 1.1 Summarizat
ion Fields
Yes Yes Yes No No No
State Name 2.0 State Data No No No No Yes No
Event
Category
1.1 Event Data No Yes Yes No No Yes
Event During
Num
2.0 Event Data No No Yes No No Yes
Event During
Scheduled
Time
2.0 Event Data No Yes Yes No No Yes
Event End
Num
2.0 Event Data No No Yes No No Yes
Event End
Time
2.0 Event Data No No Yes No No Yes
Event End
Value
2.0 Event Data No No Yes No No Yes
Event is
Fault
2.0 Event Data No Yes Yes No No Yes
Event Name 1.1 Event Data No Yes Yes No No Yes
Event
Occurrence
2.0 Event Data No No Yes No No Yes
Event
Reason
1.1 Event Data No Yes Yes No No Yes
Rockwell Automation, Inc. RPTDPE-RM002D-EN-E - October 2023 25

Chapter 4DPE data sources
Is this field supported by the DPE query?
Sorting field / introduced
in DPE version:
Source
Performa
nce
Event
Event
Detail
State Detail State
Event
DetailExt
Event
Reason
Code
1.1 Event Data No Yes Yes No No Yes
Event
Severity
1.1 Event Data No Yes Yes No No Yes
Event Start
Num
2.0 Event Data No No Yes No No Yes
Event Start
Time
2.0 Event Data No No Yes No No Yes
Event Start
Value
2.0 Event Data No No Yes No No Yes
Record State 2.0 Event Data Yes Yes Yes No No Yes
Name will
be the
configured
name for
Flex Field 1
1.1 Flex Field 1 Yes Yes Yes No Yes Yes
Name will
be the
configured
name for
Flex Field 2
1.1 Flex Field 2 Yes Yes Yes No Yes Yes
Name will
be the
configured
name for
Flex Field 3
1.1 Flex Field 3 Yes Yes Yes No Yes Yes
Name will
be the
configured
name for
Flex Field 4
1.1 Flex Field 4 Yes Yes Yes No Yes Yes
Name will
be the
configured
name for
Flex Field 5
1.1 Flex Field 5 Yes Yes Yes No Yes Yes
Available
Time
1.1 Report
Fields
Yes No No No No No
26 RPTDPE-RM002D-EN-E - October 2023 Rockwell Automation, Inc.

Chapter 4DPE data sources
Is this field supported by the DPE query?
Sorting field / introduced
in DPE version:
Source
Performa
nce
Event
Event
Detail
State Detail State
Event
DetailExt
Cycle Time
Diff.
1.1 Report
Fields
Yes No No No No No
Cycle Time
Diff. %
1.1 Report
Fields
Yes No No No No No
Down % 2.0 Report
Fields
Yes Yes No No No No
Down Time 1.1 Report
Fields
Yes No No No No No
Event Count 1.1 Report
Fields
No Yes No No No No
Event
Duration
1.1 Report
Fields
No Yes Yes No No Yes
Failure
Frequency
Rate
2.0 Report
Fields
Yes Yes No No No No
Failure Rate 2.0 Report
Fields
Yes Yes No No No No
Fault Time 2.0 Report
Fields
Yes Yes No No No No
Faults 2.0 Report
Fields
Yes Yes No No No No
Good Parts 1.1 Report
Fields
Yes No No No No No
Ideal Parts 1.1 Report
Fields
Yes No No No No No
Monitored
Unavail
Time
2.0 Report
Fields
Yes Yes No No No No
MTBF 2.0 Report
Fields
Yes No No No No No
MTTR 2.0 Report
Fields
Yes No No No No No
OEE % 1.1 Report
Fields
Yes No No No No No
Percent
Ideal Parts
1.1 Report
Fields
Yes No No No No No
Quality % 1.1 Report
Fields
Yes No No No No No
Rockwell Automation, Inc. RPTDPE-RM002D-EN-E - October 2023 27

Chapter 4DPE data sources
Is this field supported by the DPE query?
Sorting field / introduced
in DPE version:
Source
Performa
nce
Event
Event
Detail
State Detail State
Event
DetailExt
Realized
Cycle Time
1.1 Report
Fields
Yes No No No No No
Running
Time
1.1 Report
Fields
Yes No No No No No
Sched Avail
Time
2.0 Report
Fields
Yes Yes No No No No
Sched
Unavail
Time
2.0 Report
Fields
Yes Yes No No No No
Schedule
Capacity
2.0 Report
Fields
Yes Yes No No No No
Scrap Parts 1.1 Report
Fields
Yes No No No No No
State Count 2.0 Report
Fields
No No No No Yes No
State
Duration
2.0 Report
Fields
No No No No Yes No
Throughput
%
1.1 Report
Fields
Yes No No No No No
Total
Capacity
2.0 Report
Fields
Yes Yes No No No No
Total Parts 1.1 Report
Fields
Yes No No No No No
Total Time 2.0 Report
Fields
Yes Yes No No No No
Up Time 2.0 Report
Fields
Yes Yes No No No No
Uptime % 1.1 Report
Fields
Yes No No No No No
NOTE:
The Event Count sorting for the EventDetail query was removed in the version 2.0 of Report
Expert. It is present in previous versions, but generates an error.
Each report based on the StateDetail query is always sorted internally by Line, Workcell Ordered
and Start Time. All sorting settings are completely ignored by reports based on this query.
Plant model filtering settings
All standard DPE queries respect the plant model unit (PMU) filtering according to the values in the parameter set.
28 RPTDPE-RM002D-EN-E - October 2023 Rockwell Automation, Inc.
Chapter 4DPE data sources
Filtering settings
The available filtering fields and specific DPE queries using them are listed in the following table. The table presents
as well inappropriate filtering settings that are ignored in a query.
Supported by the DPE query?
Filtering field Source
Performa
nce
Event
Event
Detail
State Detail State
Event
DetailExt
Site 1.1 Plant Model Yes Yes Yes Yes Yes Yes
Area 1.1 Plant Model Yes Yes Yes Yes Yes Yes
Line 1.1 Plant Model Yes Yes Yes Yes Yes Yes
Workcell 1.1 Plant Model Yes Yes Yes Yes Yes Yes
Month 1.1 Date Part Yes Yes Yes Yes Yes Yes
Week 1.1 Date Part Yes Yes Yes Yes Yes Yes
Date 1.1 Date Part Yes Yes Yes Yes Yes Yes
Shift 1.1 Date Part Yes Yes Yes Yes Yes Yes
Shift Start 2.0 Date Part Yes Yes Yes Yes Yes Yes
Hour 1.1 Date Part Yes Yes Yes Yes Yes Yes
Part Id 1.1 Summarizat
ion Fields
Yes Yes Yes No No Yes
Part
Description
1.1 Summarizat
ion Fields
Yes Yes Yes No Yes Yes
Ideal Cycle
Time
1.1 Summarizat
ion Fields
Yes No No No No No
State Name 2.0 State Data No No No No Yes No
Event Has
Comment
3.2 Event Data No Yes Yes No No Yes
Event Name 1.1 Event Data No Yes Yes No No Yes
Event
Category
1.1 Event Data No Yes Yes No No Yes
Event
Severity
1.1 Event Data No Yes Yes No No Yes
Event
Reason
Code
1.1 Event Data No Yes Yes No No Yes
Event
Reason
1.1 Event Data No Yes Yes No No Yes
Event During
Scheduled
Time
2.0 Event Data No Yes Yes No No Yes
Rockwell Automation, Inc. RPTDPE-RM002D-EN-E - October 2023 29

Chapter 4DPE data sources
Supported by the DPE query?
Filtering field Source
Performa
nce
Event
Event
Detail
State Detail State
Event
DetailExt
Event is
Fault
2.0 Event Data No Yes Yes No No Yes
Event Start
Num
2.0 Event Data No No No No No Yes
Event End
Num
2.0 Event Data No No No No No Yes
Record State 2.0 Event Data Yes Yes Yes No No Yes
Name will
be the
configured
name for
Flex Field 1
1.1 Flex Field 1 Yes Yes Yes No Yes Yes
Name will
be the
configured
name for
Flex Field 2
1.1 Flex Field 2 Yes Yes Yes No Yes Yes
Name will
be the
configured
name for
Flex Field 3
1.1 Flex Field 3 Yes Yes Yes No Yes Yes
Name will
be the
configured
name for
Flex Field 4
1.1 Flex Field 4 Yes Yes Yes No Yes Yes
Name will
be the
configured
name for
Flex Field 5
1.1 Flex Field 5 Yes Yes Yes No Yes Yes
NOTE:
The Ideal Cycle Time filtering for EventDetail was removed in version 2.0 of Report Expert. It
is present in previous versions but generates an error.
The same applies to Part Id, Part Description and Ideal Cycle Time filters for StateDetail.
30 RPTDPE-RM002D-EN-E - October 2023 Rockwell Automation, Inc.
Chapter 5
Structure and functionality
In this chapter, you will learn about the following:
•
Structure of standard report templates on page 31
• Structure of subreports on page 33
• Report configuration on page 34
•
Report properties on page 39
•
Methods and properties of the terminology on page 44
•
Structural and grouping requirements of subreports on page 44
• Aggregate function on page 47
•
Drillthrough capability on page 47
As examples, we will use the EmptyTemplate report template or standard Report Expert report templates. They are
all available in the RptReports SSDT project that you have downloaded.
Structure of standard report templates
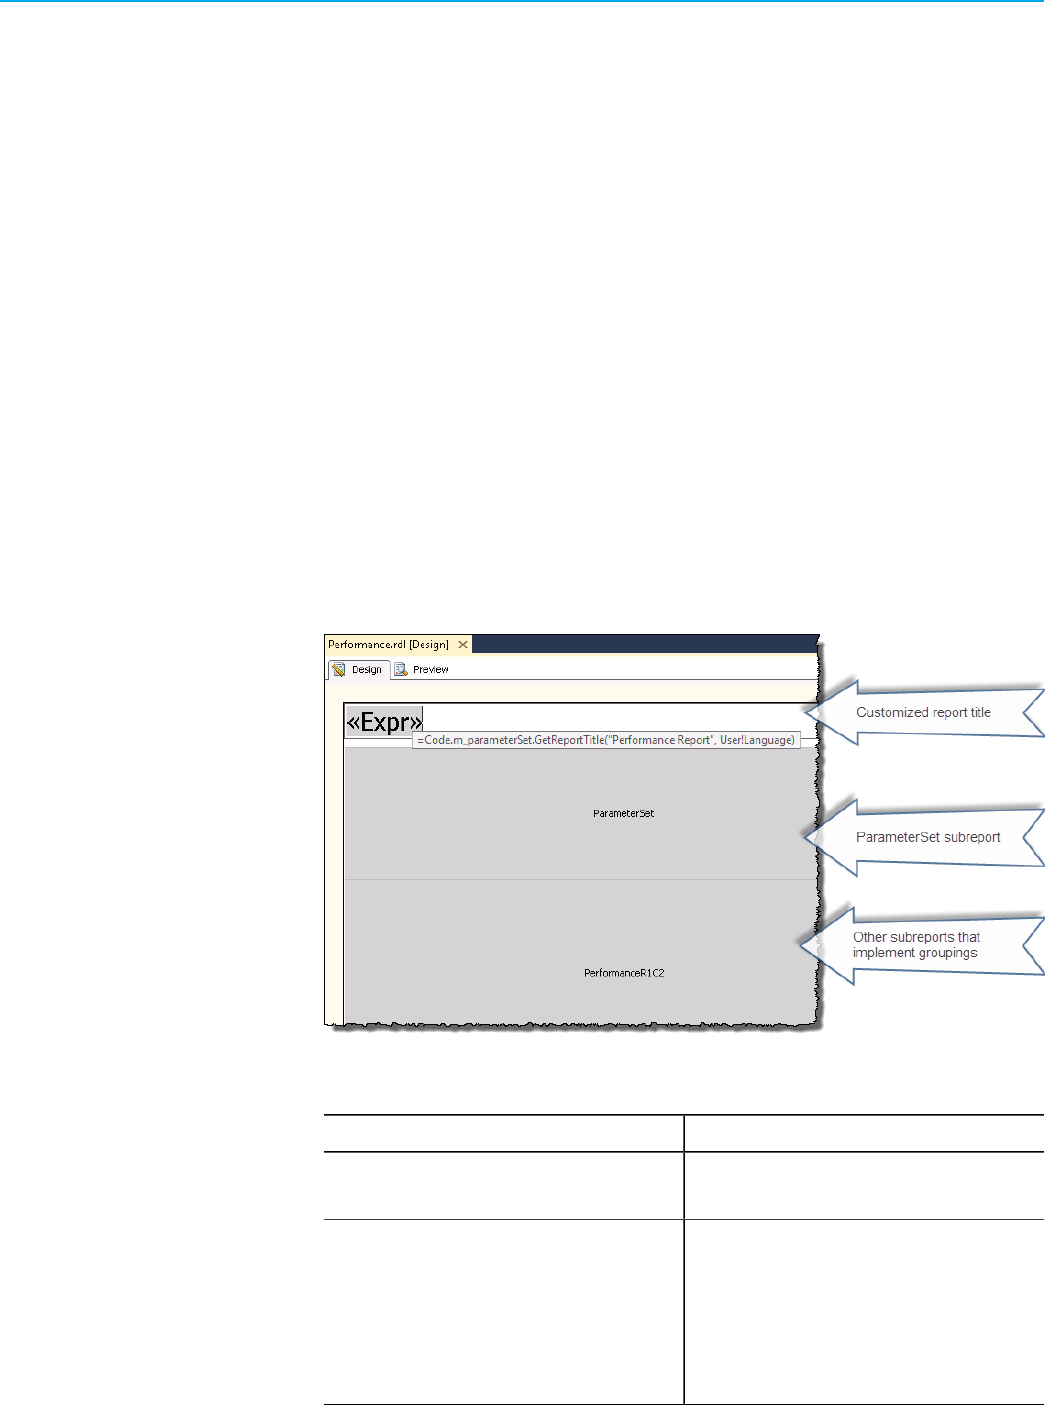
The report template can be considered a container for a subreport displaying parameter set settings and all other
subreports presenting data. It should have the following structure to be compliant with other standard Report Expert
report templates:
The standard report template consists of the following elements:
Item Description
Customized report title The title, with which you name the report. Refer to Configure the
report title on page 80.
ParameterSet subreport A default subreport in a standard Report Expert report template
displaying the report parameter set settings used to generate
the report. With the parameter set subreport, you can determine
how the data displayed in the report is filtered, for example,
what time period it contains, and so on. The standard Report
Expert parameter set subreport is called ParameterSet.rdl and
Rockwell Automation, Inc. RPTDPE-RM002D-EN-E - October 2023 31
Chapter 5Structure and functionality
Item Description
can be included into a new custom report by reference. You
will use it in the tutorial. You can also create a parameter set
subreport from scratch.
All other subreports implementing groupings Other subreports that use dynamic groupings and the
drillthrough functionality.
To comply with the Report Expert requirements with regard to the number of subreports and grouping combinations,
the report template should include as many subreports as there are grouping combinations that you want to
implement. For more information, refer to Number of subreports and grouping combinations on page 46.
NOTE:
In order to create a complete report template, you must create its subreports first.
Report naming conventions
When naming subreports, follow the subreport name pattern ReportNameRxCy, where:
This item: Is: Example
ReportName The name of the report template. Performance
Rx The number of groupings by row. R1
Cy The number of groupings by column. C2
Example
A subreport named PerformanceR1C2 supports the following groupings:
•
One grouping by row (R1).
•
Two groupings by column (C2).
This naming pattern ensures that all subreports constituting a given report template are displayed correctly.
32 RPTDPE-RM002D-EN-E - October 2023 Rockwell Automation, Inc.
Chapter 5Structure and functionality
Structure of subreports
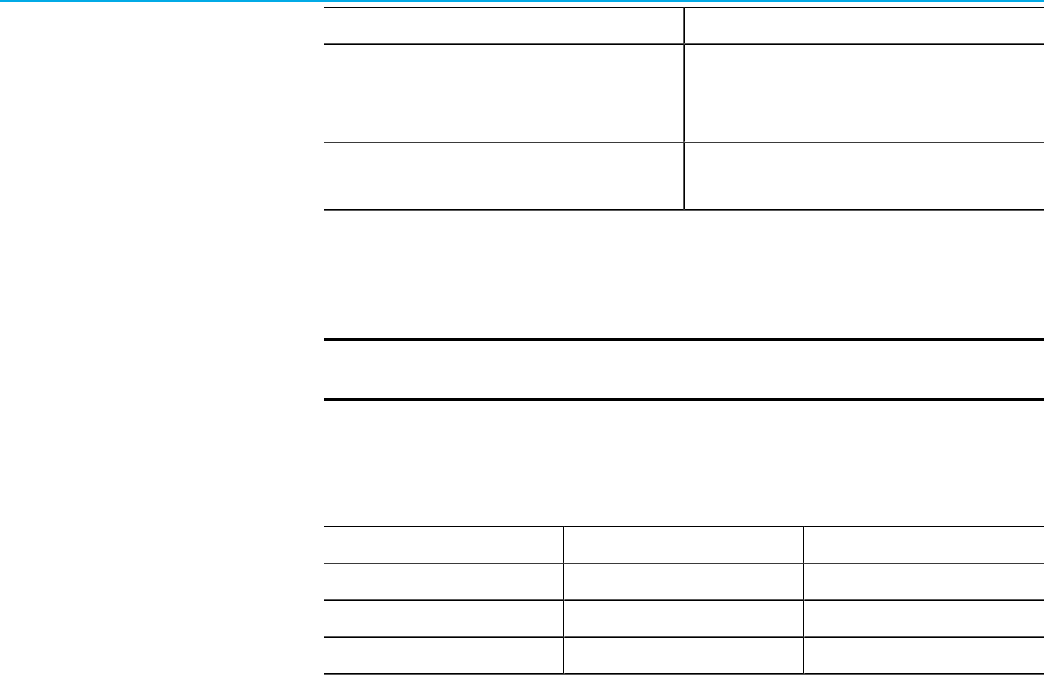
The figure presents a subreport with several objects defined:
•
Text Box. Use the text box as a container for page groupings. In the figure above, the text box represents the
header for the grouping by page. If no page groupings are used, the text box behaves like an "empty" page
grouping.
For more information, refer to Add a text box: txtPageGroup1 on page 56.
•
Rectangle. Use the rectangle to group other objects and manage them in an easier manner. For example,
you can use the rectangle to control the visibility of the objects that are contained within the rectangle. The
rectangle does not allow you to group objects by the field value.
For more information, refer to Add headings to the row groupings on page 75.
•
Chart. Use the chart to display data graphically. In most report templates, the data is shown as a bar chart.
For more information, refer to Add a chart: chartKPIs on page 62.
•
Matrix. Use the matrix to display aggregated data in rows and columns. The matrix has to be configured
with a fixed number of rows and columns, so the structure of the matrix object will be different for each
combination of row and column groupings. Due to the unique structure, it is necessary to create a different
subreport for each combination of row and column groupings.
The matrix object contains both data fields and grouping fields. The convention in Report Expert report
templates is that the data fields in the matrix object are the same for all subreports. For instance, in the
Performance report template, the matrix object in each of the 12 subreports has the same data fields:
Availability, Throughput, Quality, and OEE.
For more information, refer to Add a matrix: tablixKPIs on page 57.
The matrix and the list make up the Tablix data region.
•
List. Use the list to create a free-form layout consisting of other objects.
There are usually two lists in a subreport. The first one (in the figure it is List 1) functions as a container
for group objects (for example, a matrix and chart) associated with the header for the page grouping. The
visibility of the list is controlled by a text box, which is the group header for the page grouping. The second
list (in the figure it is List 2) is a container for the text box and the first list, which makes the entire section
easy to multiply for each of the aggregated records grouped by page.
For more information, refer to Add a list: List1 on page 55.
Rockwell Automation, Inc. RPTDPE-RM002D-EN-E - October 2023 33

Chapter 5Structure and functionality
The list and the matrix make up the Tablix data region.
•
Tablix. Use the tablix to display fields in a grid or a free form. Depending on the form in which you intend to
display data, the tablix may take the form of a matrix, or a list.
Report configuration
In order to link a report with DPE, you need first to configure the following:
1.
A shared data source on page 34
2. A dataset on page 35
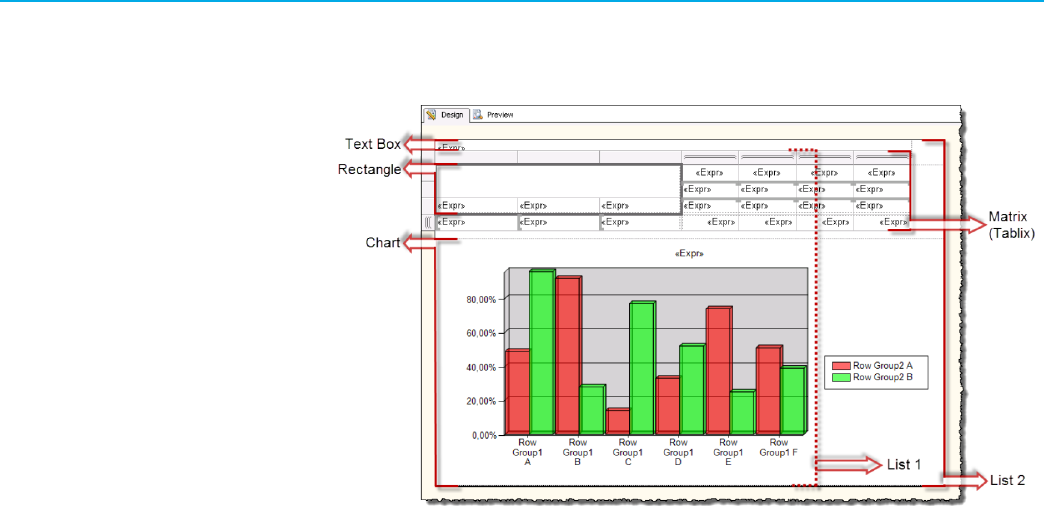
3. Dataset fields on page 36
4.
Report parameters on page 37
5.
Dataset parameters on page 38
All these settings are already defined in the RptReports SSDT project. In this chapter, you will learn how to access
them and what they are used for. We will also give you some tips if you would like to configure the settings from
scratch.
Shared data source
The first step is to create a custom shared data source that uses DPE and deploy it to SQL Server Reporting Services
(SSRS).
Standard Report Expert report templates use their own default data source. For custom report templates, we
recommend you to create a one. Otherwise, you will must reinstall your custom report templates whenever you
reinstall or upgrade Report Expert, because the references between the custom report templates and the data source
will be broken.
In the SSDT project, both the main (RptMainDataSource.rds) and custom (RptCustomDataSource.rds) shared data
sources are already configured and deployed to SSRS. You can view the data sources in the Solution Explorer.
You may also create a custom shared data source from scratch.
To create a custom shared data source
1.
Open SQL Server Data Tools (SSDT).
2.
In the Solution Explorer, right-click Shared Data Sources, and then click Add New Data Source.
The Shared Data Source Properties dialog box appears.
3.
Type the name of the new data source.
4.
From the Type list, select RSBW.
Tip:
RSBW is the data provider for FactoryTalk Metrics. It provides data from the RSBizWare
database that you have chosen for working with the DPE on page 14.
5.
Deploy the data source to SSRS in the same way as you deploy any new report template.
For more information, refer to Deploy the report template to SSRS on page 85.
In this tutorial, we will use the RptCustomDataSource.rds custom shared data source.
34 RPTDPE-RM002D-EN-E - October 2023 Rockwell Automation, Inc.

Chapter 5Structure and functionality
Dataset
The shared data source is linked to a report with a dataset object. The dataset points to the DPE query that you
want to use in your report. You must define it for each subreport you create. Usually, the subreport may use only one
dataset, and therefore one DPE query.
The EmptyTemplate.rdl report template includes datasets for all the DPE queries.
To view the datasets of the EmptyTemplate.rdl report template
1.
In the Solution Explorer, double-click EmptyTemplate.rdl.
The Report Data window and the Designer for the selected report template appear.
Tip:
If the Report Data window does not appear, do either of the following to display it:
◦
On the View menu, click Report Data.
◦ Press Ctrl+Alt+D.
2.
Under Datasets, right-click the dataset that you want to view, and then click Dataset Properties.
The Dataset Properties dialog box appears.
Tip:
The timeout value is provided in seconds. The default setting is 30 seconds, but it may not
be enough as DPE queries can take a longer time to return results.
Under Query, you will find the name of the query that is linked to the selected dataset.
Rockwell Automation, Inc. RPTDPE-RM002D-EN-E - October 2023 35
Chapter 5Structure and functionality
Tip:
For the list of datasets and their queries defined in the SSDT project, refer to Datasets, queries, and
dataset fields that are defined in the SSDT project on page 95.
Dataset fields
In order to use the dataset that you created in a subreport, you must define the dataset fields. You can view and
edit them in the properties of the selected dataset. In the EmptyTemplate.rdl sample report template, all available
dataset fields are already configured.
To open dataset fields
1.
In the Solution Explorer, double-click EmptyTemplate.rdl.
The Report Data window and the Designer for the selected report template appear.
Tip:
If the Report Data window does not appear, do either of the following to display it:
◦
On the View menu, click Report Data.
◦ Press Ctrl+Alt+D.
2.
Under Datasets, right-click the dataset that you want to view, and then click Dataset Properties.
The Dataset Properties dialog box appears.
3.
Click Fields.
The Fields tab lists all the fields defined for the selected dataset.
When you create a subreport of your own, you should configure only the dataset fields that are specific to the query
that you use in your report. Unused dataset fields should be removed from the report to enhance its performance.
36 RPTDPE-RM002D-EN-E - October 2023 Rockwell Automation, Inc.
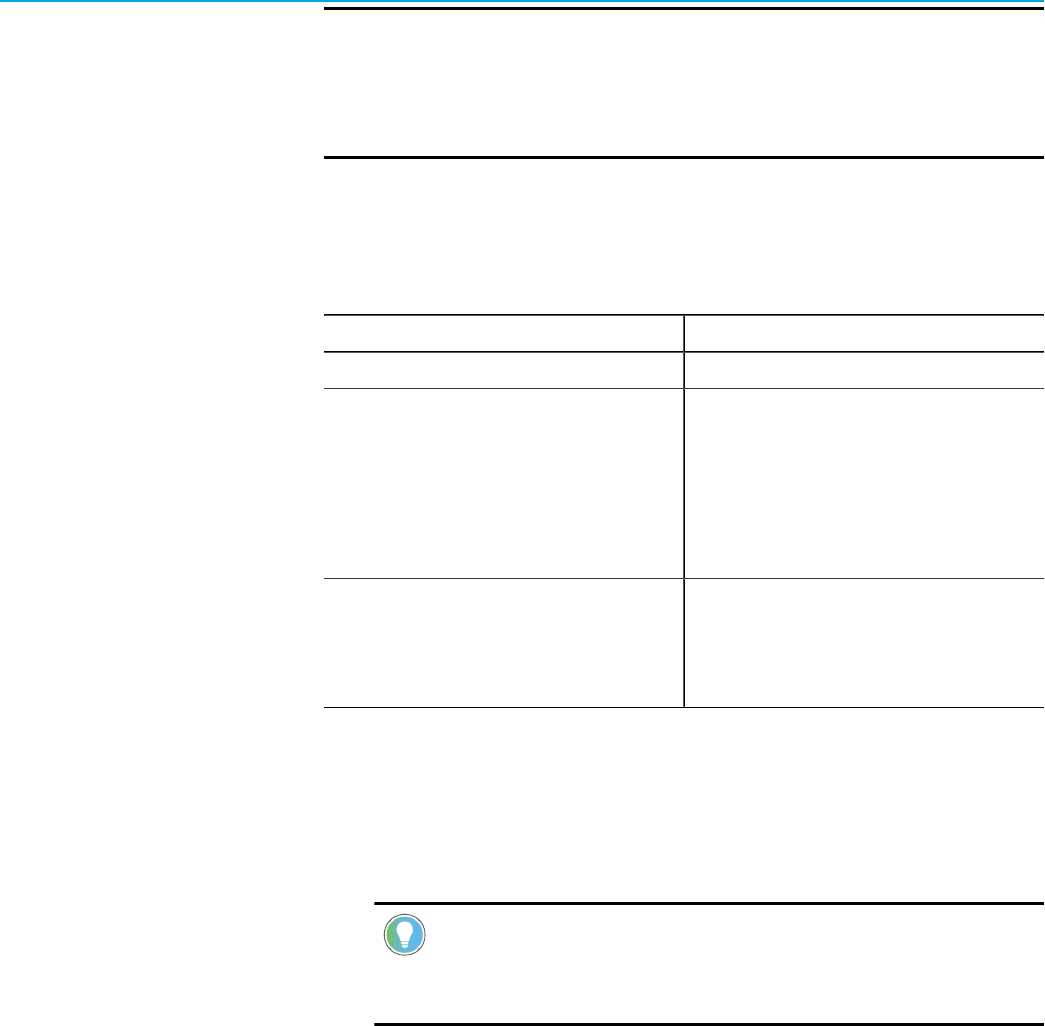
Chapter 5Structure and functionality
NOTE:
For the list of all DPE field names, refer to Query fields on page 19.
For the list of datasets and their queries defined in the SSDT project, refer to Datasets, queries, and
dataset fields that are defined in the SSDT project on page 95.
Report parameters
In order to use a parameter set from Report Expert in a report template and subreports when processing data, you
must define the following global report parameters:
Item Description
RptParameterSetId The ID of a specific parameter set in the database.
RptParameterSet A text string containing the parameter set data that you can
type in the Report Expert interface to generate an ad-hoc
report. This is the only case, in which the RptParameterSet
parameter takes precedence over RptParameterSetId. If you
define the RptParameterSet parameter, you do not have to
define RptParameterSetId.
RptReportId The ID of the Report Expert Explorer tree item to be used in a
report. In standard Report Expert report templates, this is used
to assign the report a title that is identical to the name of the
corresponding Report Expert Report Explorer tree item.
In the EmptyTemplate.rdl report template, the global report parameters are already configured.
To view report parameters
1.
In the Solution Explorer, double-click EmptyTemplate.rdl.
The Report Data window appears.
Tip:
If the Report Data window does not appear, do either of the following to display it:
◦
On the View menu, click Report Data.
◦ Press Ctrl+Alt+D.
Rockwell Automation, Inc. RPTDPE-RM002D-EN-E - October 2023 37

Chapter 5Structure and functionality
2. Under Parameters, double-click the report parameters that you want to view.
The Report Parameter Properties dialog box appears.
Dataset parameters
Apart from the report parameters, you must define RptParameterSetId and RptParameterSet dataset parameters
for subreports. They correspond to the global report parameters and are required by DPE to properly construct a
given query.
In the EmptyTemplate.rdl report template, the global report parameters are already configured.
To view the dataset parameters
1.
In the Solution Explorer, double-click EmptyTemplate.rdl.
The Report Data window and the Designer for the selected report template appear.
Tip:
If the Report Data window does not appear, do either of the following to display it:
◦
On the View menu, click Report Data.
◦ Press Ctrl+Alt+D.
2.
Under Datasets, right-click the dataset that you want to view, and then click Dataset Properties.
The Dataset Properties dialog box appears.
38 RPTDPE-RM002D-EN-E - October 2023 Rockwell Automation, Inc.
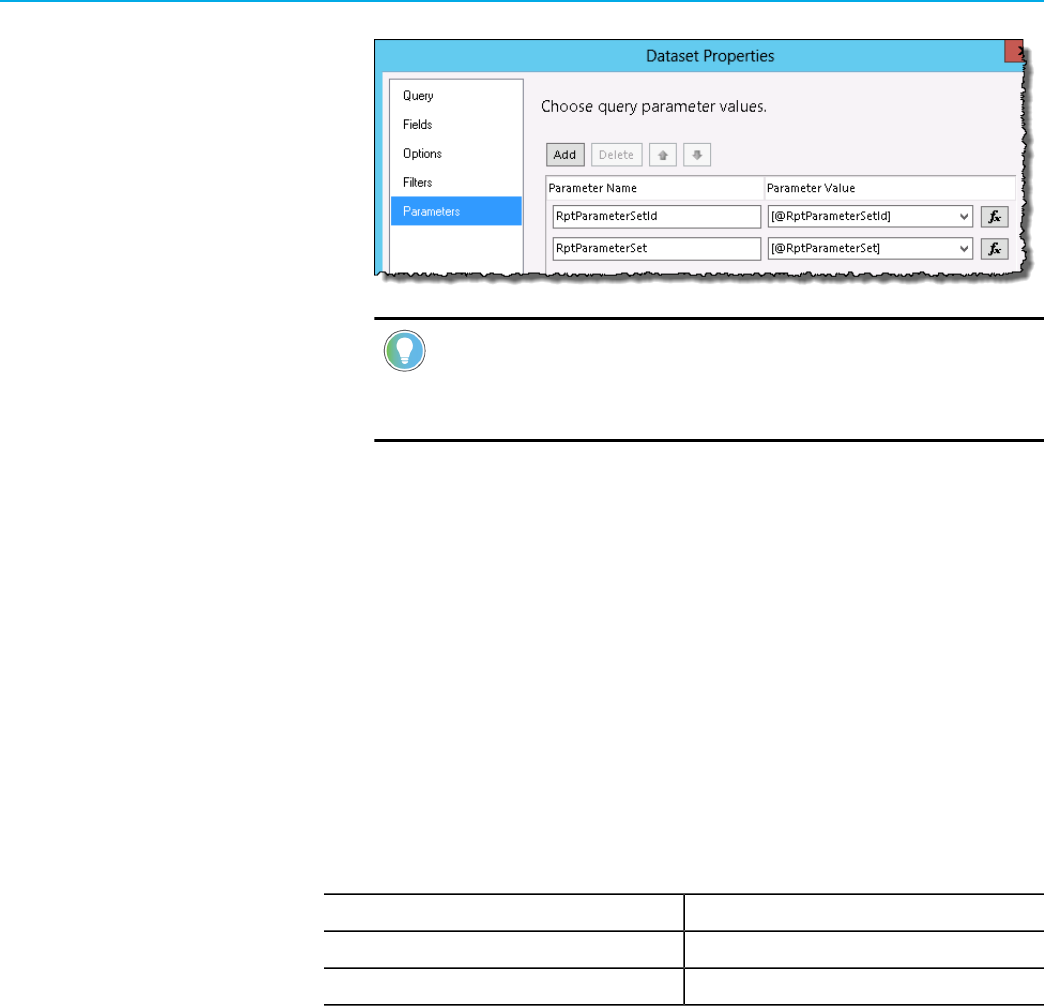
Chapter 5Structure and functionality
3. Click Parameters.
Tip:
The values of the dataset parameters are taken from the corresponding global report
parameters. Once the global report parameters are created, they are added to the Parameter
Value column automatically.
Report properties
When you create subreports or report templates, you must define their properties. They are already configured in the
SSDT project, unless otherwise stated.
Report references
The RDLUtil library is used to configure the functionality associated with parameter sets, as well as the style and
terminology properties of a report.
Use the RDLUtil library to link subreports and report templates with parameter sets. To do so, add a library reference
and create a ParameterSet class instance for a subreport or report template. There should be one class instance for
each query.
The default class instance names are the following:
Use this class instance name: When:
m_parameterSet You use a single query in your subreport.
m_parameterSetQueryName You use several queries in your subreport.
In this document we assume that you will use one query per subreport, and hence one parameter set class instance.
The EmptyTemplate.rdl report template includes the reference to the RDLUtil library, and parameter set class
instances for all the DPE queries.
To view the references and class instances
1.
In the Solution Explorer, double-click EmptyTemplate.rdl.
2.
In the Designer, right-click the empty area of the Design tab, and then click Report Properties.
The Report Properties dialog box appears.
3.
Click References.
Under Add or remove assemblies, the reference to the RDLUtil library is defined.
Rockwell Automation, Inc. RPTDPE-RM002D-EN-E - October 2023 39
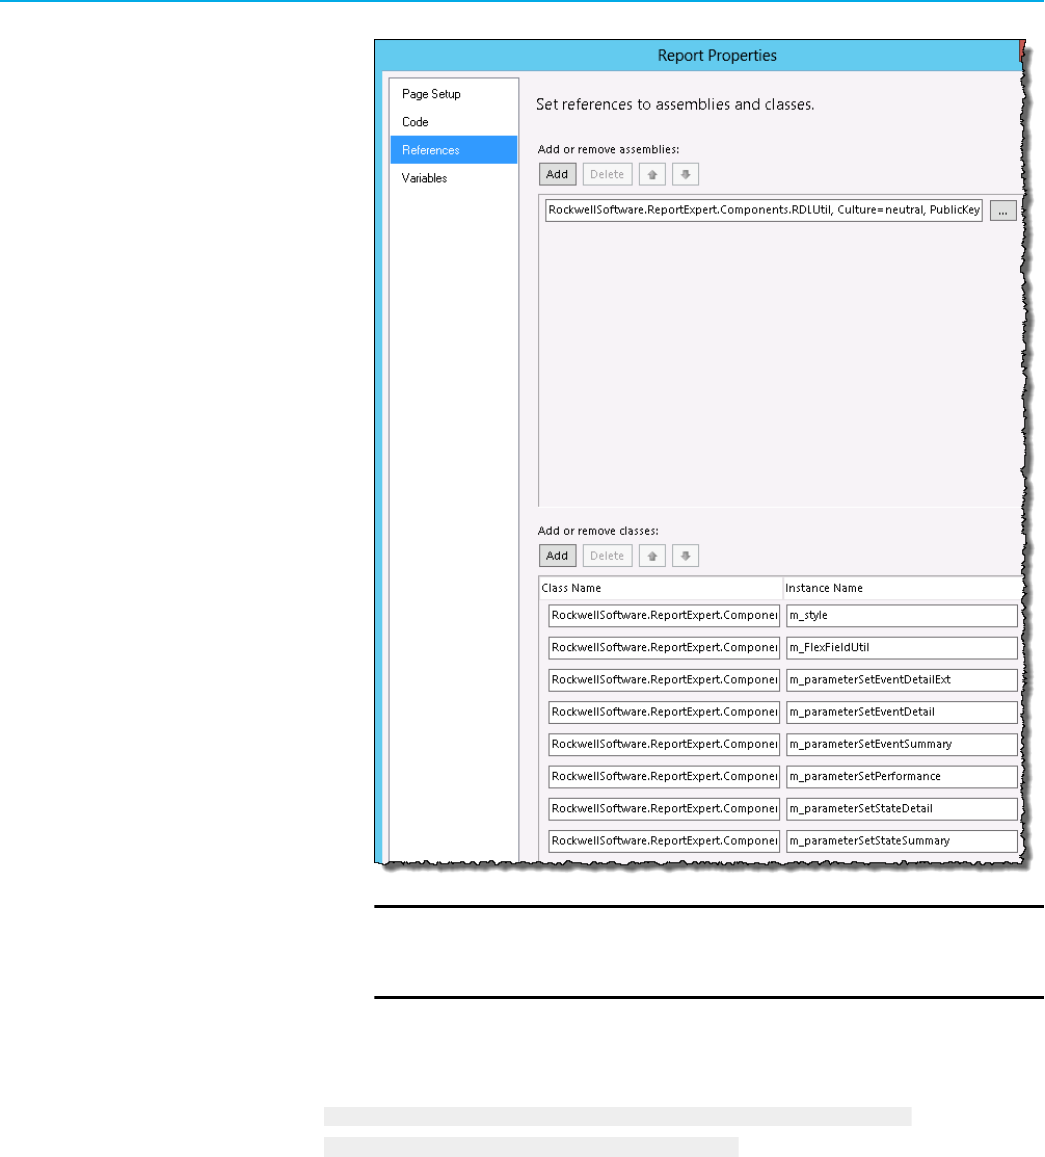
Chapter 5Structure and functionality
Under Add or remove classes, class names and their respective class instance names are listed.
NOTE:
The FlexFieldUtil class configured in the EmptyTemplate.rdl report template is used
by the EventAllDetailExt report template. It will not be covered in this document.
If you want to add another library reference, its complete name will also include the Report Expert version number,
for example:
RockwellSoftware.ReportExpert.Components.RDLUtil, Version=13.00.0.0,
Culture=neutral, PublicKeyToken=55624f8ac7c20aa6
40 RPTDPE-RM002D-EN-E - October 2023 Rockwell Automation, Inc.
Chapter 5Structure and functionality
If you want to use your report template and subreports with any version of Report Expert, you should remove the
version from the library reference name.
NOTE:
Refer to Advanced methods and properties of the RDLUtil library on page 90 on how to use
the parameter set class instance with advanced functionality of the RDLUtil library.
ParameterSet class instance
In order to initialize the ParameterSet class instance, add an OnInit event definition. This is applicable to both
subreports and report templates. The definition code has the following syntax:
Protected Overrides Sub OnInit()
m_parameterSet.Init(Report.Parameters!RptReportId.Value,Report.Parameters!
RptParameterSetId.Value, Report.Parameters!RptParameterSet.Value, "<Name of DPE
Report Query>", Report.User!Language)
End Sub
Where:
Item Description
m_parameterSet.Init The Init function that initializes the instance of the
ParameterSet class for use within the report. It is run when the
OnInit event for the report is raised by SSRS.
(Report.Parameters!RptReportId.Value,Report.Parameters!RptPa
rameterSetId.Value, Report.Parameters!RptParameterSet.Value,
The global report parameters:
• RptReportId - the database ID of the report.
•
RptParameterSetId - the database ID of the parameter
set.
•
RptParameterSet - the encoded parameter.
Note: If the report is deployed to Report Expert, the values of
the global report parameters are filled out automatically by
Report Expert.
"<Name of DPE Report Query>", The name for a particular DPE report query to be used, for
example: "Performance".
Report.User!Language) The built-in variable containing the language settings of a client
browser that are read and set by SSRS.
Rockwell Automation, Inc. RPTDPE-RM002D-EN-E - October 2023 41
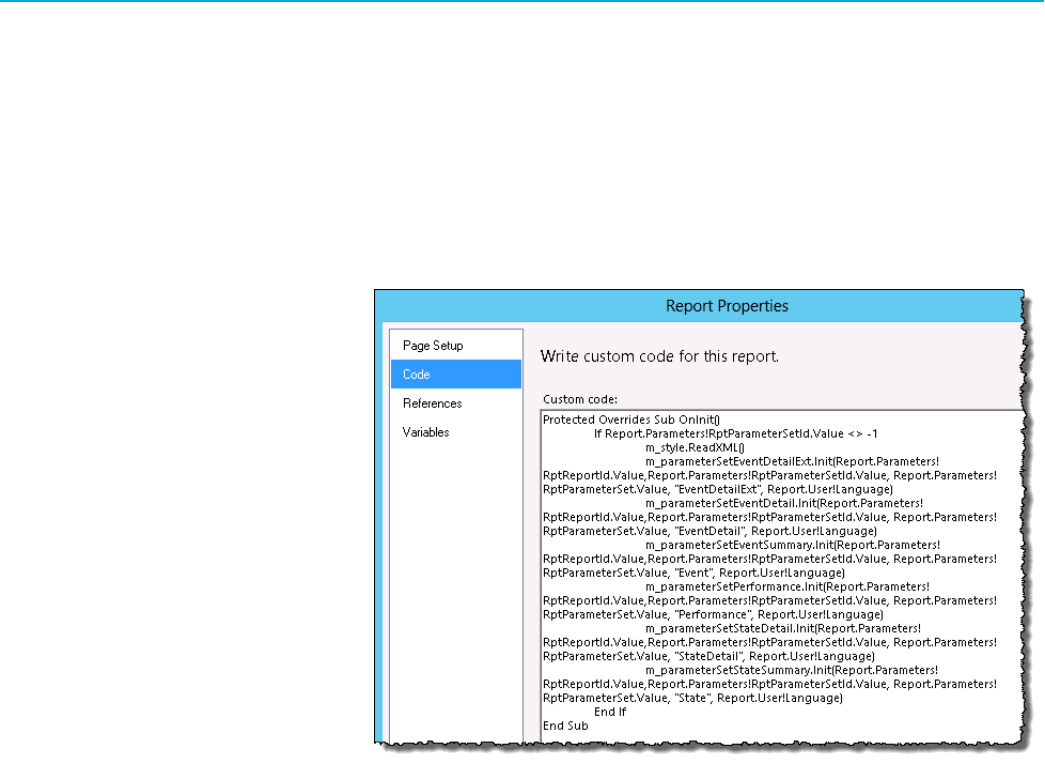
Chapter 5Structure and functionality
In the EmptyTemplate.rdl report template, the OnInit event definition is created for all the parameter set class
instances configured.
To view the OnInit event definition code
1.
In the Solution Explorer, double-click EmptyTemplate.rdl.
The Report Data window and the Designer for the selected report template appear.
2.
In the Designer, right-click the empty area of the Design tab, and then click Report Properties.
The Report Properties dialog box appears.
3.
Click Code.
Customize report styles
Use the RDLUtil library to modify the look of your custom subreports so that their layout resembles the standard
subreports of Report Expert. To do so, you must create and initialize an RDLStyle class instance for a subreport you
create.
In the EmptyTemplate.rdl report template, these settings are already configured.
To view the RDLStyle class instance reference
1.
In the Solution Explorer, double-click EmptyTemplate.rdl.
The Report Data window and the Designer for the selected report template appear.
2.
In the Designer, right-click the empty area of the Design tab, and then click Report Properties.
The Report Properties dialog box appears.
42 RPTDPE-RM002D-EN-E - October 2023 Rockwell Automation, Inc.
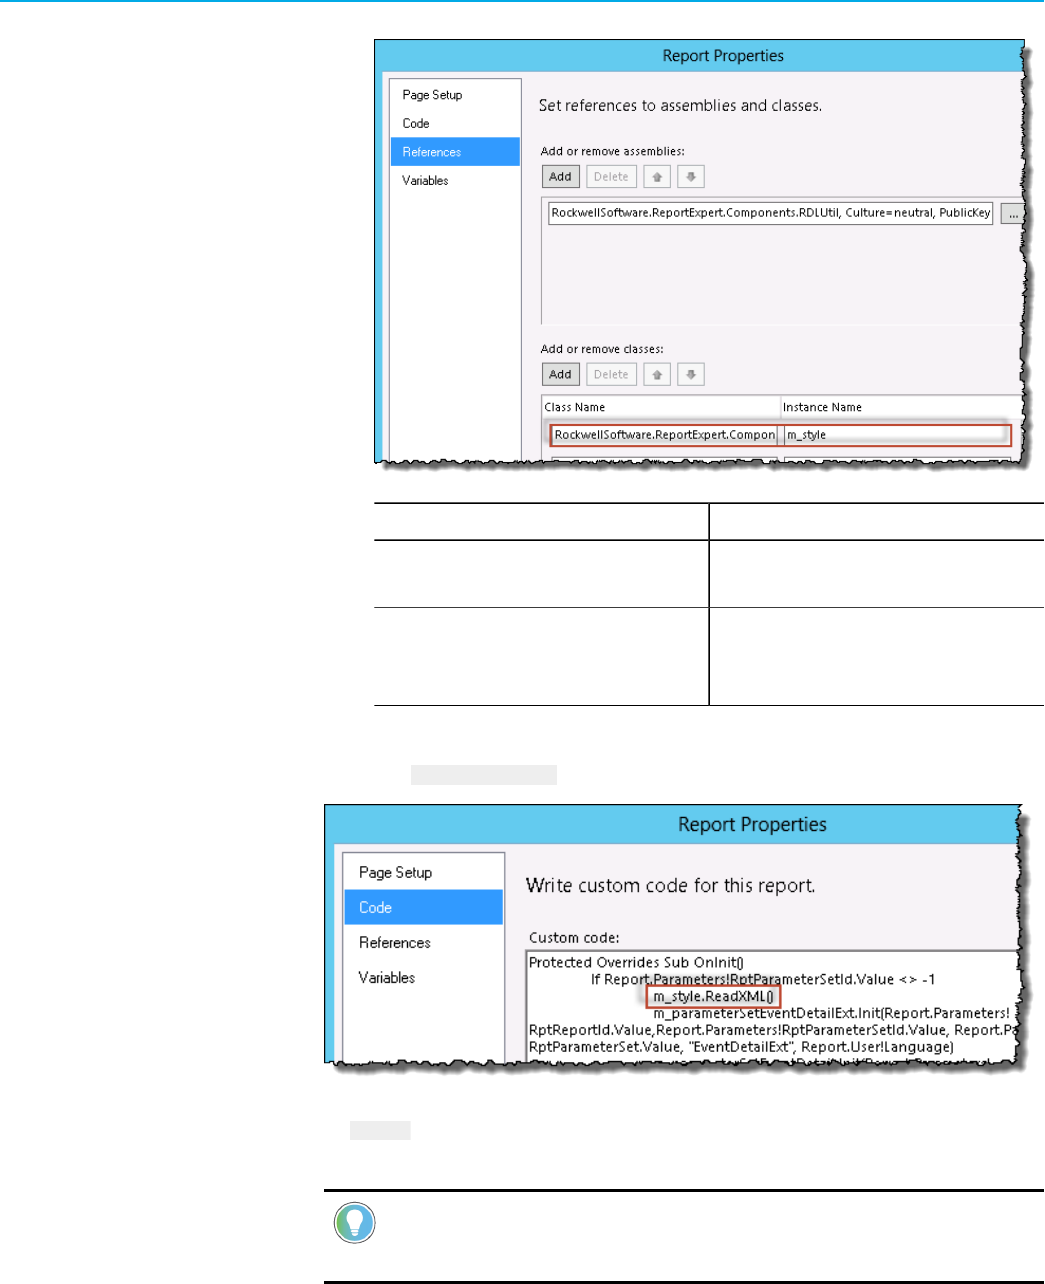
Chapter 5Structure and functionality
3. Click References.
Item Description
Class Name RockwellSoftware.ReportExpert.Components.RDLUtil.Style.R
DLStyle
Instance Name m_style
Note: The definition of the instance name comes from the
RDLUtil Library.
Once you define the RDLStyle class instance, you must add it to the existing definition of the OnInit event in the Code
tab, using the m_style.ReadXML() function:
The ReadXML function initializes the RDLStyle class instance to be used in the report. It is run when the OnInit event
for the report is raised by SSRS.
Tip:
For more information on using other style-related functionality in subreports, refer to Advanced
methods and properties of styles on page 93.
Rockwell Automation, Inc. RPTDPE-RM002D-EN-E - October 2023 43
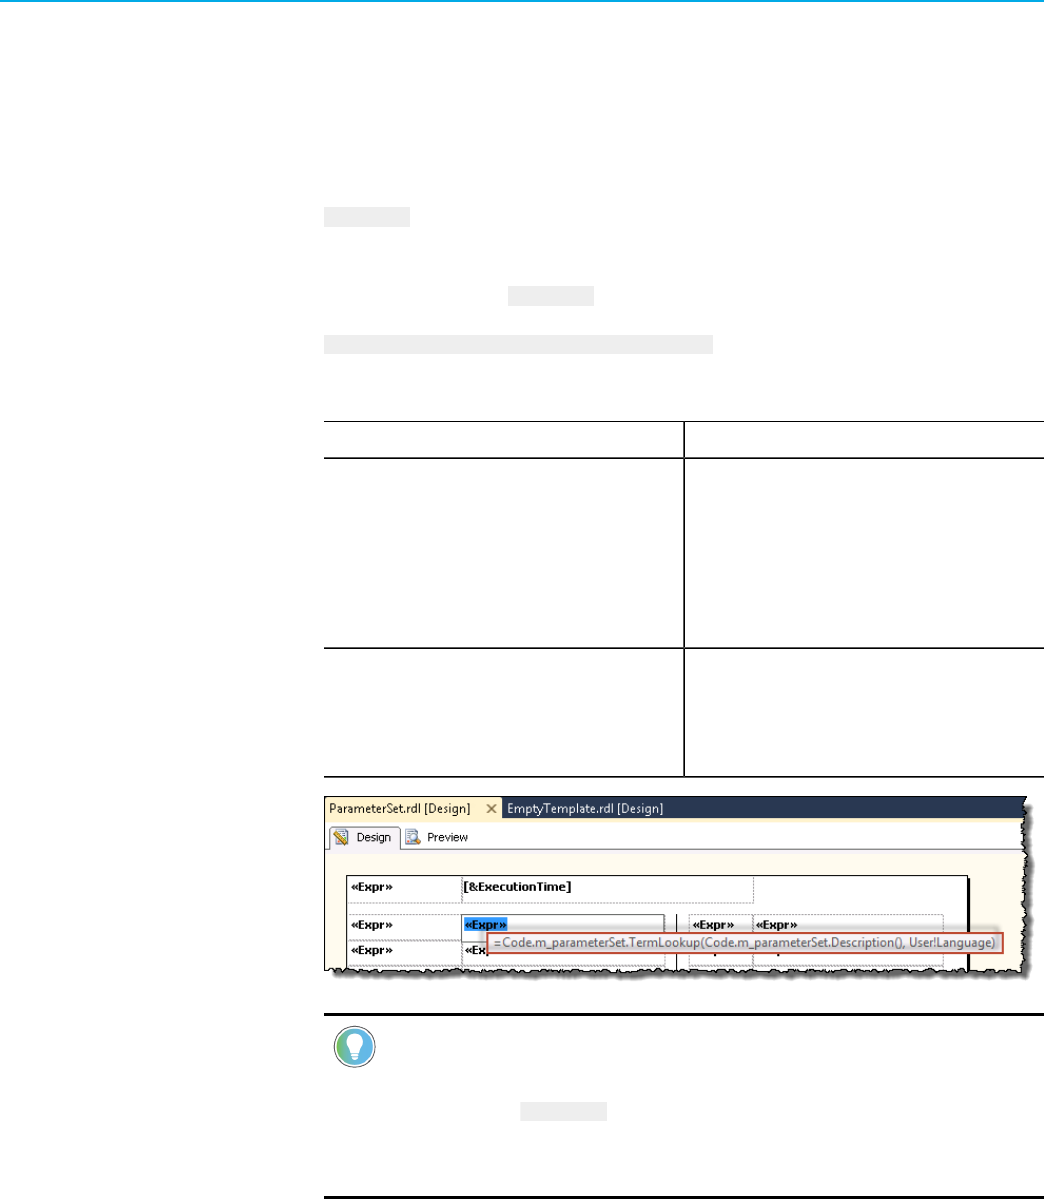
Chapter 5Structure and functionality
Terminology methods and properties
The terminology functionality of the RDLUtil library allows you to modify the look of your custom subreports so that
they use the vocabulary from the appropriate terminology customized for language options, which are set in the
client browser.
Once you define the m_parameterSet class instance in a subreport, you may use it with the terminology
TermLookup function to ensure that the term to which it refers, will be displayed in the subreport in the target
language.
The expression syntax for the TermLookup function is the following:
m_parameterSet.TermLookup("<Term>", Language)
Where:
This item: Is:
"<Term>" A string included in the default Report Expert terminology.
This string will be automatically replaced with another one,
depending on a specific terminology, which has been defined
and specified in the parameter set of a subreport (for example,
"Availability", "Throughput", "Quality", "Scrap Parts", "Quality %",
and so on).
Language A string defining the terminology target language. It may be
replaced with a fixed value, for example, EN-en, or a variable,
for example, User!Language, which takes the language
settings from the client machine.
Tip:
•
To make a report fully terminology-sensitive, all labels and headings displayed in a subreport
must use the TermLookup function.
• For information on using the parameter set class instance with other advanced functions of the
RDLUtil library, refer to Advanced methods and properties of the RDLUtil library on page 90.
Requirements of subreports
When you create custom report templates, you must make sure they are fully compliant with both DPE (in order
to connect to the FactoryTalk Metrics database) and the parameter set functionality (in order to implement the
parameter set functionality, including terminology). To ensure it, a custom report template should consist of a
default subreport with general settings (usually ParameterSet.rdl) and several subreports implementing particular
44 RPTDPE-RM002D-EN-E - October 2023 Rockwell Automation, Inc.
Chapter 5Structure and functionality
combinations of page/row/column groupings. Only one of the subreports with groupings may be visible at a time,
depending on the particular grouping combination defined in the parameter set.
While using standard DPE queries and standard Report Expert report templates, considerthe following structural
requirements and limitations:
•
Some of the parameter set settings (grouping, filtering, or sorting settings) are ignored by certain standard
DPE queries. For more information, refer to DPE standard queries on page 19.
•
Subreports based on the StateDetail query are always sorted by Line, Sequence (defined order of the work
cells), and Start_Time. Sorting settings are ignored.
•
You cannot implement all possible groupings into a single matrix, because the count and type of groupings
for a report must be static. Therefore, you must create multiple subreports, each supporting a fixed row and
column grouping combinations.
•
DPE supports three types of groupings:
•
By row (RG)
•
By column (CG)
•
By page (PG).
The groupings allow you to determine how data will be arranged in reports.
Standard Report Expert report templates support the following grouping combinations:
Report template / introduced in DPE version: DPE query Groupings
Dashboard 2.0 Event
Performance
StateDetail
0 PG 2 CG 1 RG
Order:
1.
Event Category
2. Event Name
3.
Shift
EventAllDetail 2.0 EventDetailExt 0 PG 0 RG 0 CG
EventDetail 1.1 EventDetail 1 PG 5 RG 0 CG
EventDetailPaged 3.2 EventDetail 1 PG 5 RG 0 CG
EventHistoryString 2.2 EventDetailExt
EventHistoryValue 2.2 EventDetailExt
EventOverview 2.2 EventDetailExt
EventChart 2.0 Event 1 PG 3 RG
EventConfiguration 2.2 EventConfiguration
EventSummary 1.1 Event 1 PG 3 RG 2 CG
Fault 2.0 Performance 1 PG 3 RG 2 CG
Performance 1.1 Performance 1 PG 3 RG 2 CG
Production 1.1 Performance 1 PG 3 RG 2 CG
Production Overview 2.0 Performance 1 PG 5 RG 0 CG
Quality 1.1 Performance 1 PG 3 RG 2 CG
Root Cause Analysis 1.1 StateDetail 0 PG 0 RG 0 CG
State Detail 2.0 StateDetail 0 PG 0 RG 0 CG
State Summary 2.0 State 1 PG 3 RG 2 CG
Rockwell Automation, Inc. RPTDPE-RM002D-EN-E - October 2023 45
Chapter 5Structure and functionality
Report template / introduced in DPE version: DPE query Groupings
Throughput 1.1 Performance 1 PG 3 RG 2 CG
Uptime 1.1 Performance 1 PG 3 RG 2 CG
Widget_3OEEComponents 1.1 Performance
Widget_EventCountAndDurat
ion
1.1 Event
Widget_FaultSummary 1.1 Performance
Widget_GoodPartsVsScrapP
arts
1.1 Performance
Widget_LastState 1.1 StateDetail
Widget_MachineStates 1.1 StateDetail
Widget_OEE 1.1 Performance
Widget_ProductionSummary 1.1 Performance
Widget_UptimeSummary 1.1 Performance
Widget_UptimeVsDowntime 1.1 Performance
0 PG 2 CG 1 RG
Order:
1.
Event Category
2. Event Name
3.
Shift
Note:For the Dashboard and Widget report templates, the type and order of groupings is fixed.
Due to the DPE limitation of the number of groupings, a subreport may support up to five groupings of any type
in total. For example, there may be a subreport that supports five groupings by page, no groupings by row, and no
groupings by column. The limitation is artificial and is related to how the Report Expert report templates are created.
If you want to use the drillthrough functionality in your reports, the reports should be structured so that they support
up to one-pagegrouping, up to five-rowgroupings, and up to two-columngroupings. For more information, refer to
Drillthrough capability on page 47.
Number of subreports and groupings
The report template should include as many subreports as there are grouping combinations that you want to
implement.
Example
A report that accepts up to three-rowgroupings and up to two-columngroupings will contain the following
subreports:
1.
ReportNameR0C0
2.
ReportNameR0C1
3.
ReportNameR0C2
4.
ReportNameR1C0
5.
ReportNameR1C1
6.
ReportNameR1C2
7.
ReportNameR2C0
8.
ReportNameR2C1
9.
ReportNameR2C2
10.
ReportNameR3C0
46 RPTDPE-RM002D-EN-E - October 2023 Rockwell Automation, Inc.
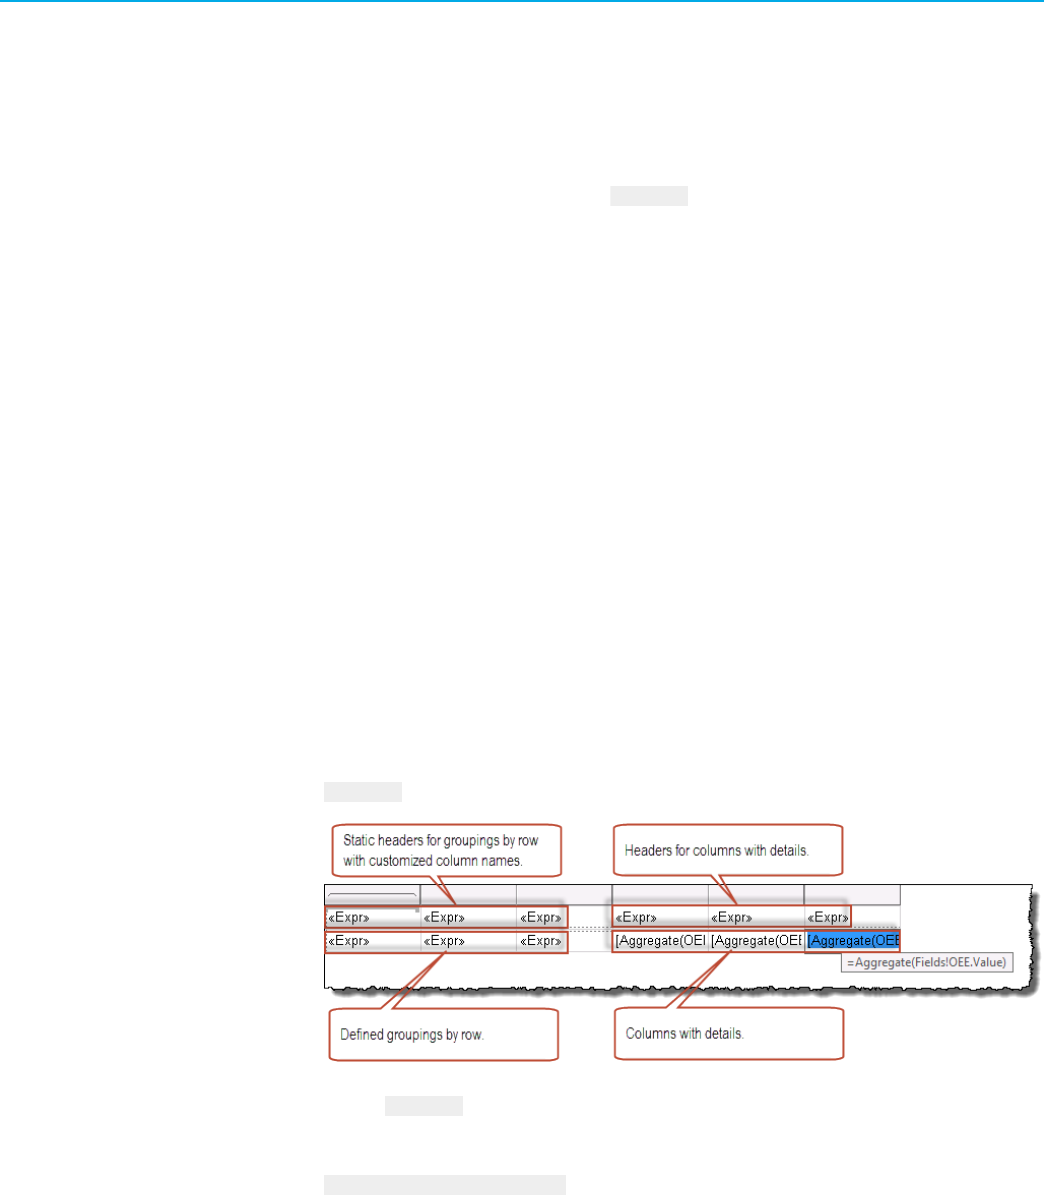
Chapter 5Structure and functionality
11. ReportNameR3C1
12.
ReportNameR3C2
Aggregate function
DPE for FactoryTalk Metrics provides custom data on each level of aggregation. To show this data with SQL Server
Reporting Services (SSRS), you have to use the Aggregate function. Without this function, the report data is based
on data from the bottom level of aggregation.
Aggregate with page grouping
If the parameter set includes one grouping by page, one grouping by row, and one grouping by column, DPE will return
the data rows aggregated using:
• One grouping (by page).
• Two groupings (by page and by row).
•
Three groupings (by page, by row, and by column).
In this way, proper calculations of KPIs values are provided, and you do not have to create groupings in the client.
Aggregate without page grouping
When the parameter set does not involve grouping by page, DPE makes an additional "empty" page grouping. The
record’s PageGroup1 column is filled with a pg1 value. Each standard subreport will function correctly if a one-page
grouping is selected, or if no page grouping is selected. This is why the number of subreports required is based on
row and column grouping combinations only.
To display only the necessary data for a specific level of aggregation (when defining the content of a matrix), use the
Aggregate function from SSRS:
Using the Aggregate function in the columns with details assures that the value displayed is the one for an
appropriate level of aggregation, for example:
=Aggregate(Fields!OEE.Value)
For an example of the aggregate function, refer to Step 5: Configure the Drillthrough property on page 61 in the Add
a matrix: tablixKPIs on page 57 tutorial.
Drillthrough capability
Each of the data fields in the matrix object in most of the report templates is a link that displays another report. This
drillthrough behavior allows you to look at a subset of the data (one line in a report) in more detail.
Rockwell Automation, Inc. RPTDPE-RM002D-EN-E - October 2023 47
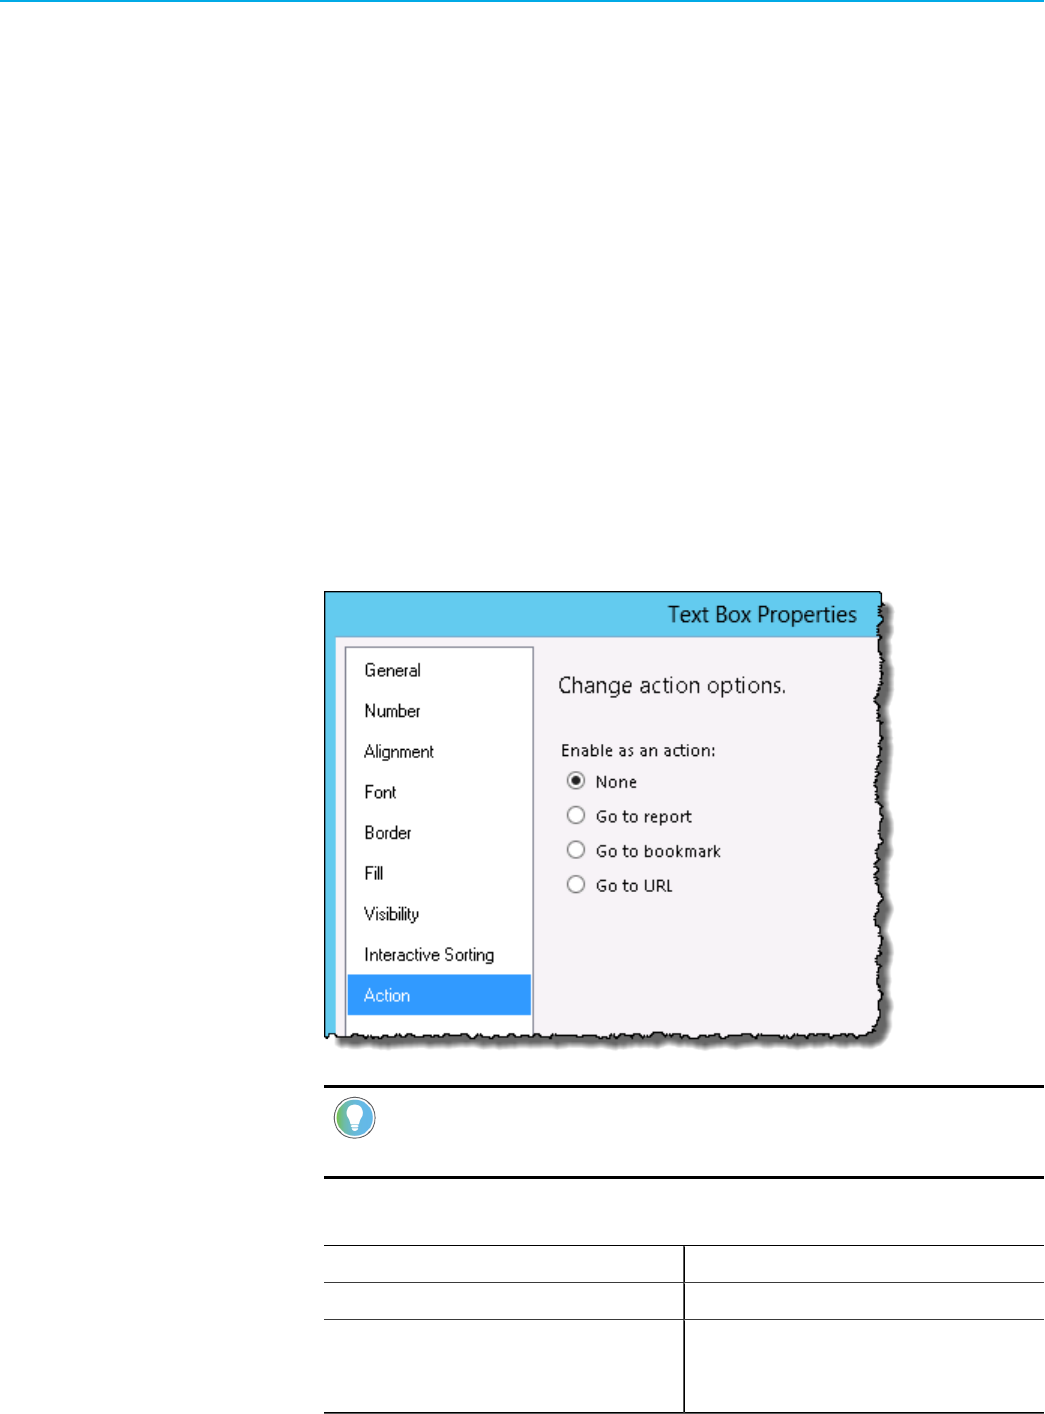
Chapter 5Structure and functionality
You can drill through a single data value by clicking a value in a report. The resulting report will display data that is
more filtered (limited to the value that was drilled-through) and with more granularity based on a new row grouping.
There is a set progression, or hierarchy, of a data grouping as you drill deeper. The hierarchy of groupings for the
drillthrough functionality is the following:
1.
Site
2.
Area
3.
Line
4. Work Cell
5.
Month
6.
Week
7.
Day
8.
Shift
9.
Hour
For example, if you drill through in a report that contains a week’s data for a single work cell in a single value (6), the
resulting report will be grouped by day (7).
You can set the drillthrough capability for a report object (for example, a matrix cell) in the Action tab of the object
properties dialog box (for example, Text Box Properties).
Tip:
To open the Text Box Properties dialog box, right-click the text box whose properties you want to
display, and then click Text Box Properties.
There are the following action options available:
Item Description
None No hyperlink action is selected.
Go to report Points to the report that will be displayed when the user clicks
the hyperlink, once you provide the ParameterSet and the
ParameterSetId values of the target report. This method cannot
48 RPTDPE-RM002D-EN-E - October 2023 Rockwell Automation, Inc.
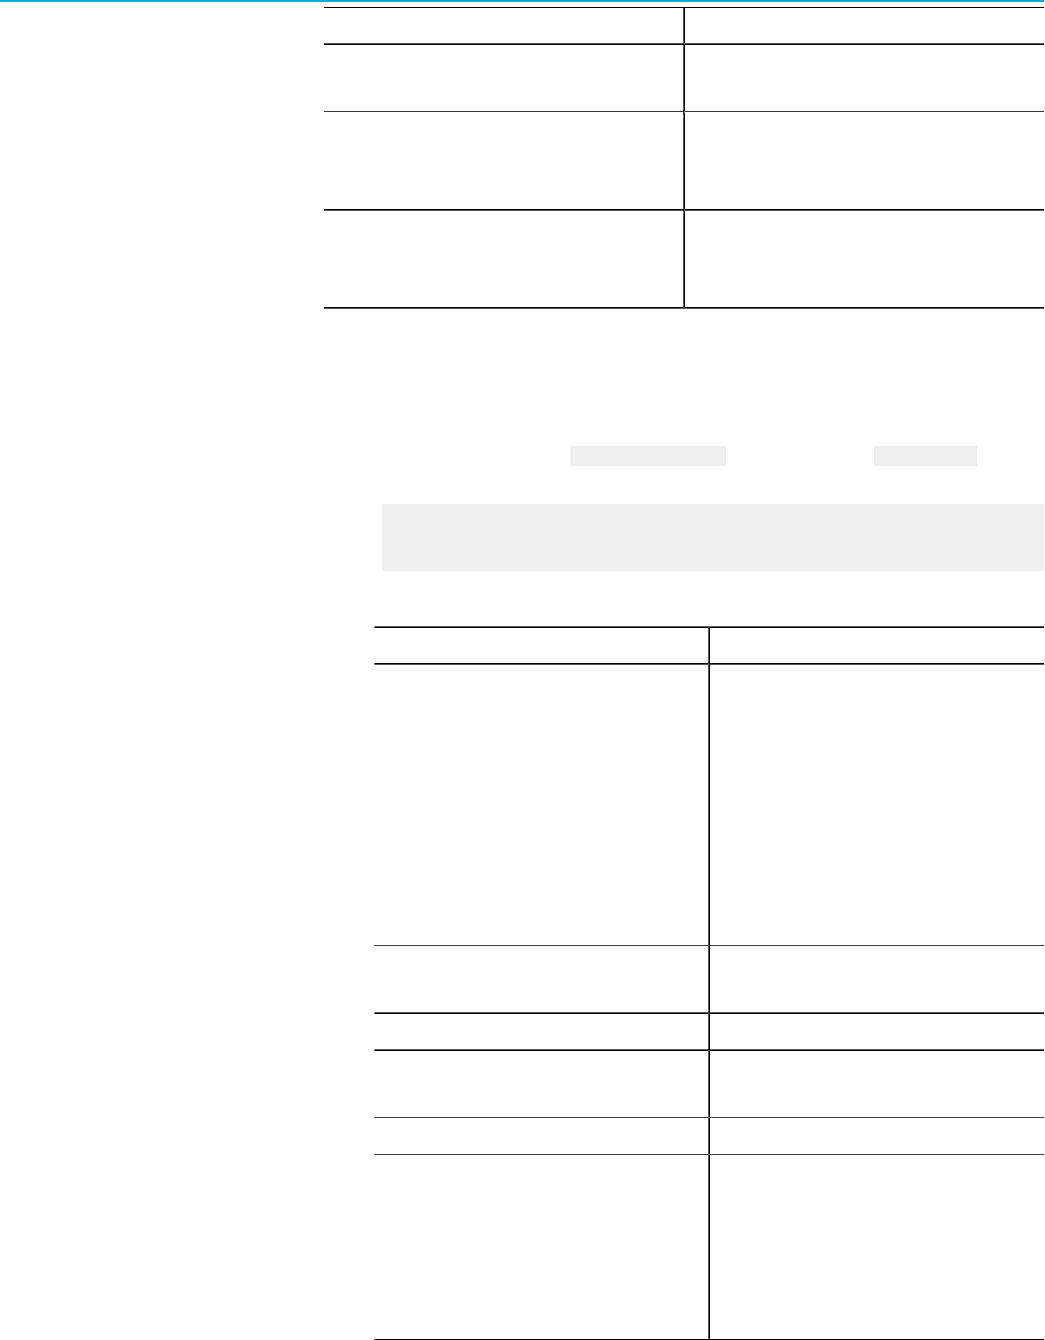
Chapter 5Structure and functionality
Item Description
be used with the drillthrough capability, because ParameterSet
objects provide only complete URLs of target reports.
Go to bookmark Points to an element in the report that will be displayed when
the user clicks the hyperlink. You must define a Bookmark ID for
the element you want to use as a bookmark.
Go to URL Points to the URL, to which the user will be redirected upon
clicking the hyperlink. This option is recommended for the use
with the drillthrough capability.
To configure the drillthrough functionality using the Go to URL option
1.
Under Enable as an action, click Go to URL.
2.
Under Select URL, type the link to which you want the user to be redirected when they click the hyperlink. You
can type a static link or use the GetDrillThroughURL function offered by the ParameterSet class.
Usage:
=Code.m_parameterSet.GetDrillThroughURL("ReportName",AggregationLevel,RowGroup1,RowGroup2,rowG
roup3,rowGroup4,rowGroup5,ColGroup1,ColGroup2,PageGroup1,"FieldName")
Where:
Item Description
ReportName The name of a report.
Use the name of the current report for the ReportName
value if you define the FieldName parameter as one of the
values listed in the table.
If you do not specify the FieldName parameter, or provide
a value for it other than the ones listed in the table, use for
the ReportName parameter the name of the report to which
you want to be redirected. It may be either a target report
or the current report.
AggregationLevel The level of the requested report in the drillthrough
hierarchy.
RowGroup1 … RowGroup5 The columns for the grouping by row (up to 3 groupings).
ColGroup1 - ColGroup2 The columns for the grouping by column (up to 2
groupings).
PageGroup1 The column for the grouping by page (max 1 grouping).
FieldName A value for which you want to execute the drillthrough
function.
If you use one of the values listed in the tablefor it, you will
be redirected to the report associated with the given value.
If you do not specify the FieldName parameter (""), or
use it fora value that is not listed in the table, you will
Rockwell Automation, Inc. RPTDPE-RM002D-EN-E - October 2023 49

Chapter 5Structure and functionality
Item Description
be redirected to the report specified in the ReportName
parameter.
Tip:
For information on grouping limitations, refer to Structural and grouping requirements of
subreports on page 44.
The following table lists the values of the FieldName parameter and their corresponding target reports.
FieldName parameter value Target report name
"Availability" "Uptime"
"Detail" "EventDetail"
"FaultDetail" "EventSummary"
"Quality" "Quality"
"Run Time" "Uptime"
"Scrap Parts" "Quality"
"StateDetail" "StateDetail"
"Throughput" "Throughput"
"Total Parts" "Production"
"Uptime" "Uptime"
"Uptime %" "Uptime"
"Uptime Percent" "Uptime"
In the standard Report Expert report templates, the drillthrough functionality is defined with the following code:
=Code.m_parameterSet.GetDrillThroughURL("ReportName",Aggregate(Fields!
AggregationFieldCount.Value),Aggregate(Fields!RowGroup1.Value),Aggregate(Fields!
RowGroup2.Value),Aggregate(Fields!RowGroup3.Value),"","",Aggregate(Fields!
ColGroup1.Value),Aggregate(Fields!ColGroup2.Value),Fields!
PageGroup1.Value,"FieldName
Tip:
The quotation marks ("") in the expressions mark a row grouping that is not supported by a given
subreport.
The sample Go to URL expressionwill redirect you from the Performance subreport to the Uptime report. The
Performance subreport supports two groupings by row and no groupings by column.
=Code.m_parameterSet.GetDrillThroughURL("Performance",Aggregate(Fields!
AggregationFieldCount.Value),Aggregate(Fields!RowGroup1.Value),Aggregate(Fields!
RowGroup2.Value),"","","",Fields!PageGroup1.Value,"Uptime")
For an example of the drillthrough function, refer to Step 5: Configure the drillthrough property on page 61 in the
Add a matrix: tablixKPIs on page 57 tutorial.
50 RPTDPE-RM002D-EN-E - October 2023 Rockwell Automation, Inc.

Chapter 5Structure and functionality
Tip:
For information on using the drillthrough method with another set of arguments, and other advanced
functions of the RDLUtil library, refer to Advanced methods and properties of the RDLUtil library on page
90.
• For more information on the drillthrough capability, refer to the MSDN online documentation:
http://msdn.microsoft.com/en-us/library/aa337439.aspx
http://msdn.microsoft.com/en-us/library/ms251765(VS.80).aspx
Rockwell Automation, Inc. RPTDPE-RM002D-EN-E - October 2023 51
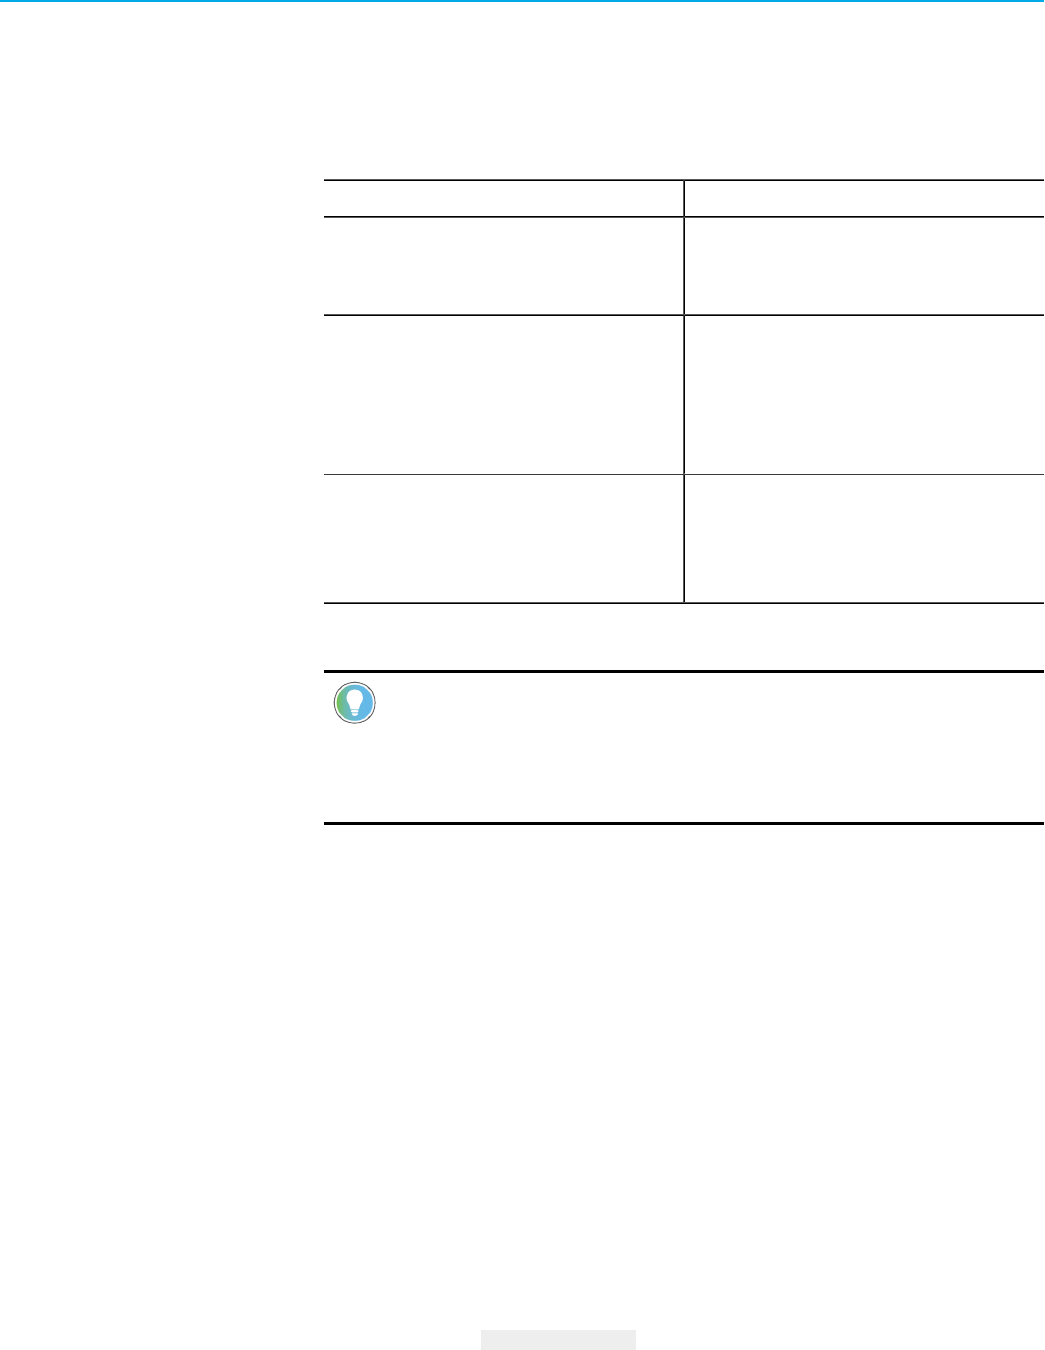
Chapter 6
Creating a report template
In this chapter, you will create a report template with subreports.
The new report will display the following Key Performance Indicators (KPI):
Item Description
OEE
(Overall Equipment Efficiency)
The field already available in the Performance query in DPE. OEE
is calculated with the following formula:
OEE = (Good Parts * Ideal Cycle Time)/Available Time
TEEP
(Total Effective Equipment Productivity)
The field not exposed by any DPE query. TEEP is similar to the
OEE calculation, only it uses Total Time instead of Available
Time in the formula:
TEEP = (Good Parts * Ideal Cycle Time)/Total Time
TEEP = OEE*(Available Time/Total Time)
MME
(Mechanical Machine Efficiency)
The field not exposed by any DPE query. It is an efficiency
calculation that excludes all stopped time except machine
faults. MME is calculated with the following formula:
MME = Running Time /(Running Time + Fault Time)
You will define the two new KPIs – TEEP and MME – as calculated fields in the dataset configuration.
Tip:
To comply with the Report Expert requirements with regard to the number of subreports and
grouping combinations, the report template should include as many subreports as there are grouping
combinations that you want to implement. For more information, refer to Number of subreports and
grouping combinations on page 46.
The report template will be called NewPerformance and will consist of the following subreports:
•
NewPerformanceR2C0 subreport, which will support two-row groupings and no-column groupings. Creating
subreports for the other grouping combinations will not be covered, but the process is similar. The subreport
will use the Performance query with Performance dataset.
•
ParameterSet subreport with general settings. You will use the standard Report Expert parameter set
subreport in the SSDT project.
You will use RptCustomDataSource.rds as the custom shared data source.
Create NewPerformanceR2C0 subreport
Perform the following steps to create the NewPerformanceR2C0 subreport.
To create the NewPerformanceR2C0 subreport
1. Go to the location of your SSDT project.
2.
Create a copy of the EmptyTemplate.rdl report template.
3.
Save the copy as NewPerformanceR2C0.
4.
In the Solution Explorer, right-click Reports, and then click Add > Existing Item.
The Add Existing Item - RptReports dialog box appears.
52 RPTDPE-RM002D-EN-E - October 2023 Rockwell Automation, Inc.
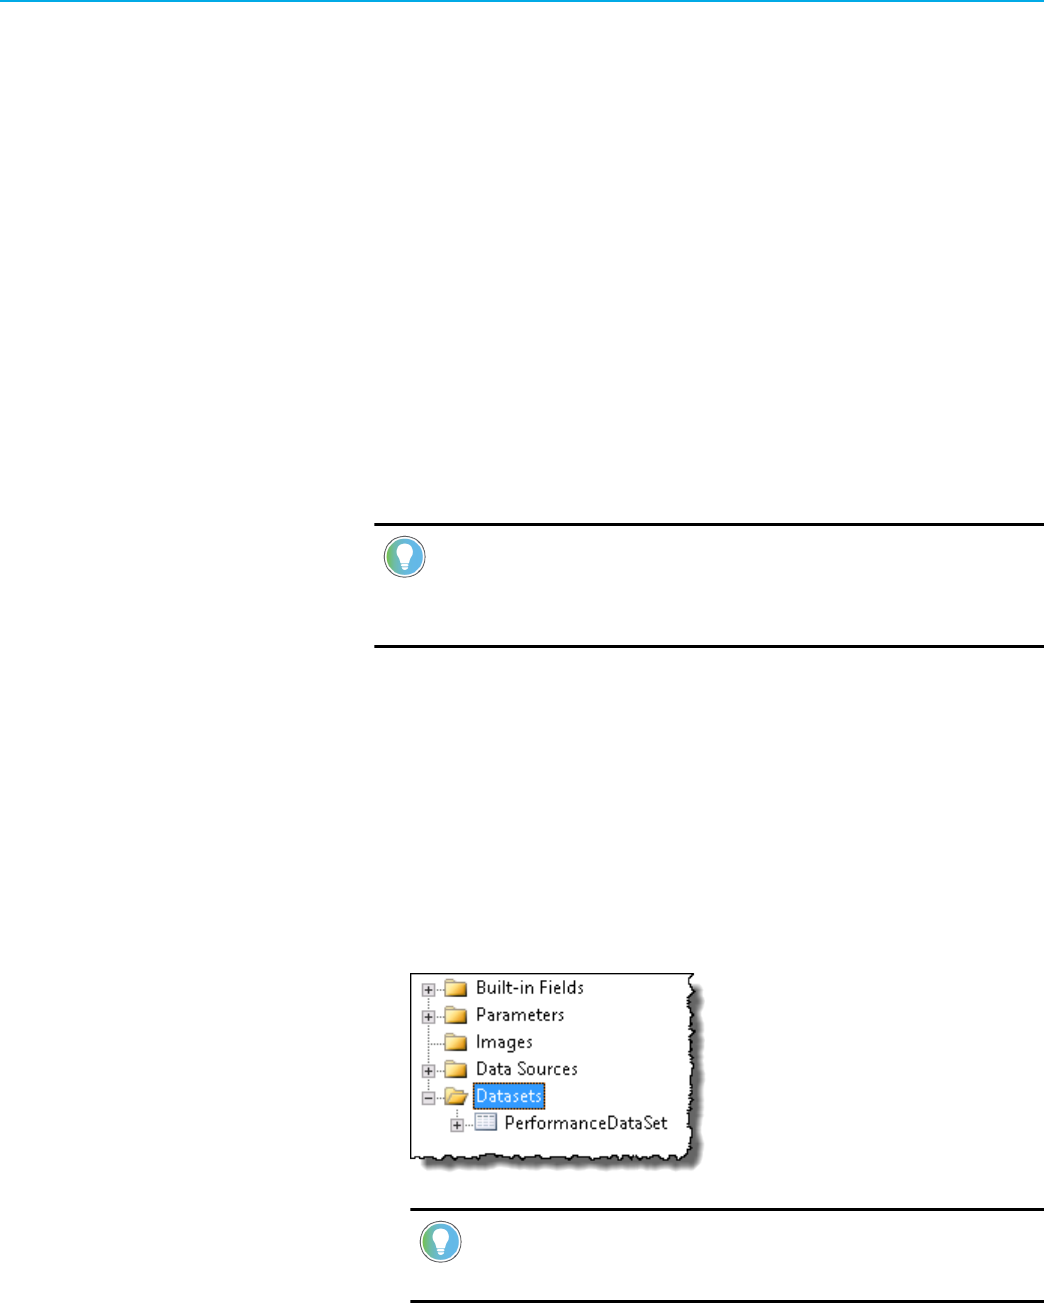
Chapter 6Creating a report template
5. Navigate to and select the NewPerformanceR2C0 subreport.
6.
Click Add.
The report is added to the Reports tree in the Solution Explorer.
Delete redundant datasets
In the SSDT project, the majority of settings, such as the shared data source, datasets, report parameters and
properties, are already defined. You will adjust some of them to specific subreport requirements.
The EmptyTemplate.rdl report template contains configurations of all the queries. Since the NewPerformanceR2C0
subreport will use only one query - Performance - you must delete references to the other queries from the
subreport.
To delete redundant datasets
1.
In the Solution Explorer, double-click the NewPerformanceR2C0 subreport.
The Report Data tab appears next to the Solution Explorer, and the subreport appears in the right pane of the
window.
Tip:
If the Report Data window does not appear, do either of the following to display it:
◦
On the View menu, click Report Data.
◦ Press Ctrl+Alt+D.
2.
On the Report Data tab, expand Datasets.
3.
Click EventDataSet, and then press Delete.
4.
Click Yes in the message dialog box that appears.
5.
Repeat the steps for the following datasets:
◦
EventDetailDataSet
◦ EventDetailExtendedDataSet
◦ StateDataSet
◦
StateDetailDataset
Your NewPerformanceR2C0 subreport should have now only PerformanceDataSet listed under
Datasets:
Tip:
It is recommended that you delete unused datasets and dataset references in order to
improve the subreport performance during execution.
Remove references to datasets
Perform the following steps to remove references to the deleted datasets.
Rockwell Automation, Inc. RPTDPE-RM002D-EN-E - October 2023 53
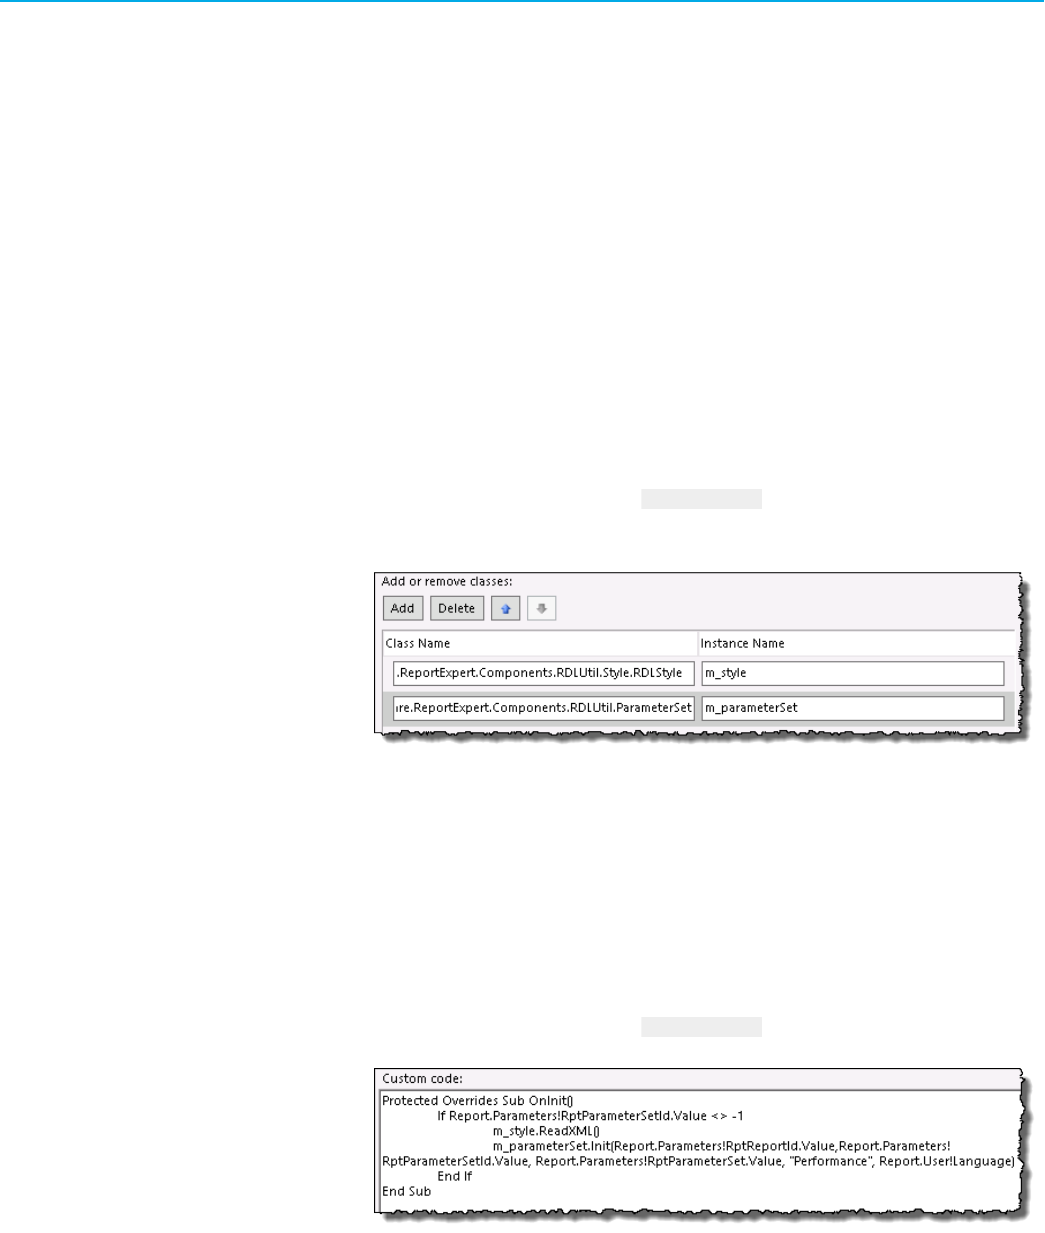
Chapter 6Creating a report template
To remove references to the deleted datasets
1.
Right-click the design surface of the NewPerformanceR2C0 subreport, and then click Report Properties.
The Report Properties dialog box appears.
2.
Click References. You have there the following parameters defined:
◦
Under Add or remove assemblies: The RDLUtil library.
◦ Under Add or remove classes: Parameter set classes for each dataset that were originally configured
in the EmptyTemplate.rdl report template, and parameter set class instance names assigned to each
class.
3.
Under Add or remove classes, click m_FlexFieldUtil, and then click Delete.
4.
Repeat step 3 for the following classes and their instances (listed by instance names):
◦
m_parameterSetEventDetailExt
◦ m_parameterSetEventDetail
◦ m_parameterSetEventSummary
◦
m_parameterSetStateDetail
◦
m_parameterSetStateSummary
5.
Rename m_parameterSetPerformance to m_parameterSet.
Your NewPerformanceR2C0 subreport should have now only the following classes and their instances
assigned:
6. In the left pane of the window, click Code.
7.
In the OnInit event definition, delete all expressions that point to the following parameter set class instances:
◦
m_FlexFieldUtil
◦ m_parameterSetEventDetailExt
◦ m_parameterSetEventDetail
◦
m_parameterSetEventSummary
◦
m_parameterSetStateDetail
◦
m_parameterSetStateSummary
8.
Rename m_parameterSetPerformance to m_parameterSet.
Your OnInit definition should now be configured like in the following figure.
9.
Click OK.
Configure datasets
Default dataset fields for PerformanceDataSet are already configured in your subreport. You will now add the MME
dataset fields.
54 RPTDPE-RM002D-EN-E - October 2023 Rockwell Automation, Inc.
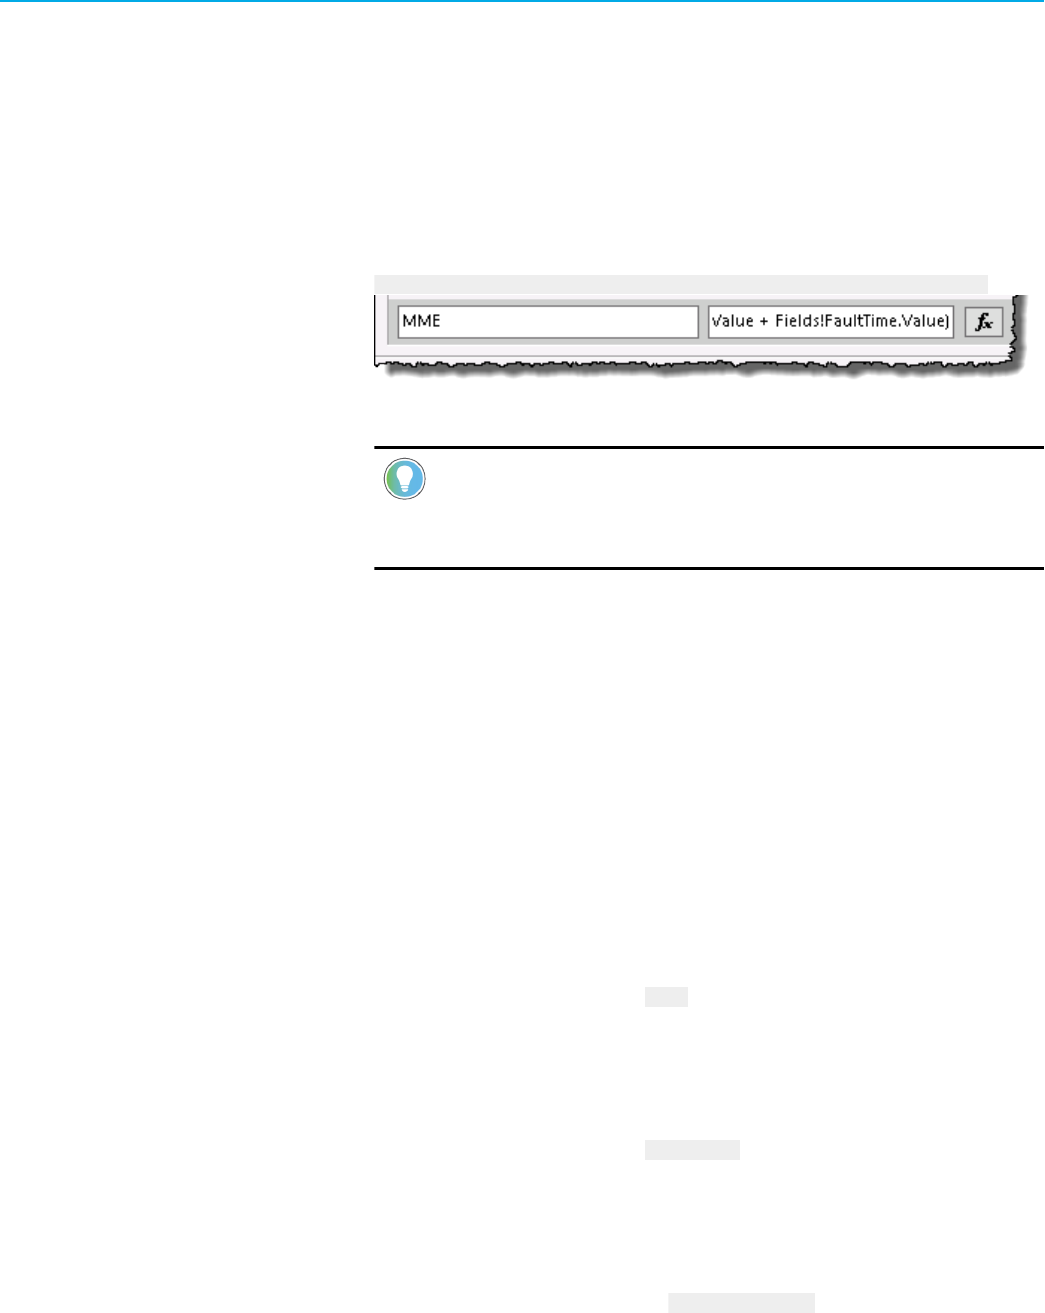
Chapter 6Creating a report template
To add MME dataset fields
1.
On the Report Data tab, right-click PerformanceDataSet, and then click Dataset Properties.
The Dataset Properties dialog box appears.
2.
In the left pane of the window, click Fields.
3.
Click Add, and then click Calculated Field.
New boxes for the field name and field source appear at the bottom of the list of fields.
4.
Inthe Field Name box, type MME.
5. In the Field Source box, type:
=Fields!RunTime.Value / (Fields!RunTime.Value + Fields!FaultTime.Value)
6.
Click OK.
Tip:
If you want to have the MME dataset fields available for localization, you should add them to
the default terminology. For more information, refer to the FactoryTalk Report Expert User Guide,
section Conguring Terminologies.
Add a list: List1
In this step, you will add a list to the subreport. Lists and matrices are templates of tablix data regions.
This list will be a container of all other objects of your subreport.
To add a list to the subreport
1.
On the View menu, click Toolbox.
The Toolbox window appears.
2.
Under Report Items, click List and drag it to the subreport design surface.
3.
Using the resize pointer, enlarge the list.
4.
Right-click the list, and then click Rectangle Properties.
The Rectangle Properties dialog box appears.
5.
Under Name, replace the default name with List1.
6.
Click OK.
7.
Click in the middle of the list object so that the handle graphics appear around it.
8.
Right-click either the left or the top handle, and then click Tablix Properties.
The Tablix Properties dialog box appears.
9.
Under Name, replace the default name with List1Tablix.
10.
Under Dataset name, select PerformanceDataSet.
11.
Click OK.
12.
Right-click either the left or the top handle, and then click Row Group > Group Properties.
The Group Properties dialog box appears.
13.
Under Name, replace the default name with the List1GroupDetails.
14.
Under Group expressions, click Add.
15.
In the Group on text box, type:
Rockwell Automation, Inc. RPTDPE-RM002D-EN-E - October 2023 55
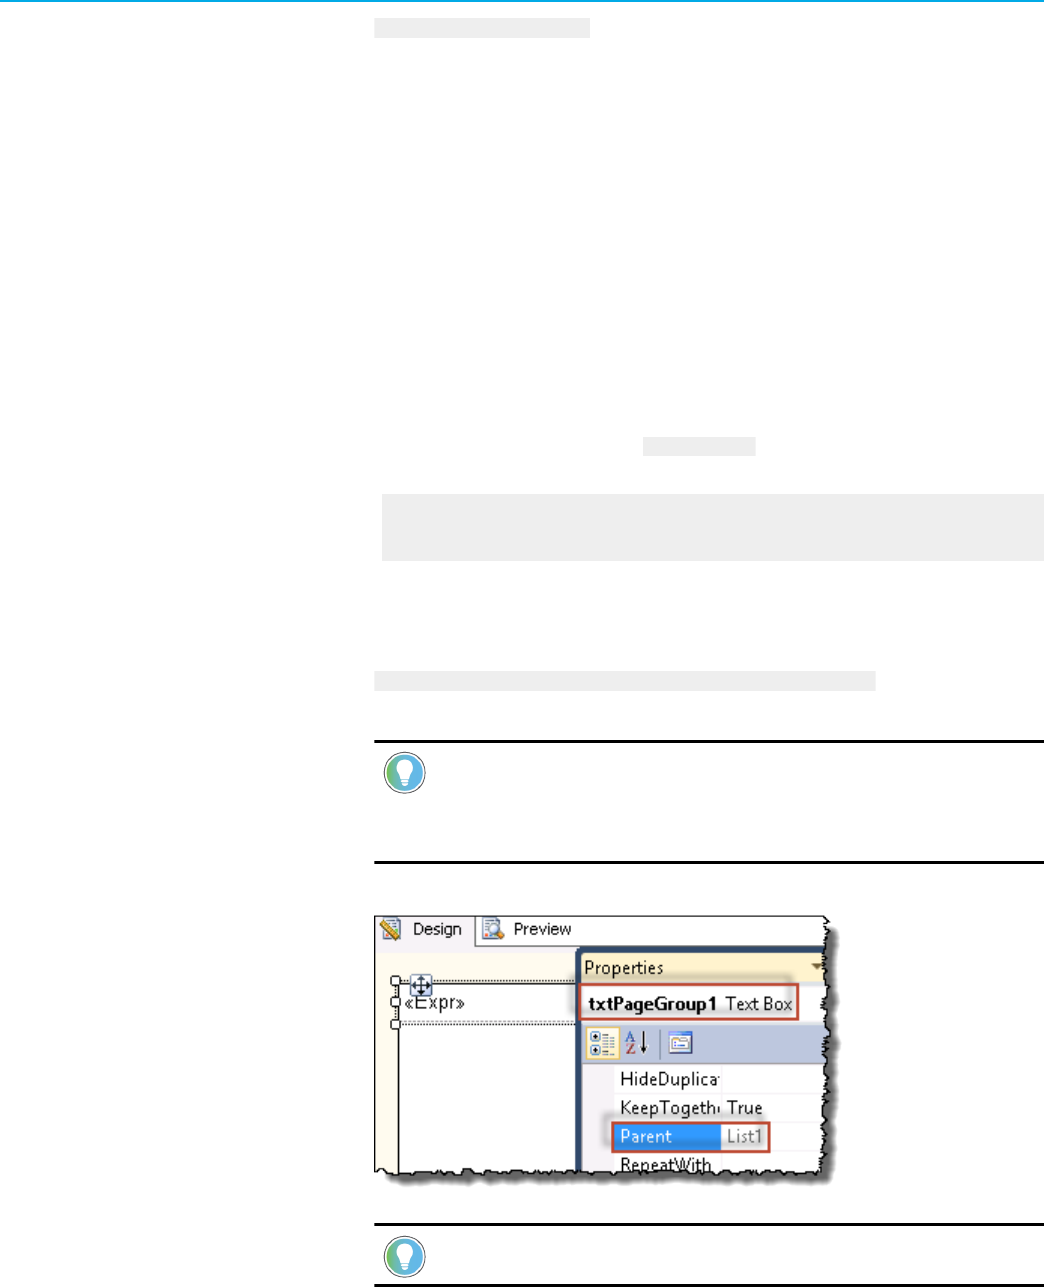
Chapter 6Creating a report template
= Fields!PageGroup1.Value
16.
Click OK.
Add a text box: txtPageGroup1
In this step, you will add a text box, which will function as a page grouping in the subreport.
To configure the page grouping
1. Right-click the list, and then select Insert > Text Box.
The text box object appears within the list object.
2.
Using the move pointer, move the text box to the top-left corner of the list.
3.
Using the resize pointer, stretch the text box so that it fits the width of the list.
4.
Right-click the text box, and then click Text Box Properties.
The Text Box Properties dialog box appears.
5.
Under Name, replace the default value with txtPageGroup1.
6.
Under Value, type:
=Code.m_parameterSet.TermLookup(iif(Code.m_parameterSet.HasPageGroup(1) ,Code.m_parameterSet.F
ormatGroupText(Fields!PageGroup1.Value, 1, 2), ""), User!Language)
7.
In the left pane of the dialog box, click Visibility.
8.
Under When the report is initially run, click the Show or hide based on an expression option.
9.
Under the option, type:
=iif(Code.m_parameterSet.StartPageCollapsed(1),false,true)
10.
Click OK.
Tip:
HasPageGroup and StartPageCollapsed are advanced functionalities of the RDLUtil library.
For more information, refer to Advanced methods and properties of the RDLUtil library on page
90.
The text box is a child of the List1 object.
Tip:
To open the Properties window, press F4.
Add a list: List2
In this step you will add another list, List2, which will contain objects that will be repeated on each page.
56 RPTDPE-RM002D-EN-E - October 2023 Rockwell Automation, Inc.

Chapter 6Creating a report template
To add List2
1.
Right-click List1, and the select Insert > List.
The list object appears within the List1 object.
2.
Using the move pointer, move the list to the left, below the txtPageGroup1 object.
3.
Using the resize pointer, stretch the list so that it fits the remaining width and height of the List1 object.
4.
Right-click the list, and then click Rectangle Properties.
The Rectangle Properties dialog box appears.
5. Under Name, replace the default name with List2.
6.
Click OK.
7.
Click in the middle of the list object so that the handle graphics appear around it.
8.
Right-click either the left or the top handle, and then click Tablix Properties.
The Tablix Properties dialog box appears.
9.
Under Name, replace the default name with List2Tablix.
10.
Click OK.
11.
Right-click either the left or the top handle, and then click Row Group > Group Properties.
The Group Properties dialog box appears.
12.
Under Name, replace the default name with List2GroupDetails.
13.
Under Group expressions, click Add.
14.
In the Group on text box, type:
= Fields!PageGroup1.Value
15.
Click OK.
Add a matrix: tablixKPIs
You will create a matrix with five columns. The first two columns will be used for defining row groupings, while the
other columns will display our KPI data: OEE, TEEP and MME.
The process consists of the following steps:
Step 1: Create the matrix on page 57
Step 2: Configure general properties on page 58
Step 3: Configure column headers on page 58
Step 4: Configure row headers on page 60
Step 5: Configure the Drillthrough property on page 61
Create the matrix
Perform the following steps to create a matrix and add columns.
To create a matrix and add columns
1. Right-click the List2 object, and then click Insert > Matrix.
The matrix object appears within the list object.
The matrix is a child of the List2 object.
2.
Using the move pointer, move the matrix to the top left of the List2 object, below the txtPageGroup1 object.
Rockwell Automation, Inc. RPTDPE-RM002D-EN-E - October 2023 57
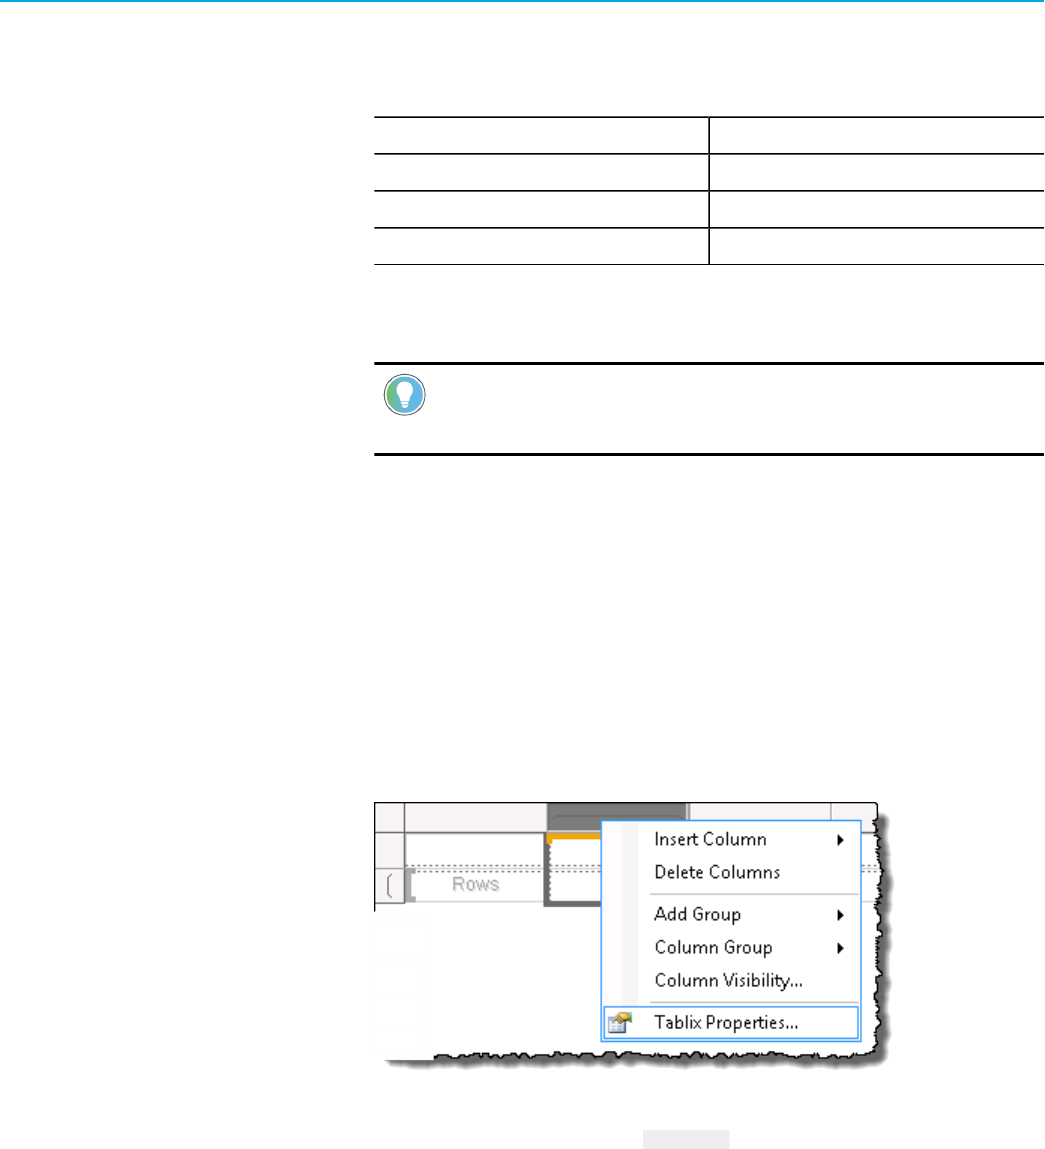
Chapter 6Creating a report template
3. Using the resize pointer, stretch the matrix so that it fits the length of the txtPageGroup1 object.
By default, the matrix object contains two groupings: by row and by column.
The matrix object consists of the following elements:
This item: Is a container for:
Columns The group header for the column grouping.
Rows The group header for the row grouping.
Data Data grouped by row and column.
4.
Right-click the Columns cell, and then select Insert Column > Outside Group - Right.
5.
Repeat step 4 to add another column.
Tip:
Adding a column into an empty matrix deletes the default column grouping. However, you
can add an additional grouping later, if necessary.
6.
Go to Step 2: Configure general properties on page 58.
Configure general properties
Perform the following steps to define the general properties of the matrix.
To define the general properties of the matrix
1. Click a cell in the matrix.
Row and column handles appear.
Row and column groups are indicated with handle graphics: vertical and horizontal brackets, respectively.
2.
Right-click any of the handles, and then click Tablix Properties.
The Tablix Properties dialog box appears.
3.
Under Name, replace the default value with tablixKPIs.
The PerformanceDataSet is already selected under Dataset name.
4.
Click OK.
5. Go to Step 3: Configure column headers on page 58.
Configure column headers
Perform the following steps to define column headers.
58 RPTDPE-RM002D-EN-E - October 2023 Rockwell Automation, Inc.
Chapter 6Creating a report template
To define column headers
1.
Right-click the text box that will function as the first column header, and then click Text Box Properties.
The Text Box Properties dialog box appears.
2.
Under Name, replace the default value with txtOEE.
3.
Under Value, type:
=Code.m_parameterSet.TermLookup("OEE %", User!Language)
4.
In the left pane of the dialog box, click Font.
5. Under Font, type:
=Code.m_style.Header.FontFamily
6.
Under Size, type:
=Code.m_style.Header.FontSize
7.
Under Style, next to Bold, click .
The Expression dialog box appears.
8. Under Set expressions for: FontWeight, replace the default value with:
=Code.m_style.Header.FontWeight
9.
Click OK.
10.
Under Style, next to Italic, click .
The Expression dialog box appears.
11.
Under Set expressions for: FontStyle, replace the default value with:
=Code.m_style.Header.FontStyle
12.
Click OK.
13.
In the left pane of the dialog box, click Border.
14.
Under Style, type:
=Code.m_style.Header.BorderStyle
15.
Under Width, type:
=Code.m_style.Header.BorderWidth
16.
Under Color, click .
The Expression dialog box appears.
17.
Under Set expression for: Default, replace the default value with:
=Code.m_style.Header.BorderColor
18.
Click OK.
19.
In the left pane of the dialog box, click Fill.
20.
Under Fill color, click .
The Expression dialog box appears.
21. Under Set expression for: BackgroundColor, replace the default value with:
=Code.m_style.Header.BackgroundColor
Tip:
For more information on the m_style parameter, refer to Advanced methods and properties
of styles on page 93.
22.
Click OK, and then click OK again.
If you have already configured the txtTEEP text box, go to step 27.
If you have already configured the txtMME text box, go to step 31.
Otherwise, continue with the next steps.
Rockwell Automation, Inc. RPTDPE-RM002D-EN-E - October 2023 59
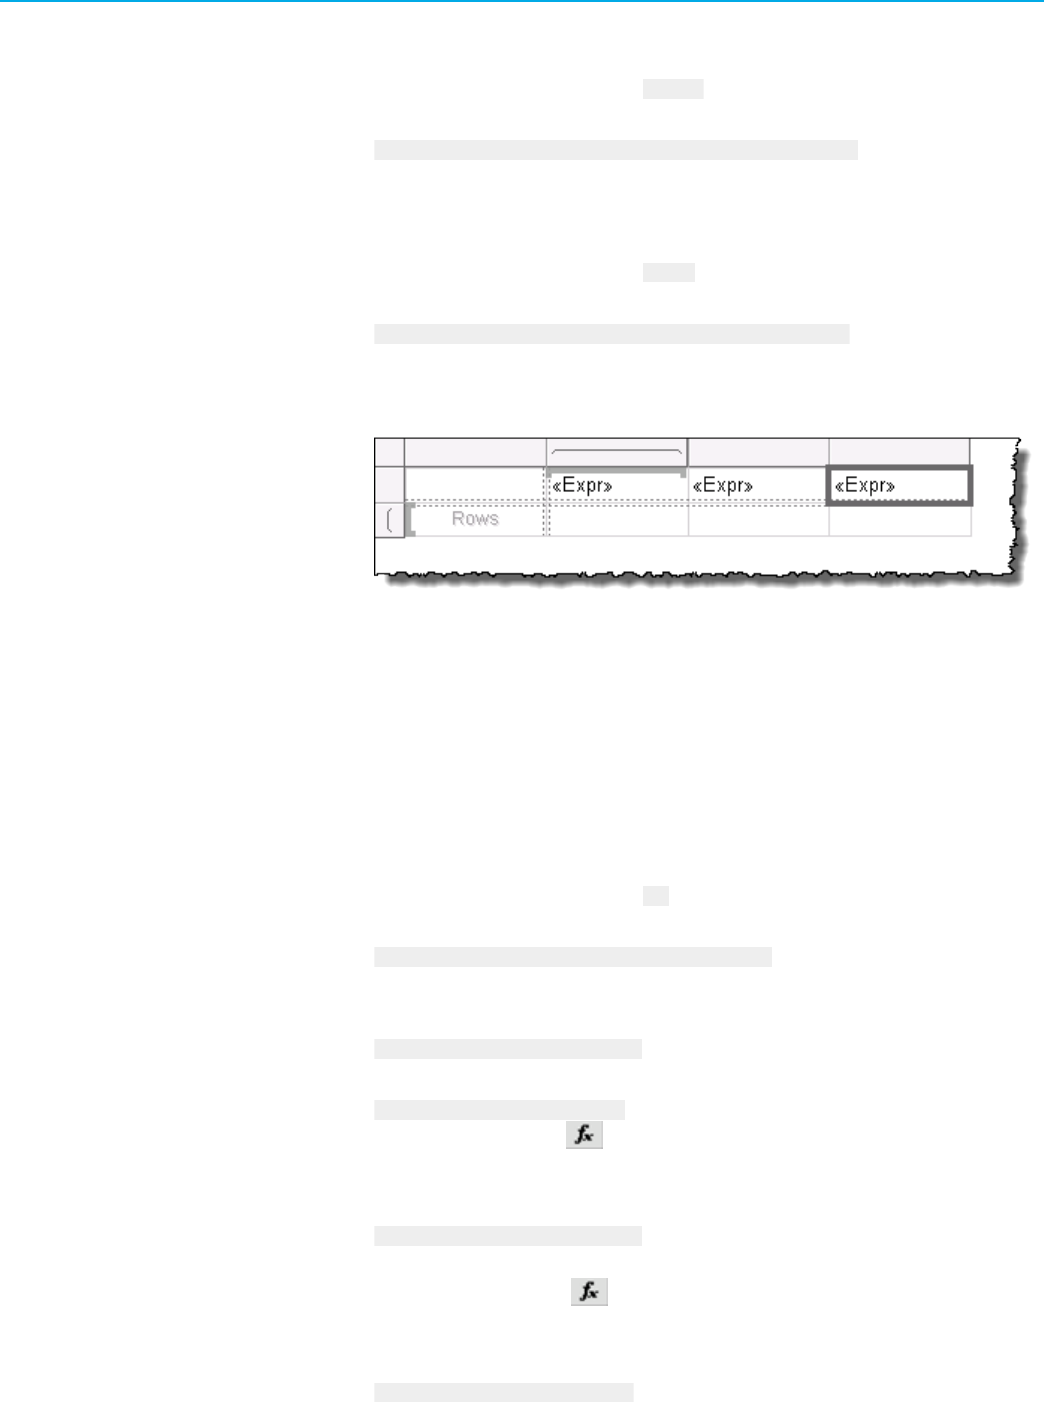
Chapter 6Creating a report template
23. Right-click the text box that will function as the second column header, and then click Text Box Properties.
The Text Box Properties dialog box appears.
24. Under Name, replace the default value with txtTEEP.
25. Under Value, type:
=Code.m_parameterSet.TermLookup("TEEP %", User!Language)
26.
Repeat steps 4 - 22.
27.
Right-click the text box that will function as the third column header, and then click Text Box Properties.
The Text Box Properties dialog box appears.
28.
Under Name, replace the default value with txtMME.
29.
Under Value, type:
=Code.m_parameterSet.TermLookup("MME %", User!Language)
30.
Repeat steps 4 - 22.
31.
Using the resize pointer, resize the matrix so that it fits the width of the List2 object.
Your matrix should look like this in the following figure.
32.
Go to Step 4: Configure row headers on page 60.
Configure row headers
Perform the following steps to define row headers.
To define row headers
1. Right-click the text box that will function as the first row header, and then click Text Box Properties.
The Text Box Properties dialog box appears.
2.
Under Name, replace the default value with OEE.
3.
Under Value, type:
=FormatPercent(Aggregate(Fields!OEE.Value), 2)
4.
In the left pane of the dialog box, click Font.
5.
Under Font, type:
=Code.m_style.Detail.FontFamily
6.
Under Size, type:
=Code.m_style.Detail.FontSize
7.
Under Style, next to Bold, click .
The Expression dialog box appears.
8.
Under Set expressions for: FontWeight, replace the default value with:
=Code.m_style.Detail.FontWeight
9.
Click OK.
10.
Under Style, next to Italic, click .
The Expression dialog box appears.
11.
Under Set expressions for: FontStyle, replace the default value with:
=Code.m_style.Detail.FontStyle
60 RPTDPE-RM002D-EN-E - October 2023 Rockwell Automation, Inc.
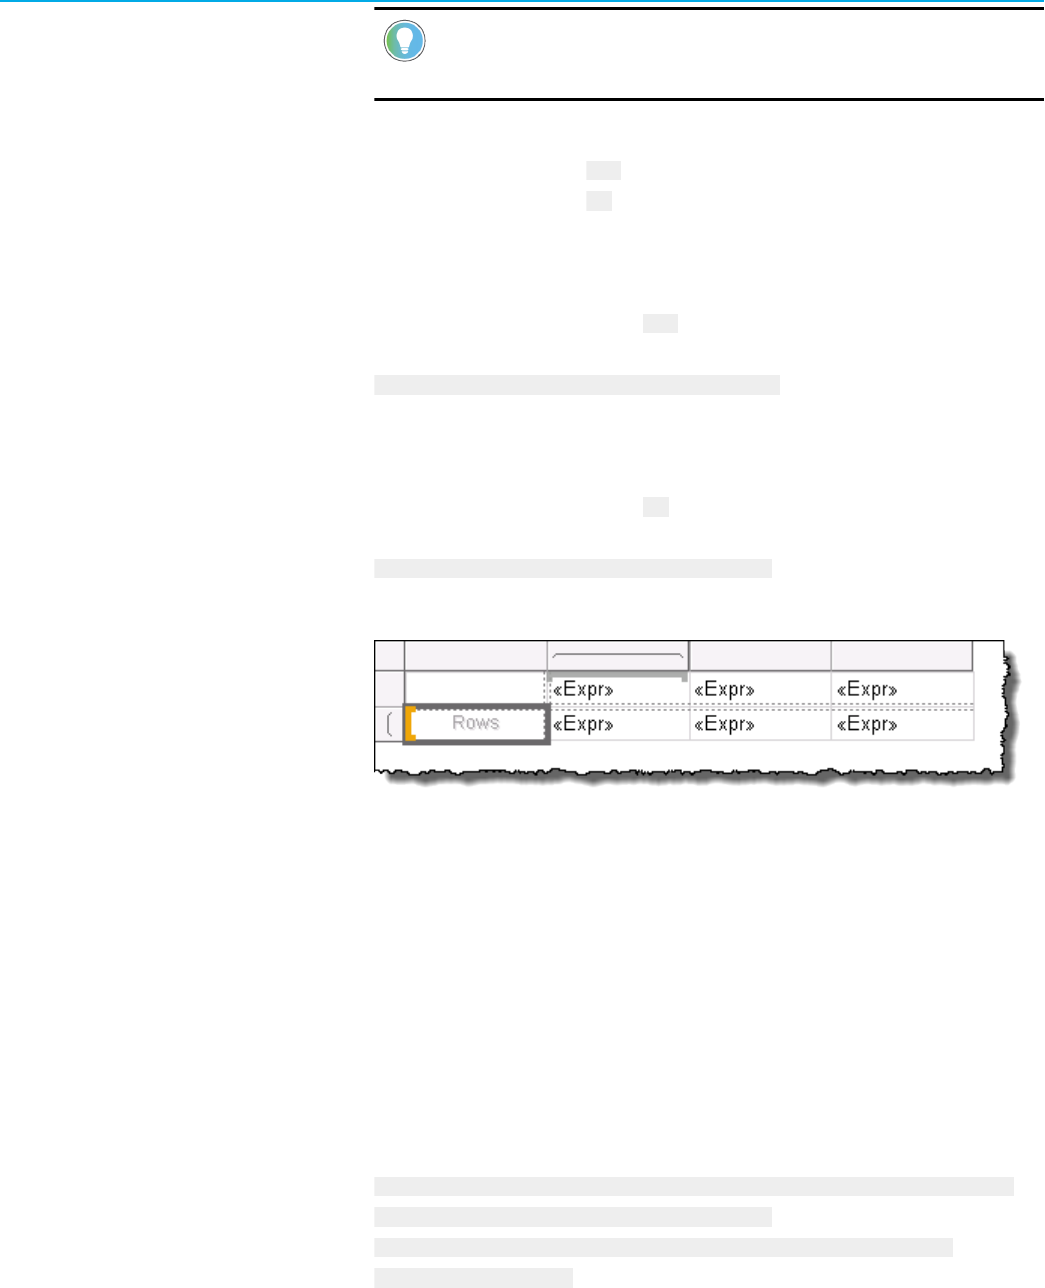
Chapter 6Creating a report template
Tip:
For more information on the m_style parameter, refer to Advanced methods and properties
of styles on page 93.
12. Click OK, and then click OK again.
If you have already configured the TEEP text box, go to step 17.
If you have already configured the MME text box, go to step 21.
Otherwise, continue with the next steps.
13.
Right-click the text box that will function as the second row header, and then click Text Box Properties.
The Text Box Properties dialog box appears.
14.
Under Name, replace the default value with TEEP.
15.
Under Value, type:
=FormatPercent(Aggregate(Fields!TEEP.Value), 2)
16.
Repeat steps 4 - 12.
17.
Right-click the text box that will function as the third row header, and then click Text Box Properties.
The Text Box Properties dialog box appears.
18.
Under Name, replace the default value with MME.
19.
Under Value, type:
=FormatPercent(Aggregate(Fields!MME.Value), 2)
20.
Repeat steps 4 - 12.
Your matrix should look like this in the following figure.
21.
Go to Step 5: Configure the Drillthrough property on page 61.
Configure the Drillthrough property
The drillthrough property that you will add for the OEE text box will point to another subreport.
To add the drillthrough property
1. Right-click the OEE text box, and then click Text Box Properties.
The Text Box Properties dialog box appears.
2.
In the left pane of the dialog box, click Action.
3.
Under Enable as an action, click Go to URL.
4.
Under Select URL, type:
=Code.m_parameterSet.GetDrillThroughURL("NewPerformance",Aggregate(Fields!
AggregationFieldCount.Value),Aggregate(Fields!
RowGroup1.Value),Aggregate(Fields!RowGroup2.Value),"","","",Fields!
PageGroup1.Value,"OEE")
Rockwell Automation, Inc. RPTDPE-RM002D-EN-E - October 2023 61
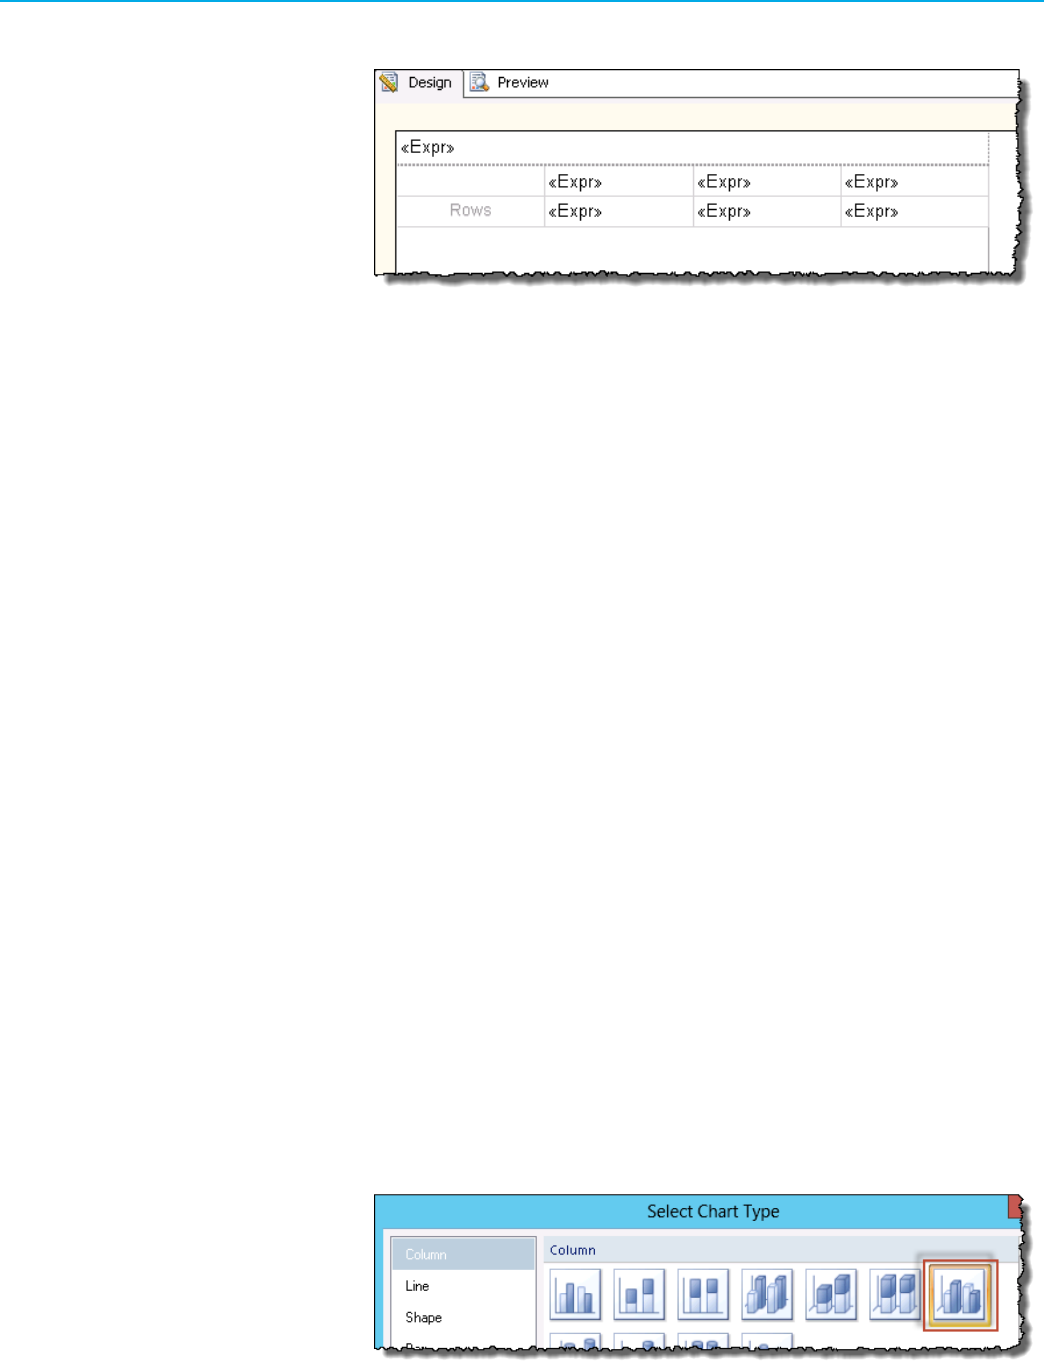
Chapter 6Creating a report template
5. Click OK.
Your subreport layout should look like this in the following figure.
Add a chart: chartKPIs
You will create a chart with two data series: TEEP % and MME %.
The process consists of the following steps:
Step 1: Create the chart on page 62
Step 2: Configure TEEP data on page 63
Step 3: Configure MME data on page 65
Step 4: Add a category group on page 66
Step 5: Add a series group on page 67
Step 6: Configure the vertical axis on page 68
Step 7: Configure the legend on page 69
Step 8: Configure 3D options on page 70
Step 9: Hide axis titles on page 70
Create the chart
Perform the following steps to create a chart.
To create a chart
1. Move the pointer below the matrix.
2.
Right-click the List2 object, and then select Insert > Chart.
The Select Chart Type dialog box appears.
3.
Select a 3-D Clustered Column chart type.
4.
Click OK.
62 RPTDPE-RM002D-EN-E - October 2023 Rockwell Automation, Inc.
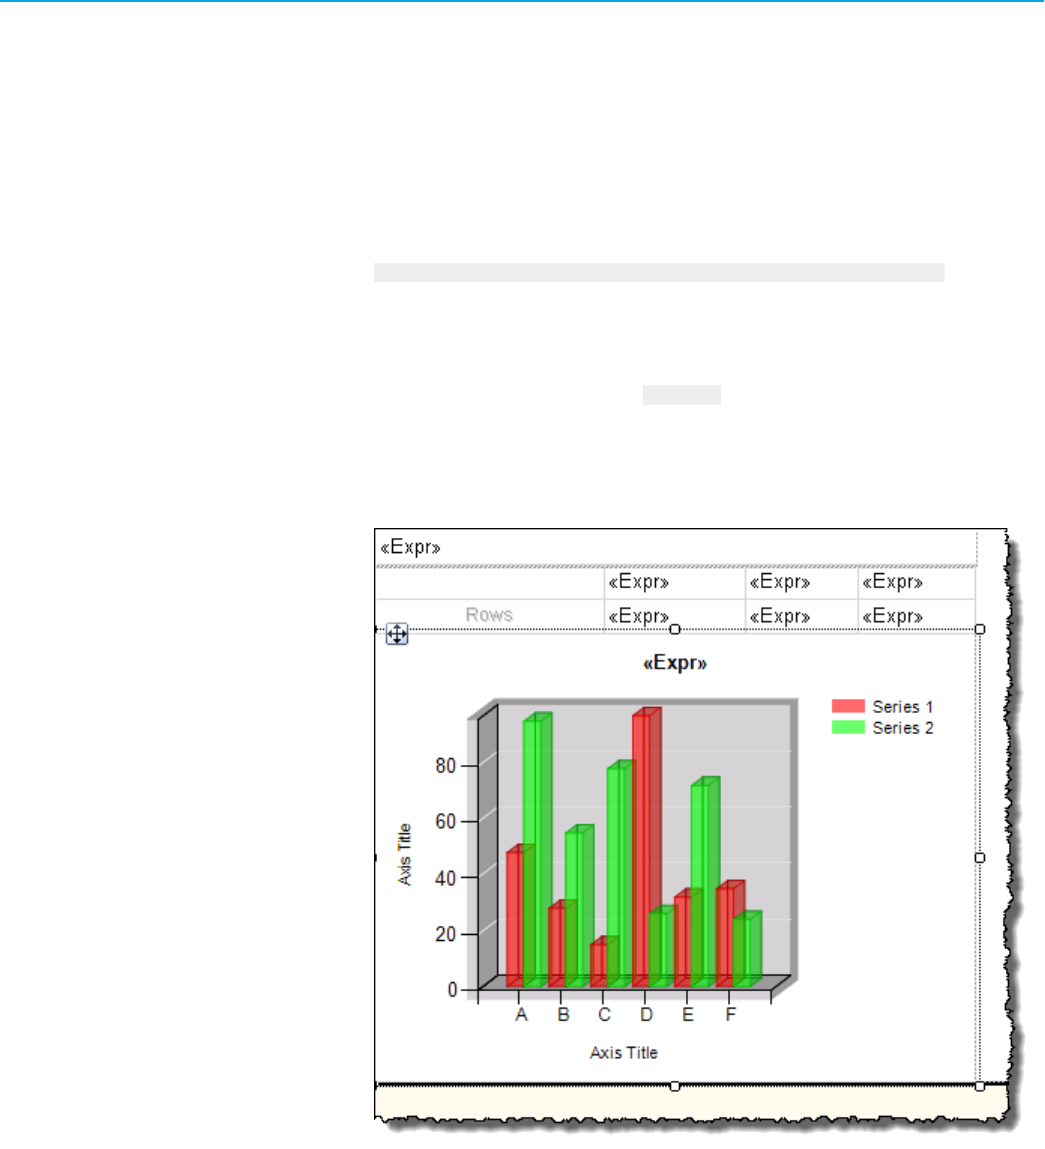
Chapter 6Creating a report template
The chart object appears within the list object.
The chart is a child of the List2 object.
5. Using the move pointer, move the chart to the left, right below the matrix.
6. Using the resize pointer, stretch the chart so that it fits the width of the matrix and the height of the List2
object.
7.
Right-click the chart title, and select Title Properties.
The Chart Title Properties dialog box appears.
8. Under Title text, replace the default value with:
=Code.m_parameterSet.TermLookup("TEEP % and MME %", User!Language)
9.
Click OK.
10.
Right-click the chart area, and then click Chart Properties.
The Chart Properties dialog box appears.
11.
Under Name, replace the default value with chartKPIs.
The PerformanceDataSet is already selected under Dataset name.
12.
Under Color palette, select Semi transparent.
13.
Click OK.
Your chart should look like the following figure.
14.
Go to Step 2: Configure TEEP data on page 63.
Configure TEEP data
Perform the following steps to configure the TEEP data properties.
Rockwell Automation, Inc. RPTDPE-RM002D-EN-E - October 2023 63
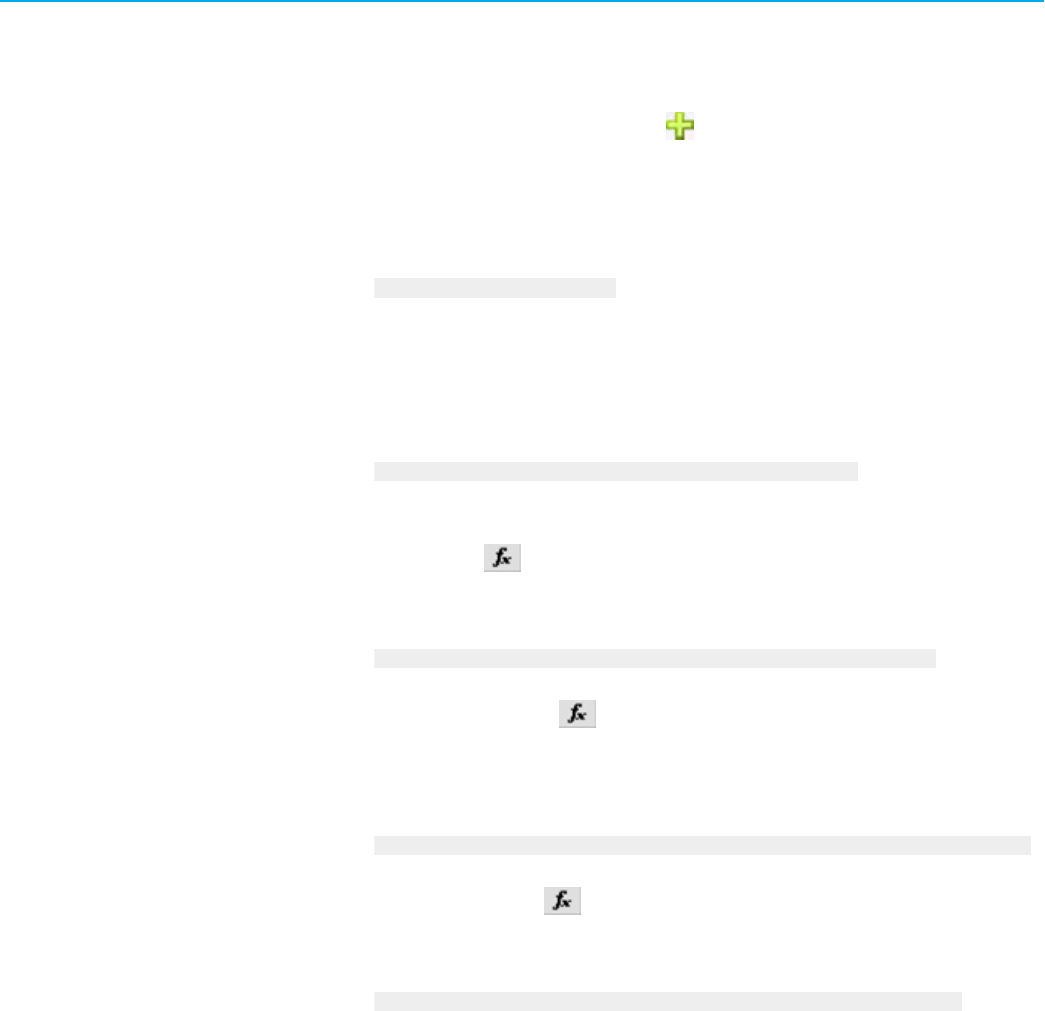
Chapter 6Creating a report template
To configure the TEEP data properties
1.
Double-click the chart area.
The Chart Data window appears.
2. In the Chart Data window, next to Values, click .
3.
A list of pre-defined values appears.
4.
Using the arrow at the bottom of the list, scroll down, and then click Expression.
The Expression dialog box appears.
5.
Under Set expression for: Series, type after the equation sign:
Aggregate(Fields!TEEP.Value)
6.
Click OK.
7.
In the Chart Data window, click the arrow next to Series, and then click Series Properties.
The Series Properties dialog box appears.
8.
In the left pane of the window, click Legend.
9.
Under Custom legend text, type:
=Code.m_parameterSet.TermLookup("TEEP %", User!Language)
10.
In the left pane of the dialog box, click Fill.
11. Under Fill style, click Gradient.
12.
Under Color, click .
The Expression dialog box appears.
13.
Under Set expression for: Color, replace the default value with:
=Code.m_style.Chart.GetPalette("Default").GetPaletteItem(0).Color
14.
Click OK.
15.
Under Secondary color, click .
The Expression dialog box appears.
16.
Under Set expression for:
BackgroundGradientEndColor, replace the default value with:
=Code.m_style.Chart.GetPalette("Default").GetPaletteItem(0).GradientEndColor
17.
Click OK.
18.
Under Gradient style, click .
The Expression dialog box appears.
19.
Under Set expression for: BackgroundGradientType, replace the default value with:
=Code.m_style.Chart.GetPalette("Default").GetPaletteItem(0).Gradient
20.
In the left pane of the dialog box, click Border.
21.
Under Line style, select Solid.
22.
Under Line color, select Black.
23.
Click OK.
64 RPTDPE-RM002D-EN-E - October 2023 Rockwell Automation, Inc.
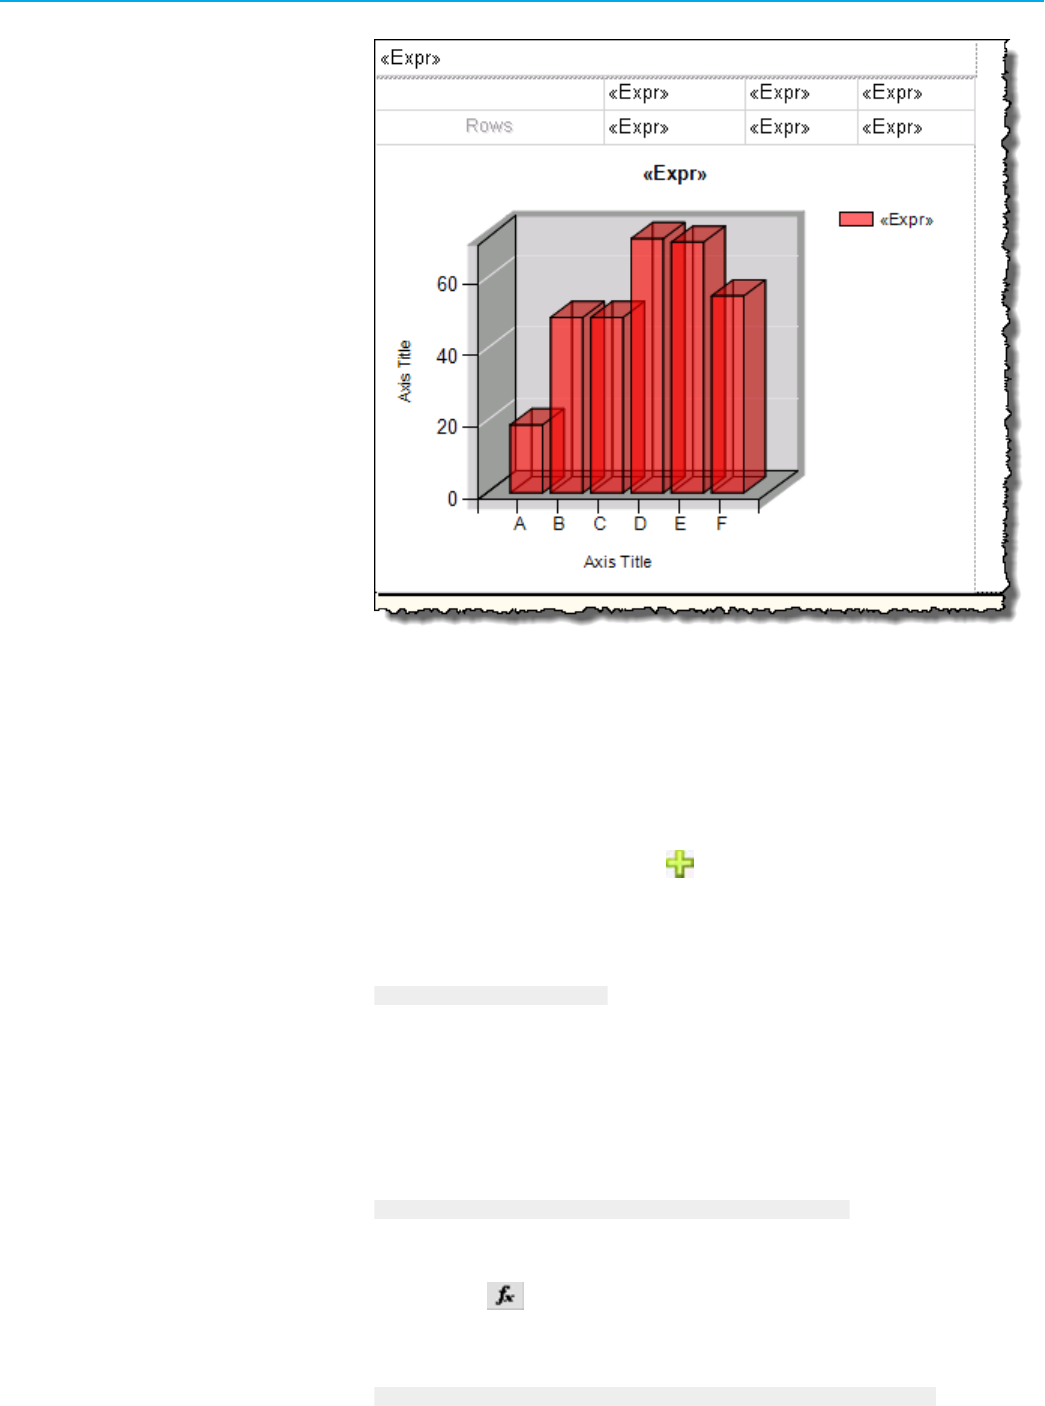
Chapter 6Creating a report template
Your chart should look like the following figure.
24.
Go to Step 3: Configure MEE data on page 65.
Configure MME data
Perform the following steps to configure the MME data properties.
To configure the MME data properties
1. In the Chart Data window, next to Values, click .
2. Using the arrow at the bottom of the list, scroll down, and then click Expression.
The Expression dialog box appears.
3.
Under Set expression for: Series, type after the equation sign:
Aggregate(Fields!MME.Value)
4.
Click OK.
5.
In the Chart Data window, click the arrow next to the Series item for [Aggregate(MME)], and then click
Series Properties.
The Series Properties dialog box appears.
6. In the left pane of the window, click Legend.
7.
Under Custom legend text, type:
=Code.m_parameterSet.TermLookup("MME %", User!Language)
8.
In the left pane of the dialog box, click Fill.
9.
Under Fill style, click Gradient.
10.
Under Color, click .
The Expression dialog box appears.
11.
Under Set expression for: Color, replace the default value with:
=Code.m_style.Chart.GetPalette("Default").GetPaletteItem(1).Color
Rockwell Automation, Inc. RPTDPE-RM002D-EN-E - October 2023 65
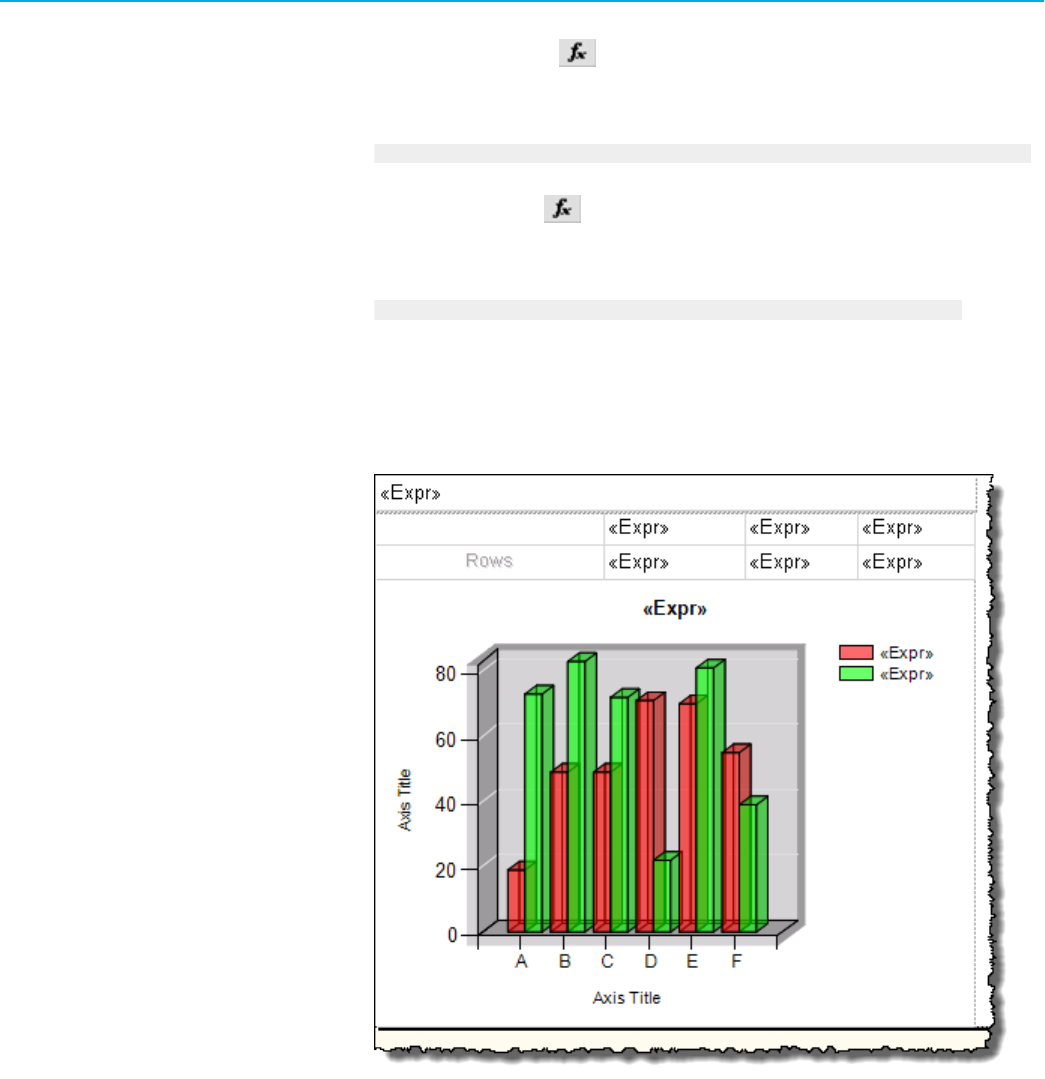
Chapter 6Creating a report template
12. Click OK.
13. Under Secondary color, click .
The Expression dialog box appears.
14. Under Set expression for: BackgroundGradientEndColor, replace the default value with:
=Code.m_style.Chart.GetPalette("Default").GetPaletteItem(1).GradientEndColor
15.
Click OK.
16.
Under Gradient style, click .
The Expression dialog box appears.
17.
Under Set expression for: BackgroundGradientType, replace the default value with:
=Code.m_style.Chart.GetPalette("Default").GetPaletteItem(1).Gradient
18.
In the left pane of the dialog box, click Border.
19.
Under Line style, select Solid.
20.
Under Line color, select Black.
21.
Click OK.
Your chart should look like the following figure.
22.
Go to Step 4: Add a category groups on page 66.
Add a category group
In this step, you will add category groups to the chart. This function divides data into relevant categories. Each
category is represented by a unique label in the chart. In this case, you will create the categories from the first
grouping by row.
66 RPTDPE-RM002D-EN-E - October 2023 Rockwell Automation, Inc.

Chapter 6Creating a report template
To add category groups
1.
In the Chart Data window, under Category Groups, right-click (Details), and then click Category Group
Properties.
The Category Group Properties dialog box appears.
2.
Under Label, type:
=Code.m_parameterSet.FormatGroupText(Fields!RowGroup1.Value, 1, 0)
3.
Under Group expressions, click Add.
4. In the Group on box, type:
=Fields!RowGroup1.Value
5.
Click OK.
The new category group appears under Category Groups in the Chart Data window.
6.
Go to Step 5: Add a series groups on page 67.
Add a series group
In this step, you will add series groups to the chart. This function divides data into relevant categories. Each category
is represented by a unique series in the chart (for example, a column in a column chart). In this case, you will create
the categories from the second grouping by row.
To add series groups
1.
In the Chart Data window, under Series Groups, click .
2.
In the list of pre-defined values, click RowGroup2.
The new series group appears in the Chart Data window under Series Groups.
3.
Under Series Groups, right-click RowGroup2, and then click Series Group Properties.
The Series Group Properties dialog box appears.
4.
Under Label, replace [RowGroup2] with:
=Code.m_parameterSet.FormatGroupText(Fields!RowGroup2.Value, 2, 0)
5. Click OK.
Rockwell Automation, Inc. RPTDPE-RM002D-EN-E - October 2023 67
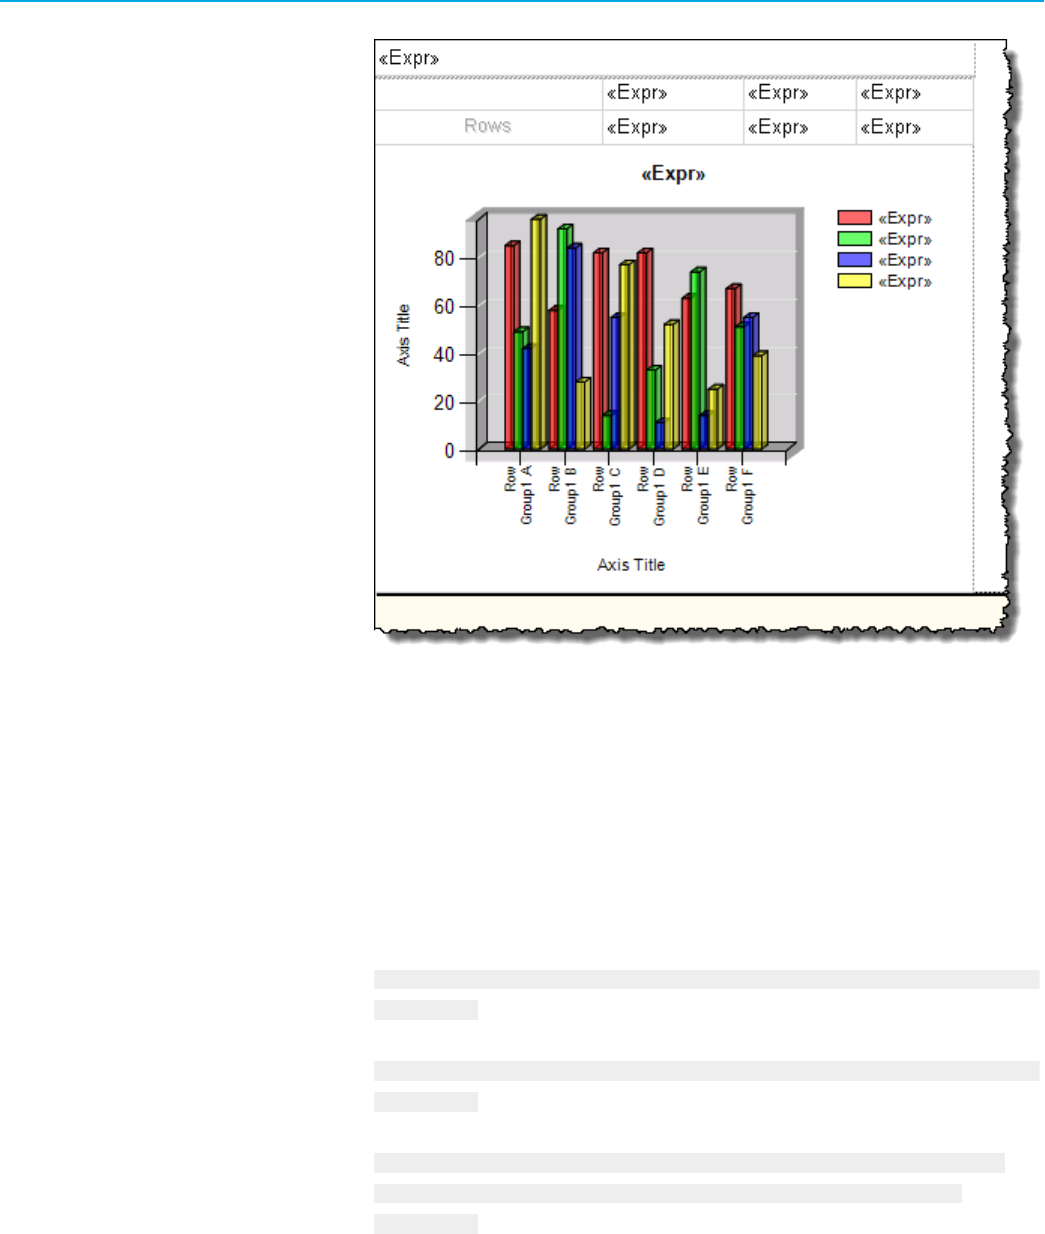
Chapter 6Creating a report template
Your chart should look like the following figure.
6.
Go to Step 6: Configure the vertical axis on page 68.
Configure the vertical axis
Perform the following steps to configure the vertical axis.
To configure the vertical axis
1. In the chart area, right-click the vertical axis, and then click Vertical Axis Properties.
The Vertical Axis Properties dialog box appears.
2.
Under Minimum, replace the default value with:
=Code.m_parameterSet.GetYAxisMin(Math.Min(Min(Fields!TEEP.Value), Min(Fields!
MME.Value)))
3.
Under Maximum, replace the default value with:
=Code.m_parameterSet.GetYAxisMax(Math.Max(Max(Fields!TEEP.Value), Max(Fields!
MME.Value)))
4.
Under Interval, replace the default value with:
=Code.m_parameterSet.GetYAxisInterval(0, Math.Min(Min(Fields!TEEP.Value),
Min(Fields!MME.Value)), Math.Max(Max(Fields!TEEP.Value), Max(Fields!
MME.Value)))
5.
In the left pane of the dialog box, click Number.
6.
Under Category, click Percentage.
7.
Click OK.
68 RPTDPE-RM002D-EN-E - October 2023 Rockwell Automation, Inc.
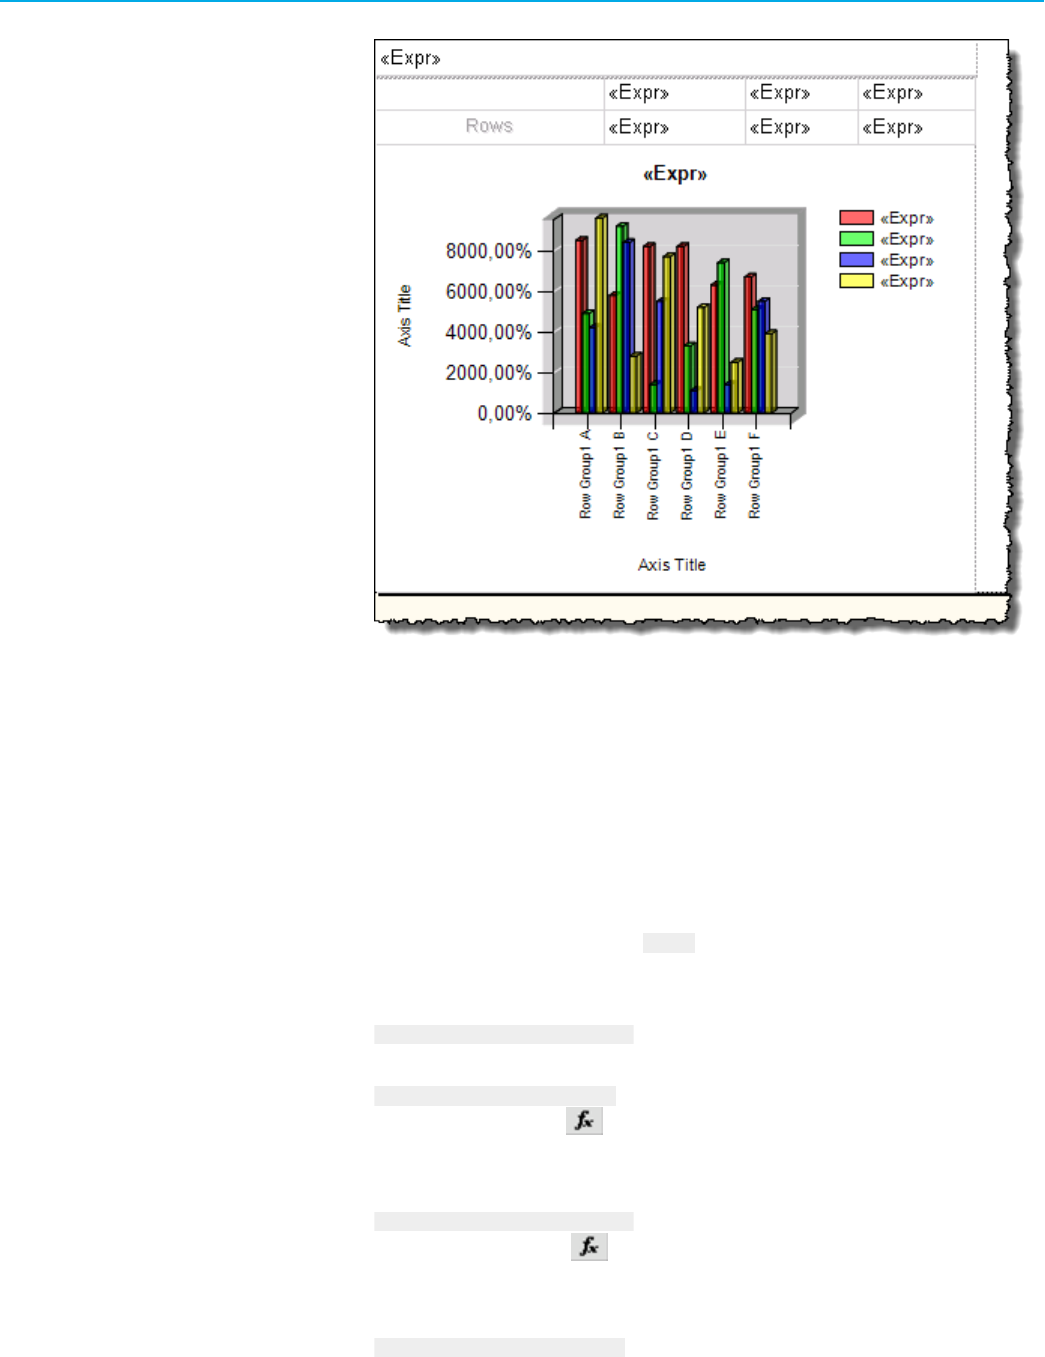
Chapter 6Creating a report template
Your chart should look like the following figure.
8.
Go to Step 7: Configure the legend on page 69.
Configure the legend
Perform the following steps to configure the legend.
To configure the legend
1. In the chart area, right-click the legend, and then click Legend Properties.
The Legend Properties dialog box appears.
2.
Under Name, replace the default value with Legend.
3.
In the left pane of the dialog box, click Font.
4.
Under Font, replace the default value with:
=Code.m_style.Chart.FontFamily
5.
Under Size, replace the default value with:
=Code.m_style.Chart.FontSize
6.
Under Style, next to Bold, click .
The Expression dialog box appears.
7.
Under Set expression for: FontWeight, replace the default value with:
=Code.m_style.Chart.FontWeight
8.
Under Style, next to Italic, click .
The Expression dialog box appears.
9.
Under Set expression for: FontStyle, replace the default value with:
=Code.m_style.Chart.FontStyle
10.
Click OK.
Rockwell Automation, Inc. RPTDPE-RM002D-EN-E - October 2023 69

Chapter 6Creating a report template
Your legend should look like the following figure.
11.
Go to Step 8: Configure 3D options on page 70.
Configure 3D options
Perform the following steps to configure the chart 3D options.
To configure the chart 3D options
1. In the chart area, right-click the series, and then click 3D Effects.
The Chart Area Properties dialog box appears.
2.
Under Wall thickness, replace the default value with 0.
3.
Click OK.
4.
Using the resize pointer, resize List1 so that is fits the objects that it contains.
5.
Go to Step 9: Hide axis titles on page 70.
Hide axis titles
Perform the following steps to hide axis titles.
To hide axis titles
1. Right-click the vertical axis title, and then clear the Show Axis Title option.
2.
Right-click the horizontal axis title, and then clear the Show Axis Title option.
Add groupings
Now you will configure and link page and row groupings in the subreport.
All subreport groupings should be associated with each other in order to work properly.
Adhere to the following rules:
•
The text box object representing the page grouping (here: txtPageGroup1) should be linked with the list
object (here: List2) that aggregates other subreport objects.
•
The text box object representing the page grouping (here: txtPageGroup1) should be linked with the first
non-page grouping (row or column) within the matrix object (here: matrix1_RowGroup1).
•
All the non-page groupings should be linked together so that the preceding grouping (here:
matrix1_RowGroup1) is set as the parent for the next grouping (here: matrix1_RowGroup2).
Link List2 and txtPageGroup1
Perform the following steps to link List2 with txtPaGEGroup1.
70 RPTDPE-RM002D-EN-E - October 2023 Rockwell Automation, Inc.

Chapter 6Creating a report template
To link List2 with txtPageGroup1:
1.
Right-click the left or top handle of the List2Tablix object, and then click Tablix Properties.
The Tablix Properties dialog box appears.
2.
In the left pane of the dialog box, click Visibility.
3.
Under When the report is initially run, click the Show or hide based on an expression option.
4.
Under the option, type:
=iif(Code.m_ParameterSet.StartPageCollapsed(1), true, false)
5. Select the Display can be toggled by this report item checkbox.
6.
In the list below the option, select txtPageGroup1.
7.
Click OK.
Add row groupings to the matrix
Your subreport will consist of two groupings by row. The row groupings will be defined in the matrix object. So far, the
matrix has one default grouping by row defined, with the Rows group header displayed in the matrix cell.
Now you will add another group by row to the matrix and configure the row groupings.
The process consists of the following steps:
Step 1: Configure the RowGroup1 text box on page 71
Step 2: Configure the first row grouping (RowGroup1) on page 72
Step 3: Configure the RowGroup2 text box on page 73
Step 4: Configure the second row grouping (RowGroup2) on page 73
Configure the RowGroup1 text box
Perform the following steps to configure the RowGroup1 text box.
To configure the RowGroup1 text box
1. Right-click the first row text box, and then click Text Box Properties.
The Text Box Properties dialog box appears.
2.
Under Name, replace the default name with RowGroup1.
3.
Under Value, type the following:
=Code.m_parameterSet.TermLookup(Code.m_parameterSet.FormatGroupText(Fields!
RowGroup1.Value, 1, 0), User!Language)
4.
In the left pane of the dialog box, click Font.
5.
Under Font, replace the default value with the following:
=Code.m_style.Detail.FontFamily
6.
Under Size, replace the default value with the following:
=Code.m_style.Detail.FontSize
7. Under Style, next to Bold, click .
The Expression dialog box appears.
8.
Under Set expressions for: FontWeight, replace the default value with:
=Code.m_style.Detail.FontWeight
Rockwell Automation, Inc. RPTDPE-RM002D-EN-E - October 2023 71
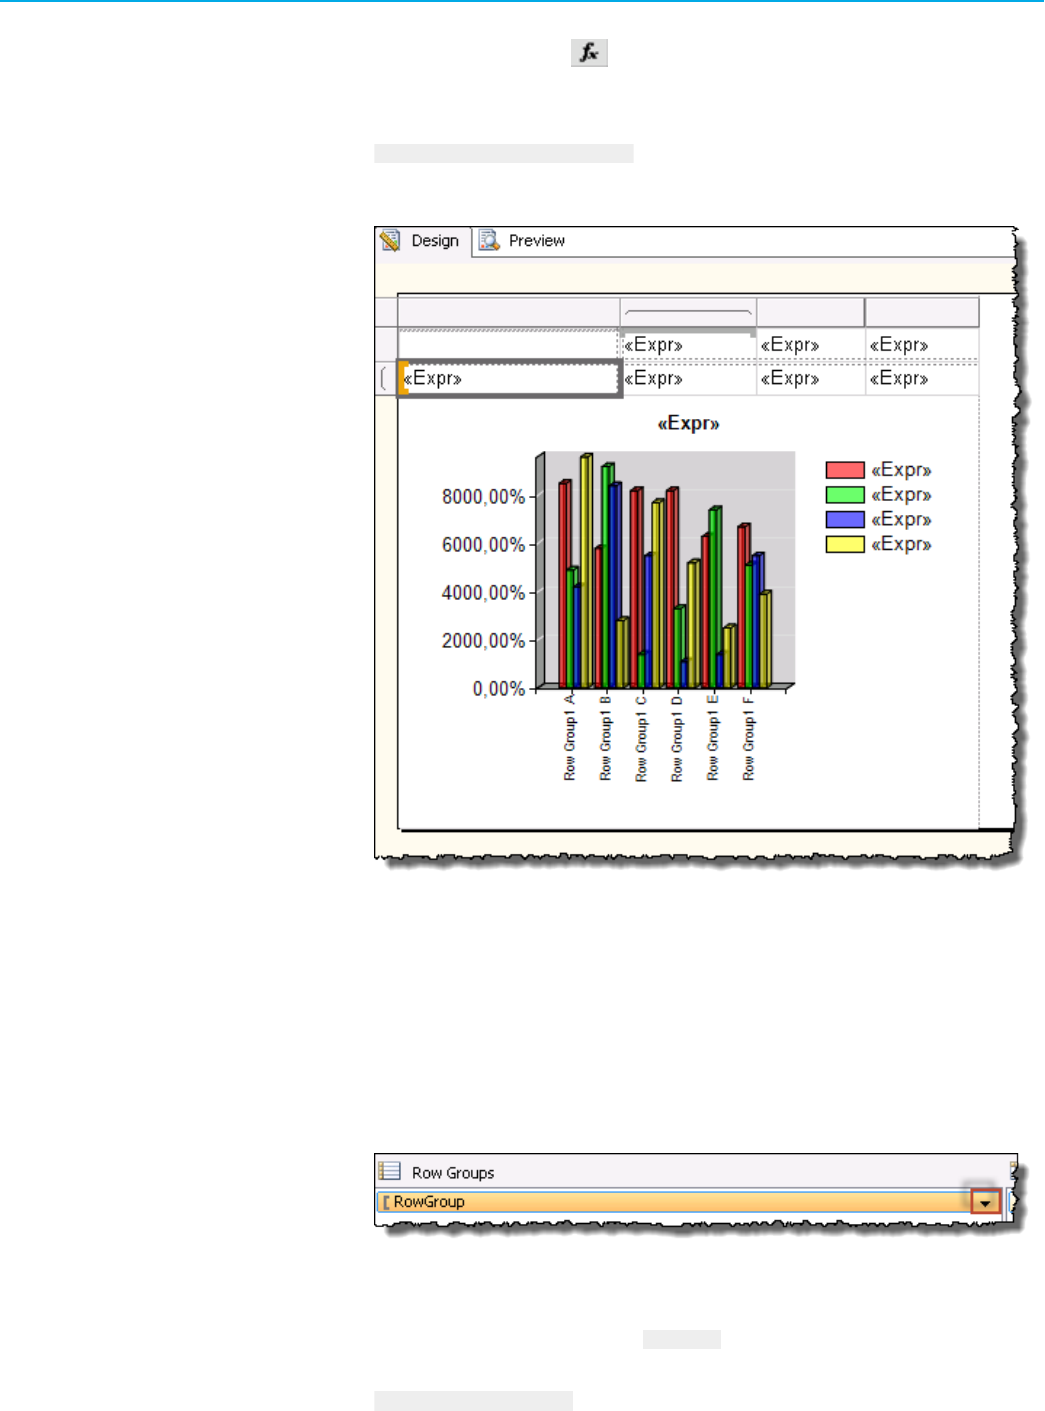
Chapter 6Creating a report template
9. Click OK.
10. Under Style, next to Italic, click .
The Expression dialog box appears.
11. Under Set expressions for: FontStyle, replace the default value with:
=Code.m_style.Detail.FontStyle
12.
Click OK, and then click OK again.
Your subreport layout should look like the following figure.
13.
Go to Step 2: Configure the first row grouping (RowGroup1) on page 72.
Configure the first row grouping
Perform the following steps to configure the first row grouping.
To configure the first row grouping (RowGroup1):
1. Select the matrix object (tablixKPIs).
2.
Under Row Groups, below the design surface, click the arrow next to RowGroup.
3.
Click Group Properties.
The Group Properties dialog box appears.
4.
Under Name, replace the default value with RowGroup1.
5.
In the Group on text box, type:
=Fields!RowGroup1.Value
72 RPTDPE-RM002D-EN-E - October 2023 Rockwell Automation, Inc.

Chapter 6Creating a report template
6. In the left pane of the dialog box, click Visibility.
7.
Under When the report is initially run, click Show or hide based on an expression.
8. In the option text box, type:
=iif(Code.m_ParameterSet.StartRowCollapsed(1), true, false)
9.
In the left pane of the dialog box, click Advanced.
10.
Under Recursive parent, type:
=Fields!PageGroup1.Value
11. Click OK.
12.
Go to Step 3: Configure the RowGroup2 text box on page 73.
Configure the RowGroup2 text box
Perform the following steps to configure the RowGroup2 text box.
To configure the RowGroup2 text box
1. In the matrix, right-click the [RowGroup2] text box, and then click Text Box Properties.
The Text Box Properties dialog box appears.
2.
Under Value, replace the value with the following:
=Code.m_parameterSet.TermLookup(Code.m_parameterSet.FormatGroupText(Fields!
RowGroup2.Value, 2, 0), User!Language)
3.
Click OK.
Your subreport layout should look like the following figure.
4.
Go to Step 4: Configure the second row grouping (RowGroup2) on page 73.
Configure the second row grouping
Perform the following steps to configure the second row grouping.
Rockwell Automation, Inc. RPTDPE-RM002D-EN-E - October 2023 73
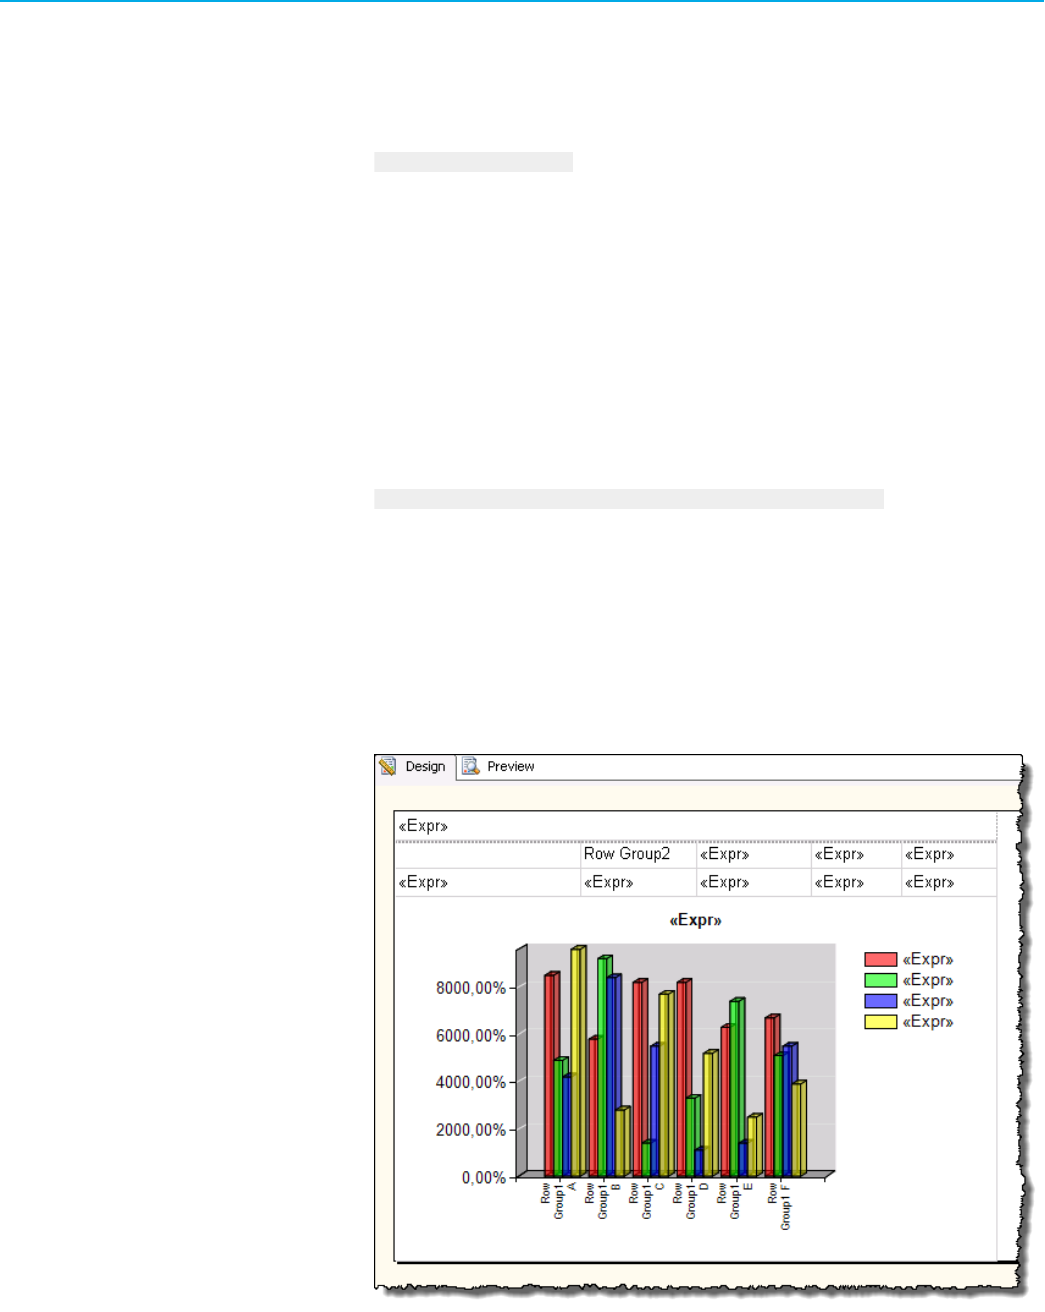
Chapter 6Creating a report template
To configure the second row grouping (RowGroup2):
1.
Under Row Groups, click the arrow next to RowGroup1, and then select Add Group > Child Group.
The Tablix group dialog box appears.
2.
In the Group by list, type:
=Fields!RowGroup2.Value
3.
Click OK.
The parent-child relationship between the groupings is indicated in the Row Groups list below the design
surface.
4.
Under Row Groups, click the arrow next to RowGroup2, and then click Group Properties.
The Group Properties dialog box appears.
The Name and Group on boxes are already populated with the data that you have provided when configuring
the RowGroup1 and RowGroup2 text boxes.
5.
In the left pane of the dialog box, click Visibility.
6.
Under When the report is initially run, click the Show or hide based on an expression option.
7.
Under the option, type:
=iif(Code.m_ParameterSet.StartRowCollapsed(2), true, false)
8.
Select the Display can be toggled by this report item checkbox.
9.
In the list below the option, select RowGroup1.
10.
In the left pane of the dialog box, click Advanced.
11.
In the Recursive parent list, select [RowGroup1].
12.
Click OK.
13.
Using the resize pointer, adjust the width of the objects so that they all fit the width and the height of the
List1 object.
Your subreport layout should look like the following figure.
74 RPTDPE-RM002D-EN-E - October 2023 Rockwell Automation, Inc.

Chapter 6Creating a report template
Add headings to the row groupings
Now you will create headings for the row groupings in order to label the rows.
To configure headings for the row groupings
1. From the Toolbox window, drag a rectangle object to the design surface.
2.
Using the move pointer, move the rectangle onto the first two cells of the matrix.
3.
Using the resize pointer, resize the rectangle so that it fits the width and the height of the two cells.
4.
Right-click the rectangle, and then click Rectangle Properties.
The Rectangle Properties dialog box appears.
5.
Under Name, replace the default value with RowHeading.
6.
Click OK.
7.
Right-click the rectangle, and then select Insert > Text Box.
The text box appears on the rectangle. It is a child of the rectangle object.
8.
Right-click the text box, and then click Text Box Properties.
The Text Box Properties dialog box appears.
9.
Under Name, replace the default value with txtRG1.
10.
Under Value, type:
=Code.m_parameterSet.TermLookup(Code.m_parameterSet.RowColumnName(1 ), User!
Language)
11.
In the left pane of the dialog box, click Alignment.
12.
Under Horizontal, select Left.
13.
Click OK.
14.
With the text box selected, press F4.
The Properties window appears.
15.
Under Visibility, in the InitialToggleState property, type the following:
=iif(Code.m_parameterSet.StartRowCollapsed(1),false,true)
16.
Using the resize pointer, adjust the size of the text box, so that it fits the left half of the rectangle.
17.
Click in the Row Group2 cell, and remove its label.
18.
Right-click the rectangle, and then click Insert > Text Box.
19.
Another text box appears on the rectangle. It is also a child of the rectangle object.
20.
Right-click the text box, and then click Text Box Properties.
The Text Box Properties dialog box appears.
21.
Under Name, replace the default value with txtRG2.
22.
Under Value, type:
=Code.m_parameterSet.TermLookup(Code.m_parameterSet.RowColumnName(2 ), User!
Language)
23.
In the left pane of the dialog box, click Alignment.
24.
Under Horizontal, select Left.
25.
Click OK.
26.
With the text box selected, press F4.
The Properties window appears.
27.
Under Visibility, in the InitialToggleState property, type the following:
=iif(Code.m_parameterSet.StartRowCollapsed(2),false,true)
28.
Using the resize pointer, adjust the size of the text box, so that it fits the right half of the rectangle.
29.
Select the matrix (TablixKPIs).
Rockwell Automation, Inc. RPTDPE-RM002D-EN-E - October 2023 75
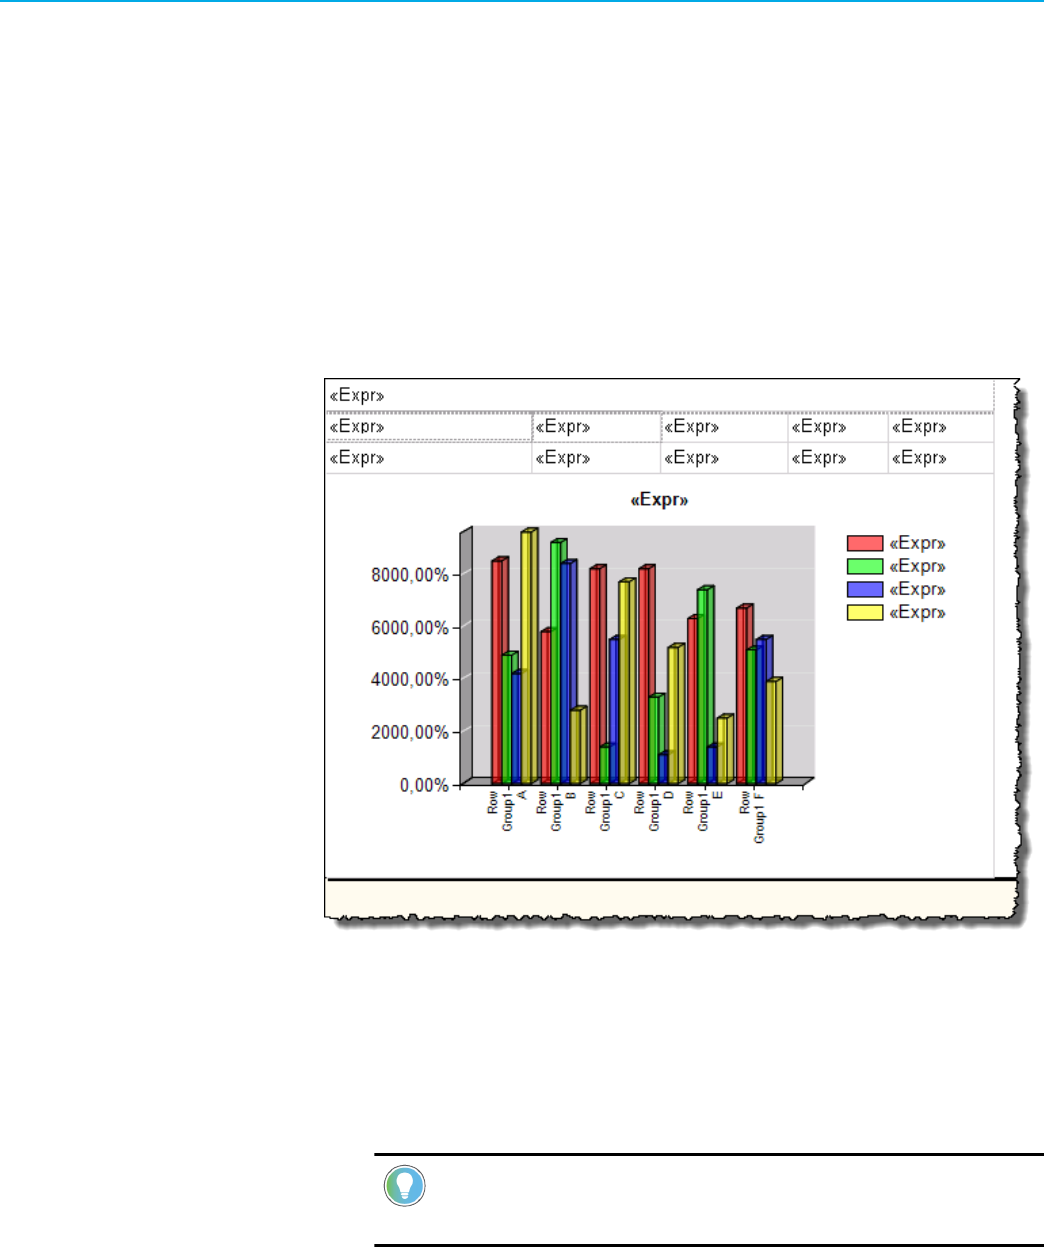
Chapter 6Creating a report template
30. Under Row Groups, below the design surface, right-click RowGroup1, and then click Group Properties.
The Group Properties dialog box appears.
31. In the left pane of the dialog box, click Visibility.
32. Select the Display can be toggled by this report item option.
33.
Under the option, select txtRG1.
34.
Click OK.
35.
Press Ctrl+S.
Your subreport layout is saved.
Preview the subreport
Congratulations! Your NewPerformanceR2C0 subreport layout is complete.
To preview the subreport
1.
Click the Preview tab.
2.
Next to the Parameter Set Id box, clear the NULL checkbox.
3.
In the Parameter Set Id box, type the ID of a parameter set that supports two groupings by row and no
groupings by column.
Tip:
For information on how to check the parameter set values, refer to Check the parameter set
ID value on page 77.
76 RPTDPE-RM002D-EN-E - October 2023 Rockwell Automation, Inc.
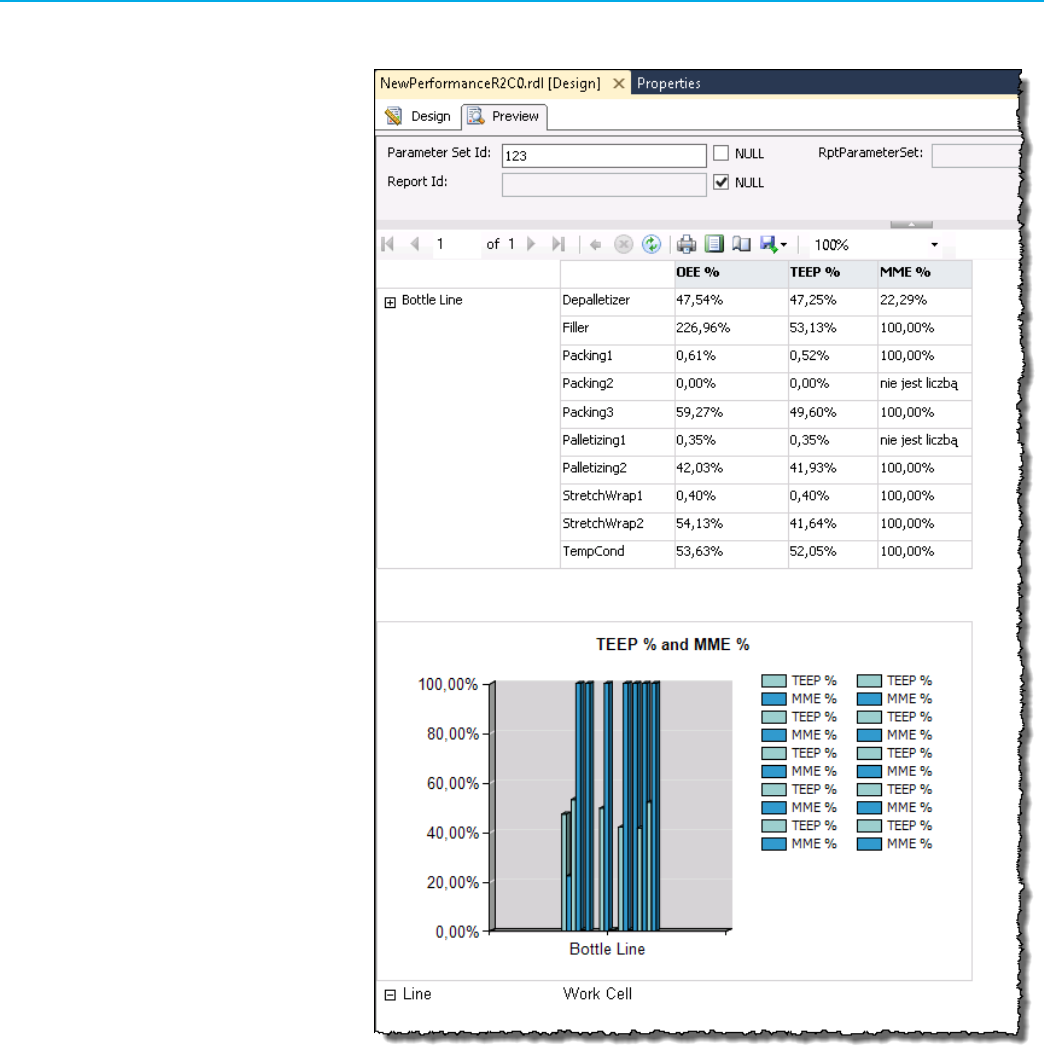
Chapter 6Creating a report template
4. Click View Report.
The subreport data for the Parameter Set Id 123 (Last Shift by Line/WC) is loaded.
Check the parameter set ID value
Perform the following steps on the server computer on which the RSBizWare database that you are using for the DPE
is configured.
To check the parameter set ID value
1.
Open SQL Server Management Studio.
2.
Sign in to the database.
3.
In the Object Explorer, expand Databases > <Your RSBizWare Database> > Tables.
4.
Under Tables, right-click the RptParameterSet table, and then click Select Top 1000 Rows.
Rockwell Automation, Inc. RPTDPE-RM002D-EN-E - October 2023 77
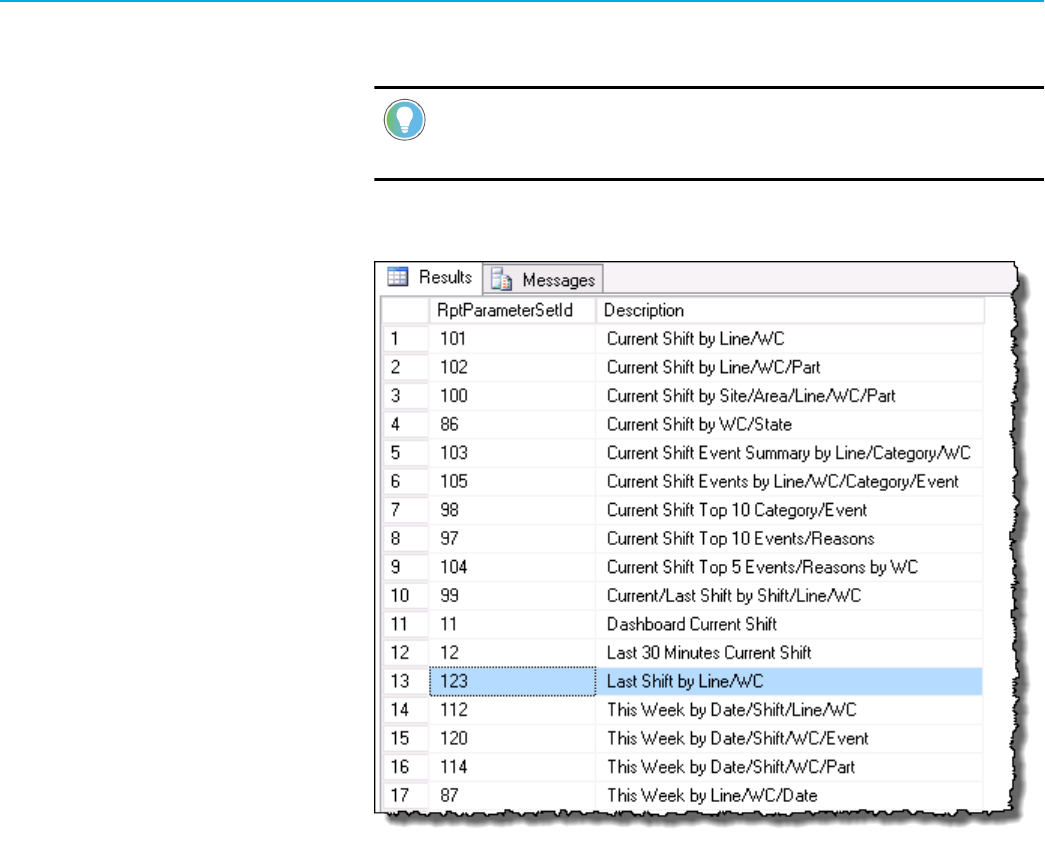
Chapter 6Creating a report template
5. In the right pane of the window, under Results, check the ID of the parameter set that supports the number
and type of groupings that are configured for your subreport.
Tip:
If you select a value that defines more groupings that you have in your subreport, only the
data that is covered by your subreport groupings will be displayed.
The following figure illustrates the parameter sets available in the database used in this tutorial. The selected
parameter set is used in the NewPerformanceR2C0 subreport.
Create a report template
You will now create a report template, NewPerformance, in which you will place the NewPerformanceR2C0
subreport, and the ParameterSet subreport, which is provided with the SSDT project.
To create the NewPerformance report template
1.
Go to the location of your SSDT project.
2.
Create a copy of the EmptyTemplate.rdl report template.
3.
Save the copy as NewPerformance.
4.
In the Solution Explorer, right-click Reports, and then click Add > Existing Item.
The Add Existing Item - RptReports dialog box appears.
5.
Navigate to and select the NewPerformance subreport.
6.
Click Add.
The report is added to the Reports tree in the Solution Explorer.
78 RPTDPE-RM002D-EN-E - October 2023 Rockwell Automation, Inc.
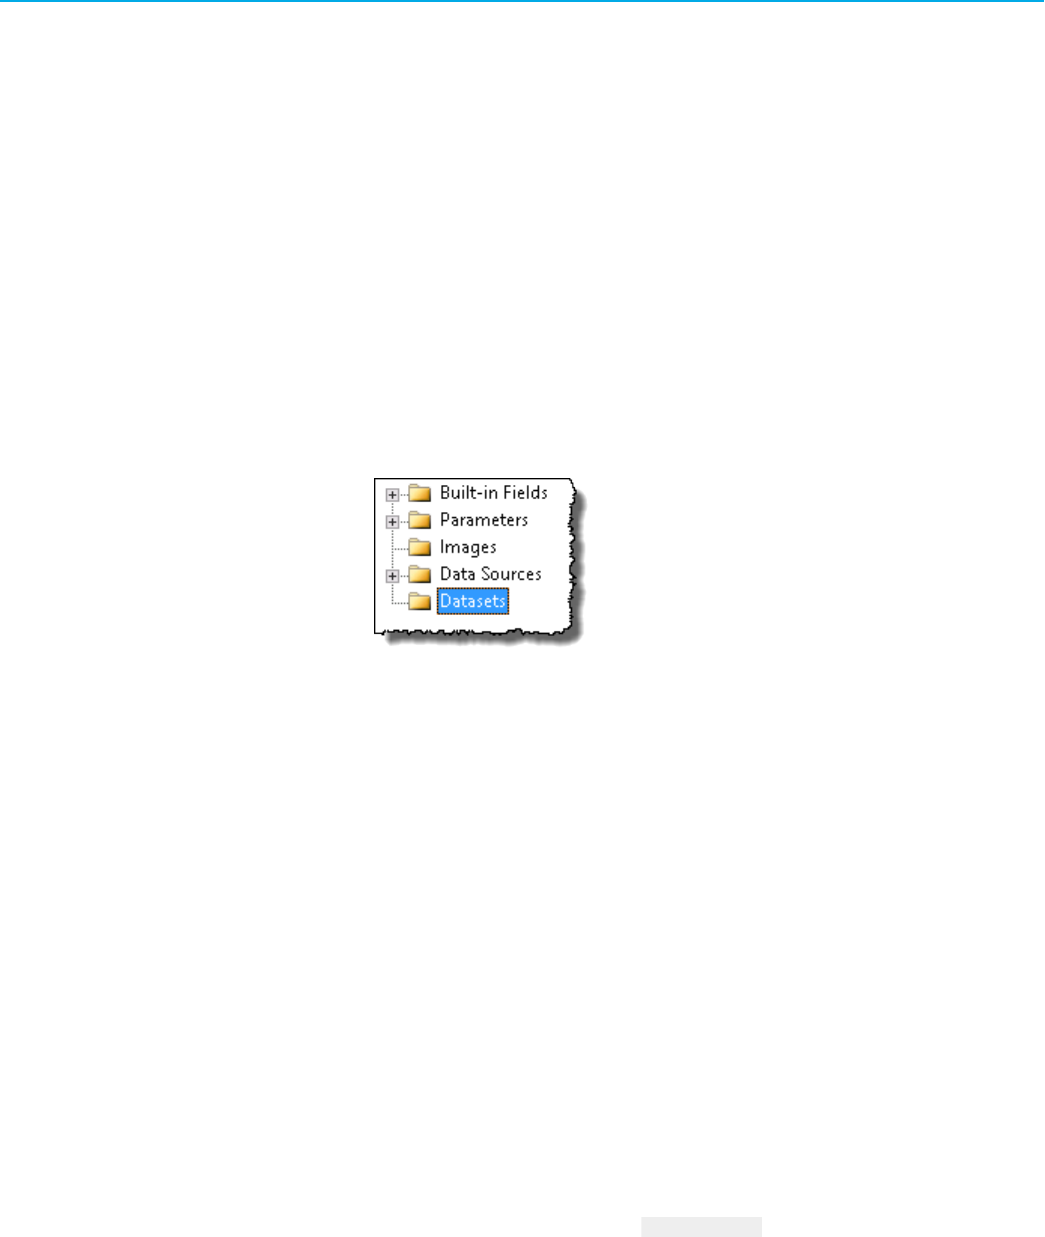
Chapter 6Creating a report template
Delete datasets
Similarly to the NewPerformanceR2C0 subreport, you will now delete redundant data from the NewPerformance
report template.
For report templates, only the report parameters and the report properties for the parameter set class instance must
be defined.
To delete redundant datasets
1.
In the Solution Explorer, double-click the NewPerformance subreport.
The Report Data tab appears next to the Solution Explorer, and the subreport design surface appears in the
right pane of the window.
2.
In the Report Data tab, expand Datasets.
3.
Delete all the datasets: click each dataset, and then press Delete.
4.
Click Yes in the message dialog box that appears.
Your NewPerformance report template should not contain any datasets now:
Remove dataset references
Perform the following steps to remove references to the deleted datasets.
To remove references to the deleted datasets
1. Right-click the design surface of the NewPerformance report template, and then click Report Properties.
2.
On the Report menu, click Report Properties.
The Report Properties dialog box appears.
3.
Click References.
4.
Under Add or remove classes, click m_style, and then click Delete.
5.
Repeat the step for the following classes and their instances (listed by instance names):
◦
m_FlexFieldUtil
◦ m_parameterSetEventDetailExt
◦ m_parameterSetEventDetail
◦
m_parameterSetEventSummary
◦
m_parameterSetStateDetail
◦
m_parameterSetStateSummary
6.
Rename m_parameterSetPerformance to m_parameterSet.
Rockwell Automation, Inc. RPTDPE-RM002D-EN-E - October 2023 79
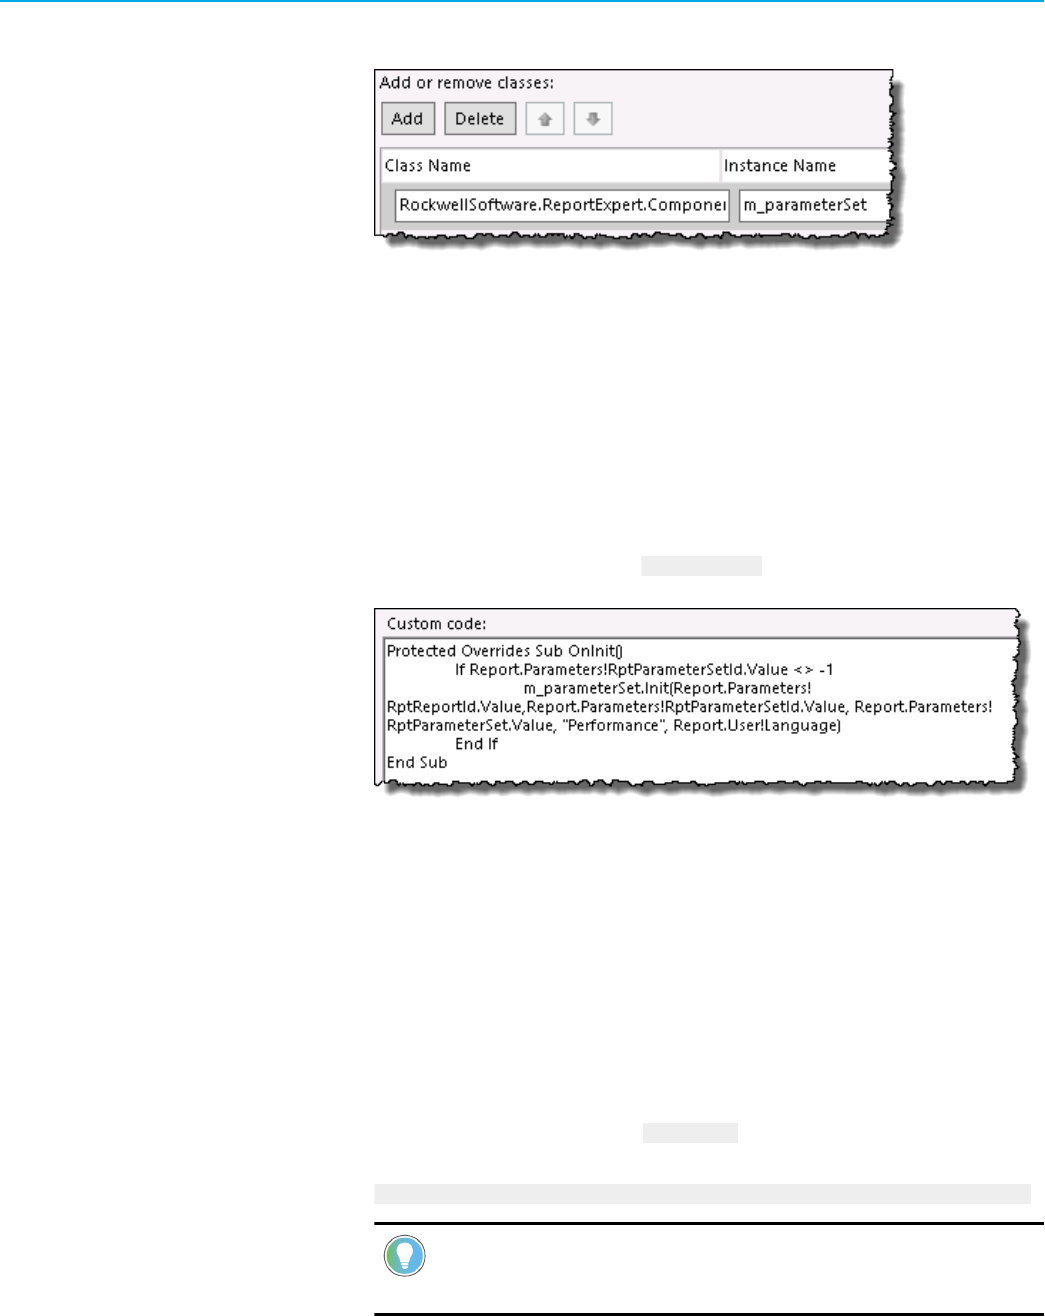
Chapter 6Creating a report template
Your NewPerformance report template should have now only the following classes and its instance
assigned:
7.
In the left pane of the window, click Code.
8.
In the OnInit event definition, delete all expressions that point to the following parameter set class instances:
◦
m_style
◦ m_FlexFieldUtil
◦ m_parameterSetEventDetailExt
◦
m_parameterSetEventDetail
◦
m_parameterSetEventSummary
◦
m_parameterSetStateDetail
◦ m_parameterSetStateSummary
9.
Rename m_parameterSetPerformance to m_parameterSet.
Your OnInit event definition should now be configured like the following figure.
10.
Click OK.
Configure the report title
Perform the following steps to configure the title of the report template.
To configure the title of the report template
1. From the Toolbox window, drag a text box object to the design surface.
2.
Right-click the text box, and then click Text Box Properties.
The Text Box Properties dialog box appears.
3.
Under Name, replace the default value with ReportTitle.
4.
Under Value, type the following:
=Code.m_parameterSet.GetReportTitle("New Performance Report", User!Language)
Tip:
GetReportTitle is one of the advanced functionalities of the RDLUtil library. For more
information, refer to Advanced methods and properties of the RDLUtil library on page 90.
5.
In the left pane of the dialog box, click Font.
6.
Under Font, select Tahoma.
80 RPTDPE-RM002D-EN-E - October 2023 Rockwell Automation, Inc.
Chapter 6Creating a report template
7. Under Size, select 20pt.
8.
Under Effects, select None.
Tip:
These are the default style settings for report titles in the standard Report Expert report
templates.
9.
Click OK.
Tip:
You can also customize the report title using the TermLookup function. For more
information, refer to Methods and properties of the terminology on page 44.
10.
Using the resize pointer, resize the text box so that it fits its content and the width of the design surface.
Add the ParameterSet subreport
Perform the following steps to add the ParameterSet subreports to the report template.
To add the ParameterSet subreport to the report template
1. From the Toolbox window, drag a Subreport object to the report template layout.
2.
Using the move pointer, move the subreport object below the ReportTitle object.
3.
Using the resize pointer, resize the subreport object so that it fits the width of the design surface.
4.
Right-click the subreport object, and then click Subreport Properties.
The Subreport Properties dialog box appears.
5.
Under Name, replace the default value with ParameterSetSubreport.
6.
Under Use this report as a subreport, select ParameterSet.
7.
In the left pane of the dialog box, click Parameters.
8.
Under Use these parameters to run the subreport, click Add.
9.
Provide the following information:
Under Name, type: Under Value, type:
RptParameterSetId =Parameters!RptParameterSetId.Value
RptParameterSet =Parameters!RptParameterSet.Value
RptReportId =Parameters!RptReportId.Value
10.
Click OK.
Rockwell Automation, Inc. RPTDPE-RM002D-EN-E - October 2023 81
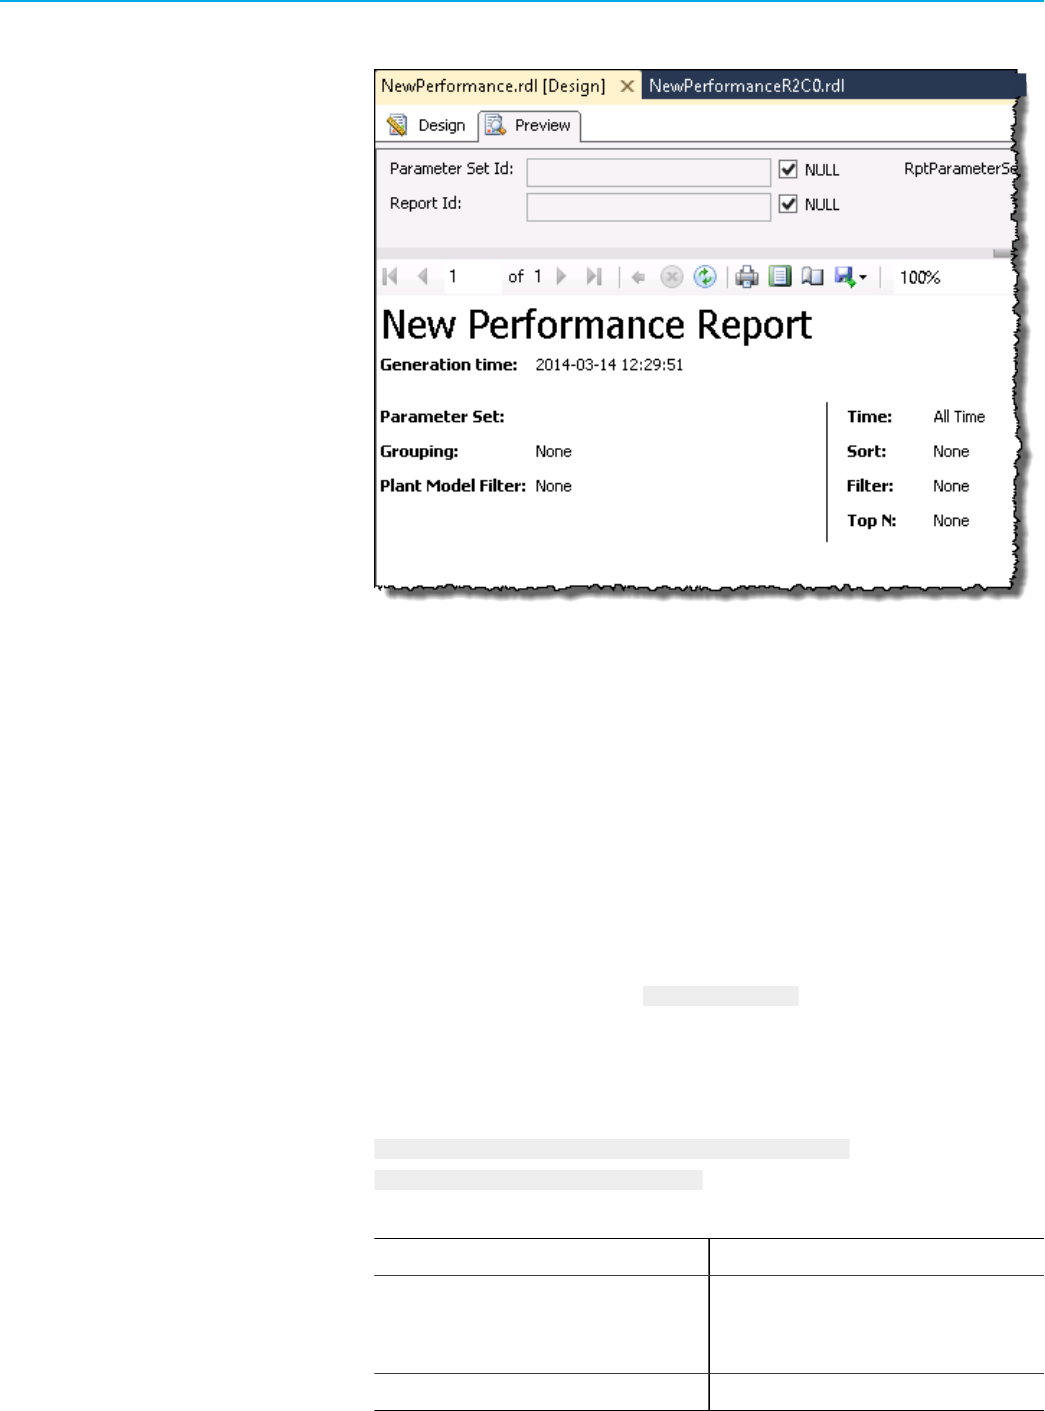
Chapter 6Creating a report template
11. Click the Preview tab.
The preview of the report template is loaded.
Add a NewPerformanceR2C0 subreport
Perform the following steps to add the NewPerformanceR2C0 subreport to the report template.
To add the ParameterSet subreport to the report template
1. From the Toolbox window, drag a Subreport object to the report template layout.
2.
Using the move pointer, move the subreport object below the ParameterSet subreport.
3.
Using the resize pointer, resize the subreport object so that it fits the width and the height of the design
surface.
4.
Right-click the subreport object, and then click Subreport Properties.
The Subreport Properties dialog box appears.
5.
Under Name, replace the default value with NewPerformanceR2C0.
6.
Under Use this report as a subreport, select NewPerformanceR2C0.
7.
In the left pane of the dialog box, click Visibility.
8.
Under When the report is initially run, click the Show or hide based on an expression option.
9.
Under the option, type:
=iif(Code.m_parameterSet.MatrixName("NewPerformance") =
"NewPerformanceR2C0.rdl", False, True)
Where:
This item: Is:
NewPerformance The name of the NewPerformance report template,
common to all the subreports that constitute the report
template.
NewPerformanceR2C0.rdl The name of the subreport file.
82 RPTDPE-RM002D-EN-E - October 2023 Rockwell Automation, Inc.
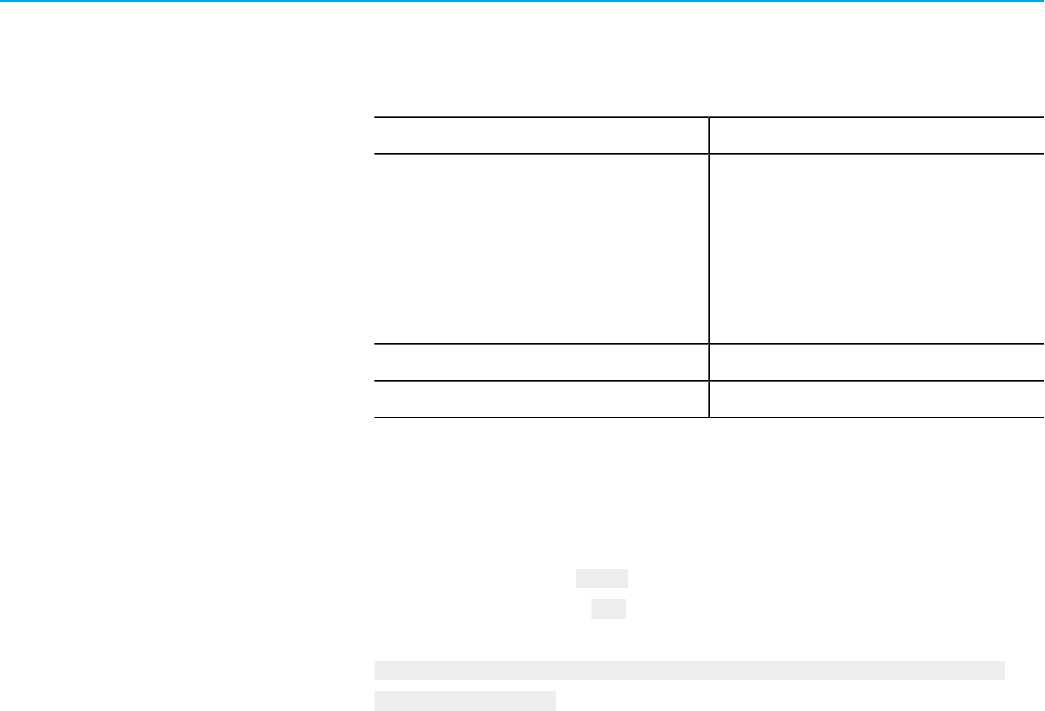
Chapter 6Creating a report template
10. In the left pane of the dialog box, click Parameters.
11.
Under Use these parameters to run the subreport, click Add.
12. Provide the following information:
Under Name, type: Under Value, type:
RptParameterSetId =iif(Code.m_parameterSet.MatrixName("NewPerformance")
= "NewPerformanceR2C0.rdl",
Parameters!RptParameterSetId.Value, -1)
Tip: Set the RptParameterSetId parameter for each
subreport with groupings to eliminate unnecessary data
processing for hidden subreports.
RptParameterSet =Parameters!RptParameterSet.Value
RptReportId =Parameters!RptReportId.Value
13.
Click OK.
14.
Select the NewPerformanceR2C0 subreport object, and then press F4.
The Properties window appears.
15.
Under No Rows, expand the Font property group.
16.
In the FontFamily property, type Tahoma.
17.
In the FontSizeType property, type 15pt.
18.
In the NoRowsMessage property, type:
=Code.m_parameterSet.TermLookup("No data found for the selected parameter
set.", User!Language)
The "No data found for the selected parameter set." message will appear when the DPE query returns no
database data matching the search criteria you have defined in the parameter set in the report.
19.
Click the Preview tab.
20.
Next to the Parameter Set Id box, clear the NULL checkbox.
Rockwell Automation, Inc. RPTDPE-RM002D-EN-E - October 2023 83
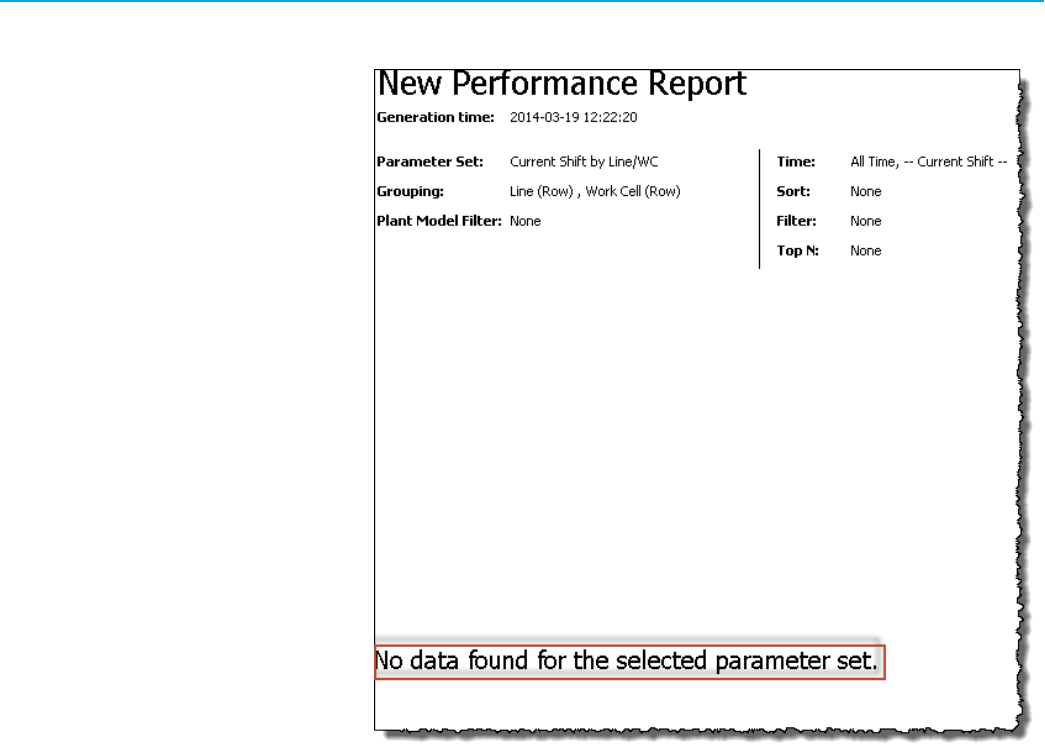
Chapter 6Creating a report template
21. In the Parameter Set Id box, type the ID of a parameter set that supports the groupings of your subreport,
but does not contain data required by the subreport.
22.
Press Ctrl+S.
The report template is saved.
Preview the report template
Congratulations! Your NewPerformance report template layout is complete.
To preview the report template
1. In the Preview tab, in the Parameter Set Id box, type the same parameter set ID that you have selected in
Preview the NewPerformanceR2C0 subreport on page 76.
2.
Click View Report.
The report data is loaded.
Integrate templates with FactoryTalk Report Expert
Once you have created a custom report template, you will integrate it with Report Expert so that you can use it.
The process consists of the following steps:
• Step 1: Deploy the report template to SSRS on page 85
•
Step 2: Add the report template to the Report Expert inventory on page 86
•
Step 3: Add the report template to the Report Expert tree on page 88
84 RPTDPE-RM002D-EN-E - October 2023 Rockwell Automation, Inc.
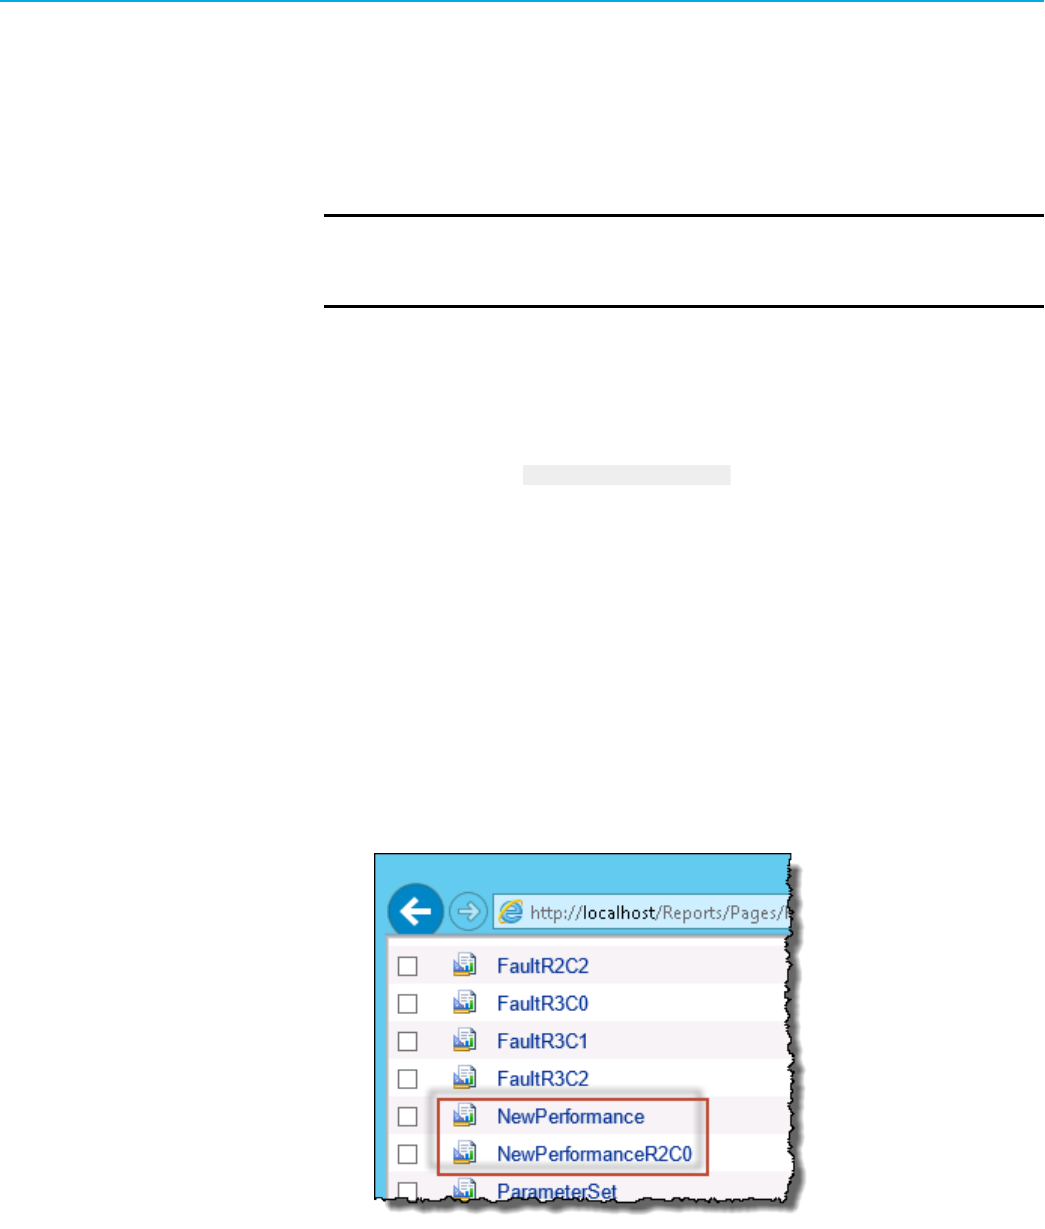
Chapter 6Creating a report template
Deploy the report template to SSRS
You must deploy the report template itself and all the subreports that constitute it. In this tutorial, you will deploy the
NewPerformance.rdl and NewPerformanceR2C0.rdl report files.
You can upload the files to the same directory in which the standard Report Expert report templates are stored, or to
another one.
NOTE:
The drillthrough functionality will not work for report templates stored in other folders than
the one, in which the default Report Expert report templates are located (that is, ReportExpert.)
For the purposes of this tutorial, we recommend that you deploy your report template to the ReportExpert folder.
To upload the report files to the ReportExpert folder
1.
Open Internet Explorer.
2.
In the address box, type http://localhost/Reports.
The SQL Server Reporting Services page appears.
3.
Click the ReportExpert folder.
Report templates and data sources stored in this folder appear.
4.
Click Upload File.
5.
Click Browse.
The Choose File to Upload dialog box appears.
6.
Navigate to and select the NewPerformance.rdl report template file.
7.
Click Open.
8.
In the Name text box, change the default name of the report file, if necessary.
9.
Click OK.
10.
Repeat steps 3-9 to upload NewPerformanceR2C0 subreport.
The files are added to the ReportExpert folder.
To upload the report files to another folder
1.
On the SQL Server Reporting Services page, click New Folder.
The New Folder page appears.
2.
In the Name text box, type a name for the folder.
Rockwell Automation, Inc. RPTDPE-RM002D-EN-E - October 2023 85
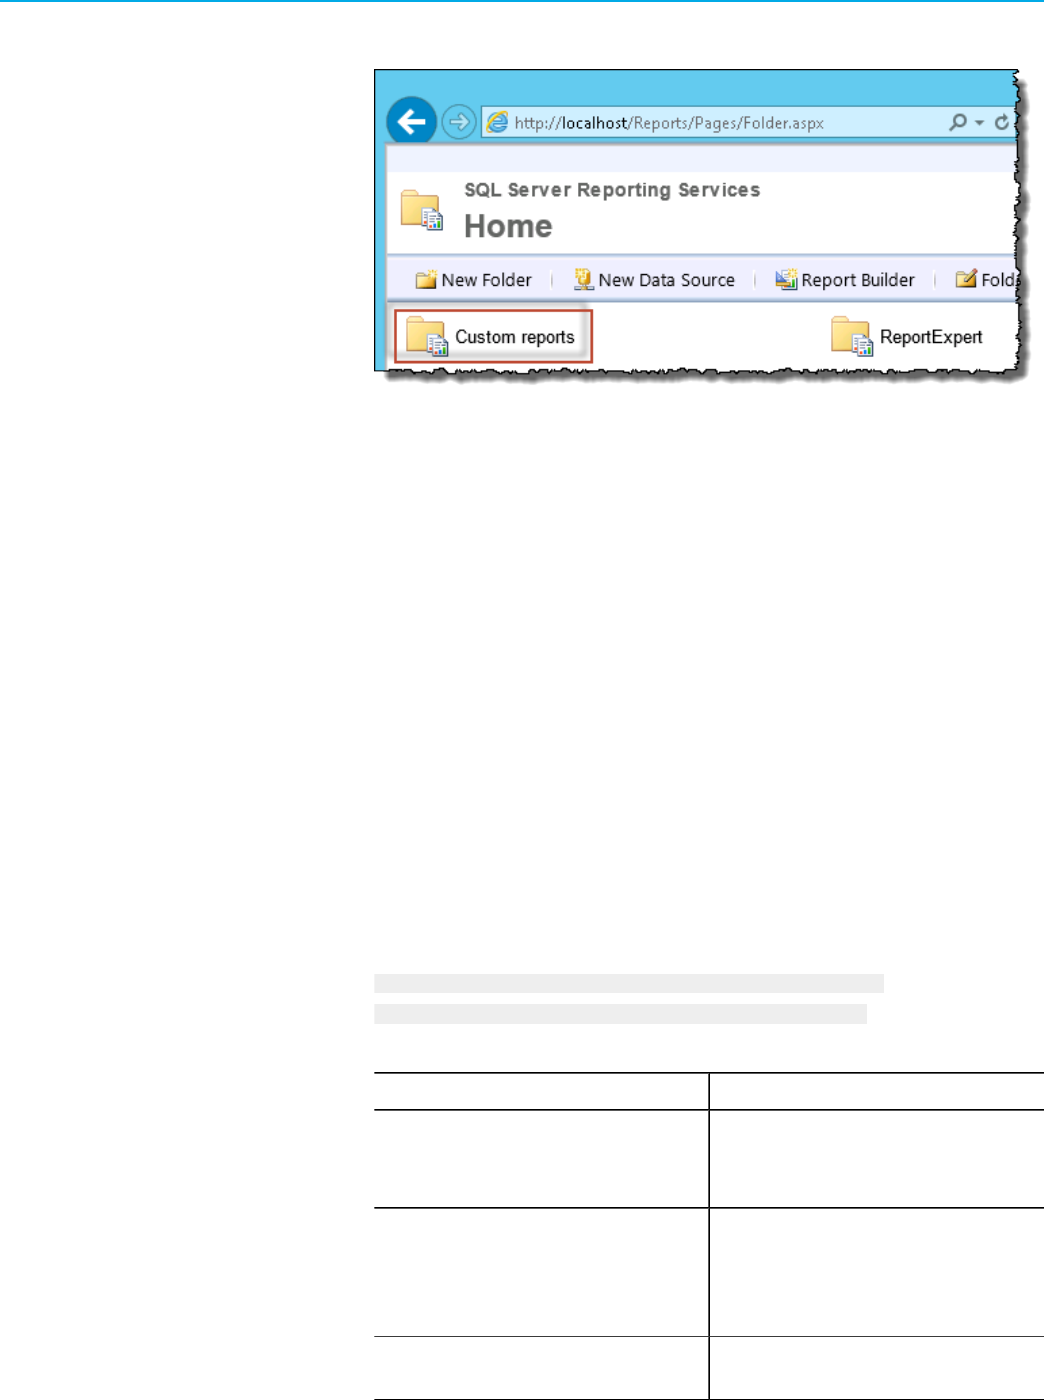
Chapter 6Creating a report template
3. Click OK.
The newly created folder appears on the SQL Server Reporting Services page.
4.
Open the folder.
5.
Repeat steps 3-9 from the previous instruction.
Add a template to the inventory
In order to make the report template available in Report Expert, you must add the template to the Report
Expert inventory, after you deploy it to SSRS. Only then the report template will be accessible from the Select
Report dropdown menu on the Report Viewer page, and in the Report Expert Report dropdown menu on the
Administration page of Report Expert, for adding a tree item to the Report Expert Report Explorer tree.
You will add the report template files using a query on your Report Expert database.
To add a report template to the Report Expert inventory
1.
Open SQL Server Management Studio.
2.
Sign in to your SQL Server.
3.
On the toolbar, click New Query.
4.
In the Available Databases list select the Report Expert database, to which you want to add the query.
In the right pane of the window, an .sql tab appears.
You will add an SQL command with the following syntax:
INSERT INTO RptReportInventory (RptReport, ReportType, URL)
VALUES ('<Report Name>', '<Report Type>', '<Report URL>')
Where:
This item: Is:
<Report Name> The name that you chose for your report template while
deploying it to SSRS.
In this tutorial, it is NewPerformance.
<Report Type> The type of the report. There are two Report Expert report
types:
◦
Product - for default Report Expert report templates.
◦ Custom - for your own report templates.
<Report URL> The URL with which you will access the report template.
The URL has the following structure:
86 RPTDPE-RM002D-EN-E - October 2023 Rockwell Automation, Inc.
Chapter 6Creating a report template
This item: Is:
http://<Machine
Name>/ReportServer?/<Folder Name>/<Report
Template Name>
Where:
◦
<Machine Name> is the name of the computer, on
which your report template is stored.
◦
<Folder Name> is the name of the folder, in which
your report template is stored.
◦
<Report Template Name> is the name that you chose
for your report template while deploying it to SSRS.
5.
In the tab, type the following expression:
INSERT INTO RptReportInventory (RptReport, ReportType, URL)
VALUES ('NewPerformance', 'Custom', 'http://localhost/ReportServer?/
ReportExpert/NewPerformance')
Tip:
For the purposes of this tutorial, we have used localhost as the machine name. If you want
to access your report templates remotely, replace localhost with the exact name of the computer
on which you store your custom report templates.
6.
Press and hold Ctrl, and then click the URL.
The report preview is displayed in the Report Viewer tab.
7.
Click the .sql tab.
8.
On the toolbar, next to the Available Databases list, click Execute.
The query is executed for the selected database.
9.
Move the pointer over the lower-left corner of the screen.
The Start screen thumbnail appears.
10.
Right-click the thumbnail, and then click Run.
The Run dialog box appears.
11.
In the Open text box, type iisreset, and then click OK.
12.
On the Start screen, start typing Services, and then click the Services shortcut.
The Services window appears.
13.
Scroll down to, and then right-click SQL Server Reporting Services (MSSQLSERVER).
14.
Click Restart.
Wait until the service is restarted.
Your report template is added to the Report Expert inventory.
15.
Open Report Expert in Internet Explorer.
16.
On the toolbar, click Parameters.
17.
Under Select Report, select NewPerformance.
18.
Under Select Parameter Set, select the parameter set with which you have tested your report so far.
In this tutorial, we will use Last Shift by Line/WC.
Rockwell Automation, Inc. RPTDPE-RM002D-EN-E - October 2023 87
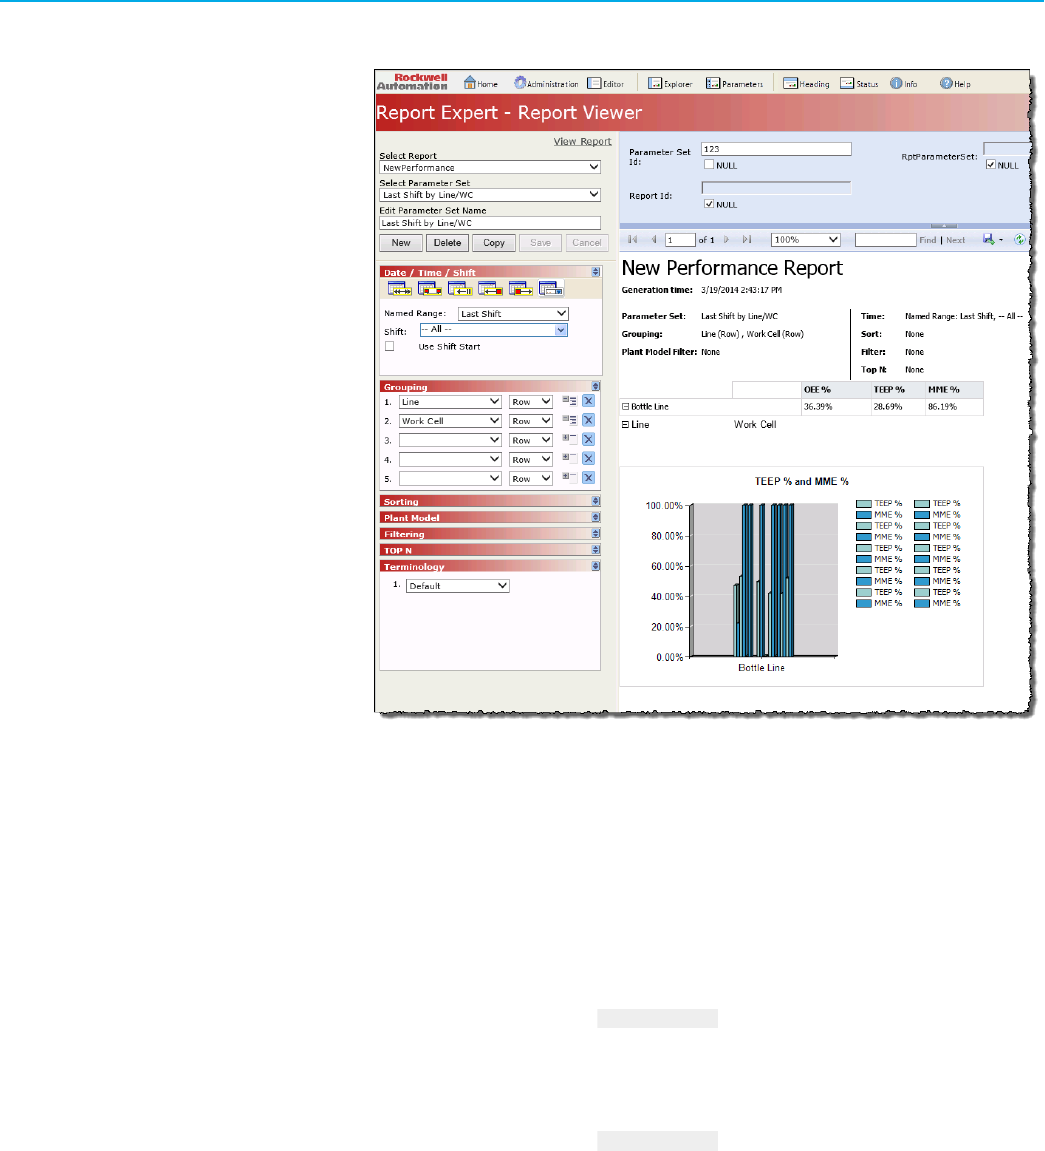
Chapter 6Creating a report template
19. Click View Report.
The report appears in the right pane of the window.
Add a template to the tree
Perform the following steps to add the report template to the Report Expert tree.
To add the report template to the Report Expert tree
1. On the Report Expert toolbar, click Administration.
The Administration page appears.
2.
In the Report Explorer tab, click New.
3.
In the Tree Item Title text box, type Custom Reports.
4.
Click Save.
The new folder is added to the report tree.
5.
In the Report Explorer tab, click New.
6.
In the Tree Item Title text box, type NewPerformance.
7.
In the Tree Item Type list, select Report Expert Report.
8.
In the Report Expert Report list, select NewPerformance.
9.
In the Parameter Set list, select the parameter set that will be associated with the report.
In this tutorial, we will use Last Shift By Line/WC.
10.
In the Terminology list, select a terminology for the report.
In this tutorial, we will use Default.
11.
Click Save.
The report appears under the Custom Reports folder.
88 RPTDPE-RM002D-EN-E - October 2023 Rockwell Automation, Inc.

Chapter 6Creating a report template
12. On the Report Expert toolbar, click Explorer.
The NewPerformance report is available under the Custom Reports folder.
13. Click the report to view it.
Rockwell Automation, Inc. RPTDPE-RM002D-EN-E - October 2023 89

Appendix A
Advanced features
This section contains the following parts:
1.
Advanced methods and properties of the RDLUtil library on page 90
2. Advanced methods and properties of styles on page 93
3. Datasets, queries, and dataset fields that are defined in the SSDT project on page 95
Methods and properties of RDLUtil
Use the m_parameterSet class instance with the advanced methods and properties of the RDLUtil Library, detailed in
the following table.
Method/Property Description Usage
m_parameterSet.Col
ColumnName(n)
Returns the proper column name for
the particular column grouping at the
specified index indicated on the basis
of the Parameter Set settings. (Normally
DPE returns the grouping information
under columns such as "ColGroup1" and
"ColGroup2".)
•
n. The 1-based index of the column
groupings.
The matrix and its text boxes.
m_parameterSet.Format
GroupText(Text, Index, Type)
Returns the formatted value for the
particular grouping, especially the
grouping by month.
• Text. The particular
grouping value (for example,
Fields!PageGroup1.Value).
•
Index. The 1-based index of a
grouping (within the particular
grouping type).
•
Type. The type of grouping (0- by
row, 1- by column, 2- by page).
The matrix.
m_parameterSet.GetDrill
ThroughURL(ReportName,
RowGroupValue1, RowGroupValue2,
RowGroupValue3, ColGroupValue1,
ColGroupValue1, PageGroupValue1,
FieldName)
Returns the string with the URL for the
particular report.
•
ReportName.The name of the
requested report.
•
RowGroupValue1-3. The value for
the 1st to 3rd row grouping.
•
ColGroupValue1-2. The value for the
1st to 2nd column grouping.
•
FieldName. The name of the field
clicked.
The matrix (for its text boxes to construct
the hyperlink).
Do not use this function for the report
templates that you want to implement in
Report Expert 2.0. only.
90 RPTDPE-RM002D-EN-E - October 2023 Rockwell Automation, Inc.

Appendix AAdvanced features
Method/Property Description Usage
m_parameterSet.GetDrill
ThroughURL(ReportName,
AgregationLevel, RowGroupValue1,
RowGroupValue2, RowGroupValue3,
ColGroupValue1, ColGroupValue2,
PageGroupValue1, FieldName)
A modified version of the previous
method in Report Expert 2.0. It allows for
an additional parameter:
• AggregationLevel. The level of the
requested report in the drillthrough
hierarchy.
The matrix (for its text boxes to construct
the hyperlink), including aggregation
level.
m_parameterSet.GetDrill
ThroughURL(ReportName,
AgregationLevel, RowGroupValue1,
RowGroupValue2, RowGroupValue3,
RowGroupValue4, RowGroupValue5,
ColGroupValue1, ColGroupValue2,
PageGroupValue1, FieldName)
A modified version of the previous
method. It allows for up to 5 groupings by
row.
The matrix (for its text boxes to construct
the hyperlink), including aggregation
level.
m_parameterSet.GetReport
Title(DefaultTitle, Language)
Displays the report title. If there is an
RptReportId parameter defined for the
report template that points to an existing
Report Expert explorer tree item, the title
displayed equals the name of the tree
item.
Otherwise, the title is customized for the
terminology of the used parameter set as
well as for the language settings of the
client’s browser.
The text box containing the report’s title.
m_parameterSet.GetYAxis
Interval(wholeNum, minValue,
maxValue)
Calculates and returns an appropriate
scaling interval for a chart in order to
produce a more attractive report.
• wholeNum. True if the intervals
must be whole numbers (otherwise
false).
•
minValue. The data min. value (from
the dataset in the RDL file).
•
maxValue. The data max. value
(from the dataset in the RDL file).
Charts.
m_parameterSet.GetYAxis
Max(maxValue)
Returns the adjusted maximum scaling
value for a chart in order to produce a
more attractive report.
• maxValue. The data max. value
(from the dataset in the RDL file).
Charts.
m_parameterSet.GetYAxis
Min(minValue)
Returns the adjusted minimum scaling
value for a chart in order to produce a
more attractive report.
• minValue. The data minimal value
(from the dataset in the RDL file).
Charts.
Rockwell Automation, Inc. RPTDPE-RM002D-EN-E - October 2023 91

Appendix AAdvanced features
Method/Property Description Usage
m_parameterSet.HasPage
Group(n)
Returns true if the m_parameterSet
instance contains a page grouping at the
specified index. Returns false otherwise.
• n. The 1-based index of page
grouping (that is, the index
numbering starts with 1).
The text box containing the value for a
page grouping.
m_parameterSet.Matrix
Name (BaseReportName)
Returns the matrix that a report should
use for the indicated subreport based on
the parameter set’s grouping settings.
(For example, "PerformanceR1C2.rdl"
means that the Performance report is
grouped by 1 row and 2 columns.)
•
BaseReportName. Specifies the
base report name (report template)
used within the name of the matrix
(for example, "Performance",
"Quality" and so on).
Throughout the report, in order to
construct the visibility expression and
to override the RptParameterSetId
parameter with the specific value (-1).
This helps prevent the execution of code
within all the subreports that are not
compliant with the report matrix.
m_parameterSet.Page
ColumnName(n)
Returns the proper column name for
the particular page grouping at the
specified index indicated on the basis
of the Parameter Set settings. (Normally
DPE returns the grouping information
under columns such as "PageGroup1" and
"PageGroup2".)
•
n. The 1-based index of the column
groupings.
The text box containing the value for a
page grouping.
m_parameterSet.Row
ColumnName(n)
Returns the proper column name for
the particular row grouping at the
specified index indicated on the basis
of the Parameter Set settings. (Normally
DPE returns the grouping information
under columns such as "RowGroup1" and
"RowGroup2".)
•
n. The 1-based index of the row
groupings.
The matrix (as well as its text boxes).
m_parameterSet.SecondsTo
TimeSpanString (int_seconds)
Converts the number of seconds into the
textual value including the time span in
the format ‘hours:minutes:seconds‘.
• int_seconds. The number of
seconds.
The matrix (for the text box containing
the value of the event duration).
m_parameterSet.Seconds
ToTimeSpanStringMil(dbl_seconds)
Converts the number of seconds
into the textual value including
The matrix (for the text box containing
the value of the event duration).
92 RPTDPE-RM002D-EN-E - October 2023 Rockwell Automation, Inc.

Appendix AAdvanced features
Method/Property Description Usage
the time span in the format
‘hours:minutes:seconds:milliseconds‘.
•
dbl_seconds. The number of
seconds.
m_parameterSet.Start
ColumnCollapsed(n)
Returns true if the drill-down for the
specified column grouping should be
collapsed on the report initialization, false
otherwise.
•
n. The 1-based index of column
grouping.
The matrix to construct the initial
visibility expression and the appearance
of the toggle image for its text boxes and
groupings.
m_parameterSet.StartPage
Collapsed(n)
Returns true if the drill-down for the
specified page grouping should be
collapsed on the report initialization, false
otherwise.
•
n. The 1-based index of page
grouping.
The text box containing the value for
a page grouping and its related list (to
construct the initial visibility expression
and the appearance of the toggle image).
m_parameterSet.StartRow
Collapsed(n)
Returns true if the drill-down for the
specified row grouping should be
collapsed on the report initialization, false
otherwise.
•
n. The 1-based index of row
grouping.
The matrix to construct the initial
visibility expression and the appearance
of the toggle image for its text boxes and
groupings.
m_parameterSet.TermLookup(Term,
Language)
Displays the term in the target language.
See Methods and properties of the
terminology on page 44 for details.
Report layout objects (for example, text
box, chart, matrix).
Methods and properties of styles
Use the m_style class instance with the following methods and properties, listed in the following table.
The following style propertiesare defined in an RDLConfig.xml file. The file is stored by default in the following
location:
<Program Files>\Microsoft SQL Server\MSSQL.x\Reporting Services\ReportServer\bin
Where "x" is the version number of SSRS.
The location may vary depending on where the Microsoft SQL Server is installed on your computer.
Method / Property Description Use
m_style.Chart.FontFamily
m_style.Chart.FontSize
m_style.Chart.FontStyle
m_style.Chart.FontWeight
Font properties to be set for the font of
the text displayed in a chart.
Charts.
Rockwell Automation, Inc. RPTDPE-RM002D-EN-E - October 2023 93
Appendix AAdvanced features
Method / Property Description Use
m_style.Chart.GetPalette("Default").GetPal
etteItem(0).Color
m_style.Chart.GetPalette("Default").GetPal
etteItem(0).Gradient
m_style.Chart.GetPalette("Default").GetPal
etteItem(0).GradientEndColor
Fill properties to be set for the data
series of a chart.
Charts.
m_style.Chart.TitleFamily
m_style.Chart.TitleSize
m_style.Chart.TitleStyle
m_style.Chart.TitleWeight
Font properties to be set for the legend
style of a chart.
Charts.
m_style.Detail.BorderColor
m_style.Detail.BorderStyle
m_style.Detail.BorderWidth
Border properties to be set for the text
box objects containing details belonging
to a matrix.
Text boxes within a matrix.
m_style.Detail.FontFamily
m_style.Detail.FontSize
m_style.Detail.FontStyle
m_style.Detail.FontWeight
Font properties to be set for the text box
objects containing details belonging to a
matrix.
Text boxes within a matrix.
m_style.Detail.BackgroundColor A background color property to be set for
the text box objects containing details.
For OEE chart objects, the colors are
taken from the respective fields in the
RptSetting table. For more details, see
Report Expert User Guide.
Text boxes within a matrix.
m_style.Header.BorderColor
m_style.Header.BorderStyle
m_style.Header.BorderWidth
Border properties to be set for the text
box objects containing group or column
headers that belong to a matrix.
Text boxes within a matrix.
m_style.Header.FontFamily
m_style.Header.FontSize
m_style.Header.FontStyle
m_style.Header.FontWeight
Font properties to be set for the text
box objects containing group or column
headers that belong to a matrix.
Text boxes within a matrix.
m_style.Header.BackgroundColor A background color property to be set for
the text box objects containing group or
column headers that belong to a matrix.
Text boxes within a matrix.
m_style.Page.FontFamily
m_style.Page.FontSize
m_style.Page.FontStyle
m_style.Page.FontWeight
m_style.Page.Color
Font properties to be set for the text box
object used for the page grouping.
Text boxes.
94 RPTDPE-RM002D-EN-E - October 2023 Rockwell Automation, Inc.

Appendix AAdvanced features
Method / Property Description Use
m_style.Page.BackgroundColor
m_style.RG1.BackgroundColor
m_style.RG2.BackgroundColor
m_style.RG3.BackgroundColor
m_style.RG4.BackgroundColor
m_style.RG5.BackgroundColor
A background color property to be set for
the text box objects containing headers
for row groups belonging to a matrix (the
other headers use the Header settings).
Text boxes within a matrix.
Datasets, queries, and fields
The following table lists datasets with assigned queries and query-specific dataset fields defined in the
EmptyTemplate.rdl sample report template from the SSDT project.
Dataset Query Dataset fields
EventDataSet Event AggregationFieldCount
Avg_Duration
ColGroup1
ColGroup2
ColGroup3
ColGroup4
ColGroup5
Duration
Event_Count
Max_Duration
Min_Duration
PageGroup1
PageGroup2
PageGroup3
PageGroup4
PageGroup5
RowGroup1
RowGroup2
RowGroup3
RowGroup4
RowGroup5
Sequence
EventDetailDataSet EventDetail AggregationFieldCount
ColGroup1
ColGroup2
ColGroup3
ColGroup4
ColGroup5
Duration
End_Time
End_Value
Event_During_Num
Event_End_Num
Event_Occurrence
Event_Start_Num
PageGroup1
PageGroup2
PageGroup3
PageGroup4
PageGroup5
RowGroup1
RowGroup2
RowGroup3
RowGroup4
RowGroup5
Sequence
Start_Time
Start_Value
EventDetailExtendedDat
aSet
EventDetailExt Duration
End_Time
End_Value
Event_Category
Event_During_Num
Event_During_Schedule
d_Time
Event_End_Num
Event_is_Fault
Event_Name
Event_Occurrence
Event_Reason
Event_Reason_Code
Event_Severity
Event_Start_Num
Flex1
Flex2
Flex3
Flex4
Flex5
Line
lOEEConfigEventId
RecordState
Sequence
Shift_Name
Shift_Number
Shift_Start_Time
Start_Time
Start_Value
Workcell
PerformanceDataSet Performance AggregationFieldCount GoodParts RowGroup1
Rockwell Automation, Inc. RPTDPE-RM002D-EN-E - October 2023 95

Appendix AAdvanced features
Dataset Query Dataset fields
Availability
AvailTime
ColGroup1
ColGroup2
ColGroup3
ColGroup4
ColGroup5
Cycle_Time_Difference
Cycle_Time_Pct_Differe
nce
DownPercent
DownTime
FailureFrequencyRate
FailureRate
Faults
FaultTime
IdealCycleTime
IdealParts
MonitoredUnavailTime
MTBF
MTTR
OEE
PageGroup1
PageGroup2
PageGroup3
PageGroup4
PageGroup5
PercentIdeal
PercentScrap
Quality
Realized_Cycle_Time
RowGroup2
RowGroup3
RowGroup4
RowGroup5
RunTime
SchedAvailTime
ScheduleCapacity
SchedUnavailTime
ScrapParts
Sequence
Stops
Throughput
TotalCapacity
TotalParts
TotalTime
UpTime
UptimePercent
StateDataSet State AggregationFieldCount
Avg_Duration
ColGroup1
ColGroup2
ColGroup3
ColGroup4
ColGroup5
Duration
Max_Duration
Min_Duration
PageGroup1
PageGroup2
PageGroup3
PageGroup4
PageGroup5
RowGroup1
RowGroup2
RowGroup3
RowGroup4
RowGroup5
Sequence
State_Count
StateDetailDataset StateDetail Duration
End_Time
GoodParts
Line
Part_Id
ScrapParts
Sequence
Shift
ShiftNumber
ShiftStart
Start_Time
StateColor
StateId
StateName
TotalParts
WorkCell
96 RPTDPE-RM002D-EN-E - October 2023 Rockwell Automation, Inc.

Legal Notices
Legal Notices
Rockwell Automation publishes legal notices, such as privacy policies, license agreements, trademark disclosures,
and other terms and conditions on the Legal Notices page of the Rockwell Automation website.
Software and Cloud Services Agreement
Review and accept the Rockwell Automation Software and Cloud Services Agreement here.
Open Source Software Licenses
The software included in this product contains copyrighted software that is licensed under one or more open source
licenses.
You can view a full list of all open source software used in this product and their corresponding licenses by opening
the oss_license.txt file located in your product's OPENSOURCE folder on your hard drive. This file is divided into these
sections:
• Components
Includes the name of the open source component, its version number, and the type of license.
• Copyright Text
Includes the name of the open source component, its version number, and the copyright declaration.
• Licenses
Includes the name of the license, the list of open source components citing the license, and the terms of the
license.
The default location of this file is:
C:\Program Files (x86)\Rockwell Software\Report Expert\Documentation\ReportExpert Release Notes\OPENSOURCE
\oss_licenses.txt.
You may obtain Corresponding Source code for open source packages included in this product from their respective
project web site(s). Alternatively, you may obtain complete Corresponding Source code by contacting Rockwell
Automation via the Contact form on the Rockwell Automation website: http://www.rockwellautomation.com/global/
about-us/contact/contact.page. Please include "Open Source" as part of the request text.
Rockwell Automation, Inc. RPTDPE-RM002D-EN-E - October 2023 97
Rockwell Automation Support
Use these resources to access support information.
Technical Support Center
Find help with how-to videos, FAQs, chat, user forums, and product notification
updates.
rok.auto/support
Knowledgebase Access Knowledgebase articles. rok.auto/knowledgebase
Local Technical Support Phone Numbers Locate the telephone number for your country. rok.auto/phonesupport
Literature Library Find installation instructions, manuals, brochures, and technical data publications. rok.auto/literature
Product Compatibility and Download Center
(PCDC)
Get help determining how products interact, check features and capabilities, and find
associated firmware.
rok.auto/pcdc
Documentation feedback
Your comments help us serve your documentation needs better. If you have any suggestions on how to improve our content, complete the form at rok.auto/docfeedback.
Waste Electrical and Electronic Equipment (WEEE)
At the end of life, this equipment should be collected separately from any unsorted municipal waste.
Rockwell Automation maintains current product environmental information on its website at rok.auto/pec.
Rockwell Otomasyon Ticaret A.Ş. Kar Plaza İş Merkezi E Blok Kat:6 34752 İçerenköy, İstanbul, Tel: +90 (216) 5698400 EEE Yönetmeliğine Uygundur
RPTDPE-RM002D-EN-E - October 2023
Supersedes Publication RPTDPE-RM002C-EN-E - July 2021
Copyright © 2023, Rockwell Automation Technologies, Inc. All rights reserved. Printed in the U.S.A.
